
It wasn’t that I had a wandering eye. I happened to see that there was this recipe that could sit in the refrigerator for a few days before you needed it. A recipe that you could freeze. A recipe that looked, well, easier than my already-easy recipe.
Dear reader, as much as I love my herbed pizza crust recipe, this is the best homemade pizza crust I’ve ever tasted. It’s my new favorite.

Light, chewy, not-too-thick, and easy as can be–what’s more to want? Well, I do like the flavor of herbs in the crust, so I might just try adding some oregano and garlic next time. But really, this was delicious.
I think the key is the use of the bread flour, which has a higher gluten content, making for a chewier crust. This dough was really easy to work with, and can sit in the refrigerator up to 3 days before being used (I made mine on day 3). We also froze the second half, and it was perfect when we used it later.
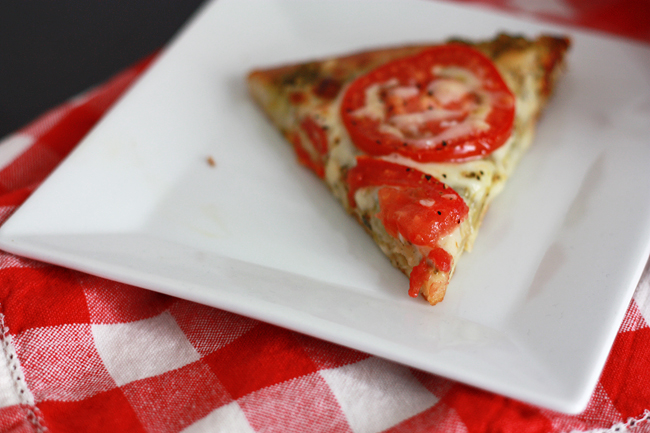
Brushing the crust with a light layer of olive oil and pre-baking it gives it a delicious texture and assures you won’t have soggy pizza. This wasn’t crunchy by any means, just perfectly cooked through and golden.
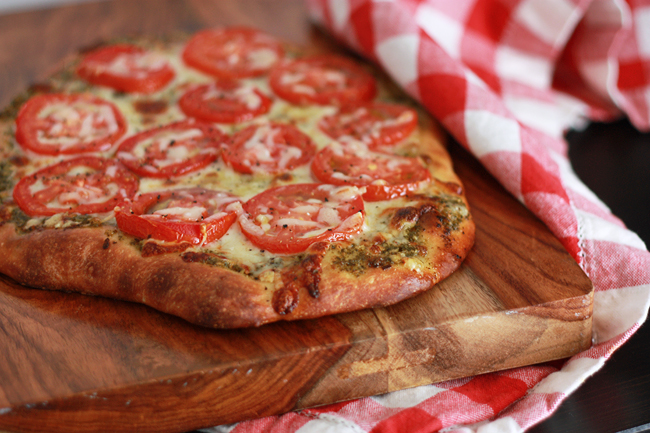
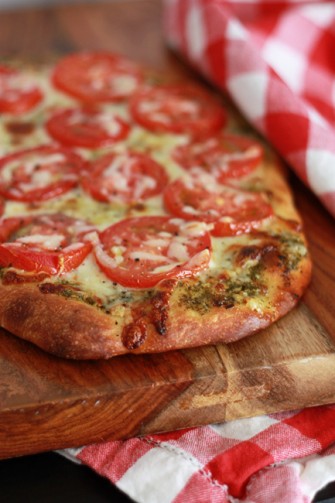
As for the pizza combination you see pictured, it’s one of my favorites. We just used about 1/2c of store-bought basil pesto (I’ve used Giada DiLaurentiis’s brand and Classico brand with good results), 2 thinly sliced roma tomatoes, mozzarella, and about 1/4c good-quality parmesan cheese. Easy-peasy.

Overnight Refrigerator Pizza Crust
- Total Time: 24 hours 28 minutes
- Yield: 2 (8-inch) pizzas 1x
- Diet: Vegetarian
Ingredients
- 3 cups bread flour
- 2 teaspoons sugar
- 1 1/2 teaspoon salt
- 1/2 teaspoon yeast
- 1 1/3 cup cold water
- 1 Tbsp olive oil, plus more for brushing
Instructions
- To make the dough, combine the flour, sugar, salt, and yeast in the bowl of a mixer. Pulse just to combine. With the machine running, add the cold water and process just until the dough is combined and all dry ingredients are incorporated, about 10 seconds. Let dough rest for 10 minutes.
- Add the oil to the dough. Process until the dough forms a smooth, tacky ball that clears the sides of the bowl, about 30-60 seconds. Remove the dough from the bowl, knead briefly on a lightly floured work surface, about 1 minute. Transfer to a lightly oiled bowl, cover with plastic wrap and refrigerate for at least 24 hours and up to 3 days. (After refrigerating, the dough can be wrapped tightly in plastic wrap, placed in a zip-top bag and frozen for later use.)
- The dough will not have risen much. Don’t worry, this is normal!
- One hour before baking the pizza, preheat the oven to 500˚ F. Remove the pizza dough from the refrigerator and divide in half. Form each half into a ball, place on a lightly oiled baking sheet and let sit at room temperature for 1 hour. (If you plan to freeze a portion of the dough, this is the time to wrap in plastic, place in a freezer bag and freeze for later use.)
- To assemble the pizza, flatten dough into an 8-inch disk on the baking sheet, then gently stretch the dough to a roughly 12-inch circle (using a rolling pin if necessary).
- Lightly brush the dough with olive oil. Bake 5-8 minutes. Top with sauce and desired toppings and return to oven. Bake until the cheese is bubbling and slightly browned, another 8-10 minutes. Let cool about 5 minutes before slicing and serving.
Notes
- Makes 2 small pizzas
- *Dough will keep in the freezer about 2 months.
- *To use frozen dough, thaw in the refrigerator overnight, or about 8 hours before using.
- Prep Time: 10 minutes
- Rise Time: 24 hours
- Cook Time: 18 minutes
- Category: Dinner
- Method: Oven
- Cuisine: American
I just made this and it is my new favorite pizza dough recipe!
Oh my goodness! I’m so happy to hear that. Thank you so much for sharing and taking the time to leave a review. I really appreciate it! 🙂
Going to try this recipe tonight! Thank you for the tips hopefully it will be a success for tomorrow. Refrigerating it overnight for dinner tomorrow😀
Oh good! I hope you love it!
Thank you for sharing the recipe Emily. My compliments
; )
Made this today. Was a little worried because the dough was kinda hard after applying cold water and mixing. But… I let it sit awhile and it came out great. Got alot of compliment on the taste. Thx!
I’m glad it turned out for you! It’s one of my favorite recipes.
We are have a DYI Pizza party tomorrow for our last day of preschool and I’m so excited to try this. I need it the dough to be ready way ahead of time so that I can get the rest of the party ready (while babysitting a friends kids!) I’m so glad you posted this and I can’t wait to eat it. It’s “resting” right now 🙂 I’m going to make a moster batch because I also need dinner later that night for a family in the ward. It’s one crazy day but this recipe is taking a whole lotta crazy out of it too. Thanks!
I’m a total pizza dough novice, so forgive me if this is a silly question. When freezing the dough, do you freeze it after you let it rest an hour or before? I tried this recipe tonight and it was delicious. Thanks so much for the recipe and your lovely blog!
Madeline – NO worries! After it’s gone through its refrigeration time, you can wrap it right up and freeze it. If you’re baking one half and freezing one half, I’d just divide it and leave one half out to rest and wrap up the other half right away. It should be okay either way, so don’t worry if you did leave it to rest before freezing it.
This is brilliant! Pizza is on the menu this week, so definitely I will be trying this dough. The pizza looks delicious.
For an even easier refrigerator dough look up Artisan Pizza and Flat Bread in 5 Minutes a Day by Jeff Hertzberg and Zoe Francois. No kneading required at all, simply mix all the ingredients in a container and after a few hours to rise you then pop it in the fridge until you want to use some. I bought the book a month ago and since then I have had a tub of dough in the fridge constantly and pizza night has become a weekly adventure everyone in the family looks forward too.
I just got that book for Christmas, and have yet to try the recipe. I’m more motivated to give it a try!
These pizzas look incredible. I love the crust recipe!
I made a really similar pizza once. Even with the pesto and tomatoes. Great minds think alike. 🙂
Emily – do you think this is a dough that can be made in a bread maker? I don’t have a stand mixer but have a bread maker that makes dough. Really curious about this – love the idea of being able to freeze/refrigerate!
Lisa, I’ve never worked with a bread machine before, but I bet you could use it for the mixing portion. I wouldn’t leave it in there to proof or anything, but to mix it up, I think it would work!
For us lame-os without a stand mixer or food processor…what do you recommend? This is DEFINITELY going on the menu this week!
Katie – You can totally mix it by hand too. The idea of doing it in the mixer (other than convenience) is to keep the dough fairly cool. To make it by hand, stir together the flour, sugar, salt, and yeast. Then pour in the cold water and stir until it comes together (it won’t be perfectly smooth, but that’s fine). Let it rest for 10 minutes. Add in the oil and stir together until the dough pulls away from the sides of the bowl and the dough is smooth and just a little tacky. This will only take 2-3 minutes by hand at most. Turn the dough out onto the counter, knead it about 1 minute, then transfer it to the oiled/sprayed bowl you plan on storing it in. Please let me know if you have any questions.
I didn’t have either a food processor or mixer for a long time, and I almost always make my pizza crust by hand anyway. Never fear!
Bless you! I could really use this pizza crust recipe in my life. 🙂
This looks outstanding! I have a favorite pizza crust, but it’s for Neapolitan pizza, and sometimes I want something a bit more substantial. This is what I’ve been looking for. Quick question – do you make this in a food processor (and if so, did you use the dough blade or the regular blade?) or a stand mixer (and with a paddle or dough hook)? Thanks!
Oooh, and my favorite pizza has a tangy NY style tomato sauce (I make it at home and freeze it), a bit of shredded mozzarella, crumbled feta, and chunks of pineapple (finished off with a drizzle of olive oil, salt and pepper). The sweet/salty combination is awesome! Now I’m really hungry….
Jessica – I made it in my stand mixer with a dough hook. The person I adapted the recipe from makes it in her food processor with a steel blade. I think you can do whichever works best for you!
Please clarify – do you knead after using your dough hook?
Hi! Sorry for the confusion–yes! See step 2: You’ll need after you remove the dough from the mixer. (“Remove the dough from the bowl, knead briefly on a lightly floured work surface, about 1 minute.”)
I have never been able to make pizza crust turn out, but I am convinced I can do this one! Thanks for sharing!! I am definitely trying it! (Oh, and I love the new new header!!)