


This healthy honey garlic chicken recipe is quick, easy, and packed with flavor! It’s a delicious meal for a busy night & always a winner.


This Sticky Honey Garlic Chicken = A GREAT Weeknight Dinner!
This gluten-free honey garlic chicken has been on repeat at my house for the last few months because both my kids LOVE it. (Any time this happens, it feels like such a win!) There’s so much to love!
🧄 IT’S EASY. This stir fry is made from simple ingredients & comes together in 30-40 minutes, depending on how speedy you are with prep. We love it on a busy weeknight!
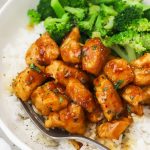
🍯 THERE’S SO MUCH FLAVOR! This easy honey garlic chicken recipe has it all, thanks to the delicious sauce! You’ll get savory, sweet, salty, tangy, and even a little warmth or heat if you want it!
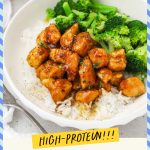
🥦 IT’S PRETTY HEALTHY. This homemade stir fry packs 27 grams of protein per serving and is lower in fat than what you’ll order from take-out.
Happy cooking! xo, Emily
Gather Your Ingredients
One thing I LOVE about this family favorite is that it mostly revolves around pantry staples. Let’s take a look:

How To Make Honey Garlic Chicken, Step By Step
As always, you can find the full recipe with ingredient amounts, detailed instructions, and tips in the recipe card below.

- Coat The Chicken. In a medium bowl, combine chicken, cornstarch, salt, and pepper. Stir with a fork to evenly coat the chicken pieces in the cornstarch mixture.
- Mix Up The Sauce. Next, mix up your honey garlic sauce. (You can also do this while the chicken cooks to save time!) In a liquid measuring cup or small bowl, combine chicken broth, honey, gluten-free tamari, rice vinegar, garlic, and red pepper flakes. Whisk to combine and set aside.
- Cook The Chicken. Heat 1-2 Tablespoons oil in a large skillet over medium heat. Working in batches so you don’t overcrowd the pan, cook the coated chicken 5-6 minutes on the first side, then flip and cook another 3-4 minutes, or until chicken is browned on each side and mostly cooked through (we’ll finish cooking it later!). Remove chicken from pan and set aside on a clean plate. Repeat with remaining chicken until all chicken is cooked, adding more oil to the pan, if needed.

- Simmer The Sauce. When the chicken is all cooked and set aside, add butter to the pan and stir to scrape up any browned bits from the bottom of the pan. Add sauce to the skillet and bring to a simmer over medium heat. Add browned chicken back to the pan and simmer another 3-4 minutes, or until the sauce has thickened and the chicken is fully cooked through to 165 degrees F.
- Serve & Store. Garnish the chicken with cilantro, green onion, sesame seeds or red pepper flakes and serve warm with rice and broccoli. Store leftover chicken in an airtight container in the fridge 3-4 days.
A NOTE ON THE SAUCE. If you find the sauce isn’t as thick as you’d like, you can dissolve 1 teaspoon cornstarch into 1 Tablespoon COLD water, then add it to the pan and simmer another 1-2 minutes to thicken it even more.


Make It A Meal! (Side Dishes To Try)
To turn this gluten-free honey garlic chicken into a full meal, you’ll need some side dishes! Here are a few of our favorites for this easy dinner:
- White Rice or Cauliflower Rice. I love having something to soak up that sauce, so I usually serve our homemade honey garlic chicken stir fry with jasmine rice (brown rice works, too!). Cauliflower rice is a great grain-free option, if you want something lower carb!
- Broccoli or Your Favorite Veggie. Next, I usually serve some steamed broccoli, though a side of green beans, snow peas, or stir-fry veggies would be delicious, too.
- Fresh Fruit. Then, I like to round out the meal with a little fresh fruit. My kids love pineapple, orange slices, or grapes with this dinner!
- Or, Turn It Into A Feast! Want to make it feel like you’re at a restaurant? Serve this stir fry with lettuce wraps and egg drop soup! It’s perfect for an at-home date night!

FAQ + Tips And Tricks For The Best Honey Garlic Chicken Stir Fry
Cook The Chicken In Batches! For the crispiest finish, make sure you don’t overcrowd the pan when you’re cooking the chicken. Work in batches to leave space for air to circulate in between the chicken pieces as they cook. It takes longer, but it’s worth it for texture!
How to Get Even Thicker Sauce. If you find the sauce isn’t as thick as you’d like, you can dissolve 1 teaspoon cornstarch into 1 Tablespoon COLD water, then add it to the pan and simmer another 1-2 minutes to thicken it even more. Or, if your sauce is TOO thick, you can thin it out by adding 1 Tablespoon of water or broth at a time until you reach your desired consistency.
Meal Prep Tip. If you want to get ahead on prepping this dinner, you can dice the chicken ahead of time (store in the fridge till you’re ready to use it!), and mix up the sauce in advance. The sauce will stay fresh in the fridge 3-5 days!
Flavor Twists To Try. If you want to experiment with the flavor, try adding a little chili crunch for heat, a few drops of sesame oil, some ginger, or even more garlic for stronger garlic flavor!


Did You Make This Recipe?
Tell me all about it! Leave a star rating below when you try our healthy Gluten-Free Honey Garlic Chicken recipe. I can’t wait to hear how it goes!
Honey Garlic Chicken
Ingredients
For The Chicken
- 1.25 pounds Boneless, Skinless Chicken Breast or Chicken Tenders, Cut Into 1-inch Pieces
- 3 Tablespoons Cornstarch
- 1/2 teaspoon Kosher Salt
- 1/2 teaspoon Black Pepper
- 2 Tablespoons Avocado Oil (Any Neutral-Tasting Oil Will Also Work, Like Canola Oil or Vegetable Oil!)
For The Honey Garlic Sauce & Stir Fry
- 1/3 cup Chicken Broth (Use Bone Broth For Extra Protein!)
- 1/3 cup Honey
- 2 Tablespoons Gluten-Free Tamari or Coconut Aminos (I Recommend Low-Sodium)
- 2 Tablespoons Rice Vinegar
- 2 cloves Garlic Finely Minced
- 1/4 teaspoon Red Pepper Flakes (or A Few Drops Chili Crunch)
- 2 Tablespoons Minced Cilantro (Or 1 Sliced Green Onion)
- 1 Tablespoon Butter
Instructions
- Coat The Chicken. In a medium bowl, combine chicken, cornstarch, salt, and pepper. Stir with a fork to evenly coat the chicken pieces.
- Mix Up The Sauce. Next, mix up your sauce. (You can also do this while the chicken cooks to save time!) In a liquid measuring cup or small bowl, combine chicken broth, honey, gluten-free tamari, rice vinegar, garlic, and red pepper flakes. Whisk to combine and set aside.
- Cook The Chicken. Heat 1-2 Tablespoons oil in a large skillet over medium heat. Working in batches so you don't overcrowd the pan, cook the chicken 5-6 minutes on the first side, then flip and cook another 3-4 minutes, or until chicken is browned on each side and mostly cooked through (we'll finish cooking it later!). Remove chicken from pan and set aside on a clean plate. Repeat with remaining chicken until all chicken is cooked, adding more oil to the pan, if needed.
- Simmer The Sauce. When the chicken is all cooked and set aside, add butter to the pan and stir to scrape up any browned bits from the bottom of the pan. Add sauce to the skillet and bring to a simmer over medium heat. Add chicken back to the pan and simmer another 3-4 minutes, or until the sauce has thickened and the chicken is fully cooked through to 165 degrees F.
- Serve & Store. Garnish the chicken with cilantro, green onion, sesame seeds or red pepper flakes and serve warm with rice and broccoli. Store leftover chicken in an airtight container in the fridge 3-4 days.
Notes
- Cook The Chicken In Batches! For the crispiest finish, make sure you don’t overcrowd the pan when you’re cooking the chicken. Work in batches to leave space for air to circulate in between the chicken pieces as they cook. It takes longer, but it’s worth it for texture!
- Choose Low Sodium. Since salt can add up quickly in stir fry, I recommend low-sodium broth and low-sodium tamari for best results.
- How to Get Even Thicker Sauce. If you find the sauce isn’t as thick as you’d like, you can dissolve 1 teaspoon cornstarch into 1 Tablespoon COLD water, then add it to the pan and simmer another 1-2 minutes to thicken it even more. Or, if your sauce is TOO thick, you can thin it out by adding 1 Tablespoon of water or broth at a time until you reach your desired consistency.
- Flavor Twists To Try. If you want to experiment with the flavor, try adding a little chili crunch for heat (my favorite!), some minced ginger along with the garlic, or even more garlic for stronger garlic flavor!
Video
Nutrition
Nutrition facts are an estimate only and will vary based on brands and amounts used.
Find it Online:
https://www.onelovelylife.com/gluten-free-honey-garlic-chicken/
The whole family very much enjoyed this recipe and super easy to make. Thanks!
YAY! I love hearing that. This one’s a win with both my kids, and that always feels like SUCH a victory!
So easy to make! I love how delicious this tastes and it is a crowd pleaser