


How to Make Chocolate Covered Strawberries – Here is everything you need to know to make this classic dessert! I’ll even show you how to make them dairy-free, vegan, and paleo-approved!
Have you been enjoying our Chocolate Week? I’ve been having a delicious time with all these yummy chocolate recipes.
There’s nothing like chocolate at Valentine’s Day, and there are few Valentine’s Day desserts that feel more classic to me than chocolate-covered strawberries. Since many of us are celebrating Valentine’s Day at home this year, it feels like the perfect time to each you how to make your own Chocolate-Covered Strawberries at home!
Homemade chocolate-covered strawberries are SUPER easy to make–they only require 3 main ingredients and a few simple steps. They’re one of those lucky desserts that looks fancy and special, but don’t require any special skills or specialty tools. (This is totally my dessert sweet spot–#easydessertsforlife)
Best of all, you can make these as traditional, vegan, paleo, or dairy-free chocolate-covered strawberries, depending on your needs! I’ll walk through the whole process step-by-step. Here’s what you’ll need to get started…
Gather Your Ingredients
Here’s What You Need To Make Dairy-Free Chocolate Covered-Strawberries :
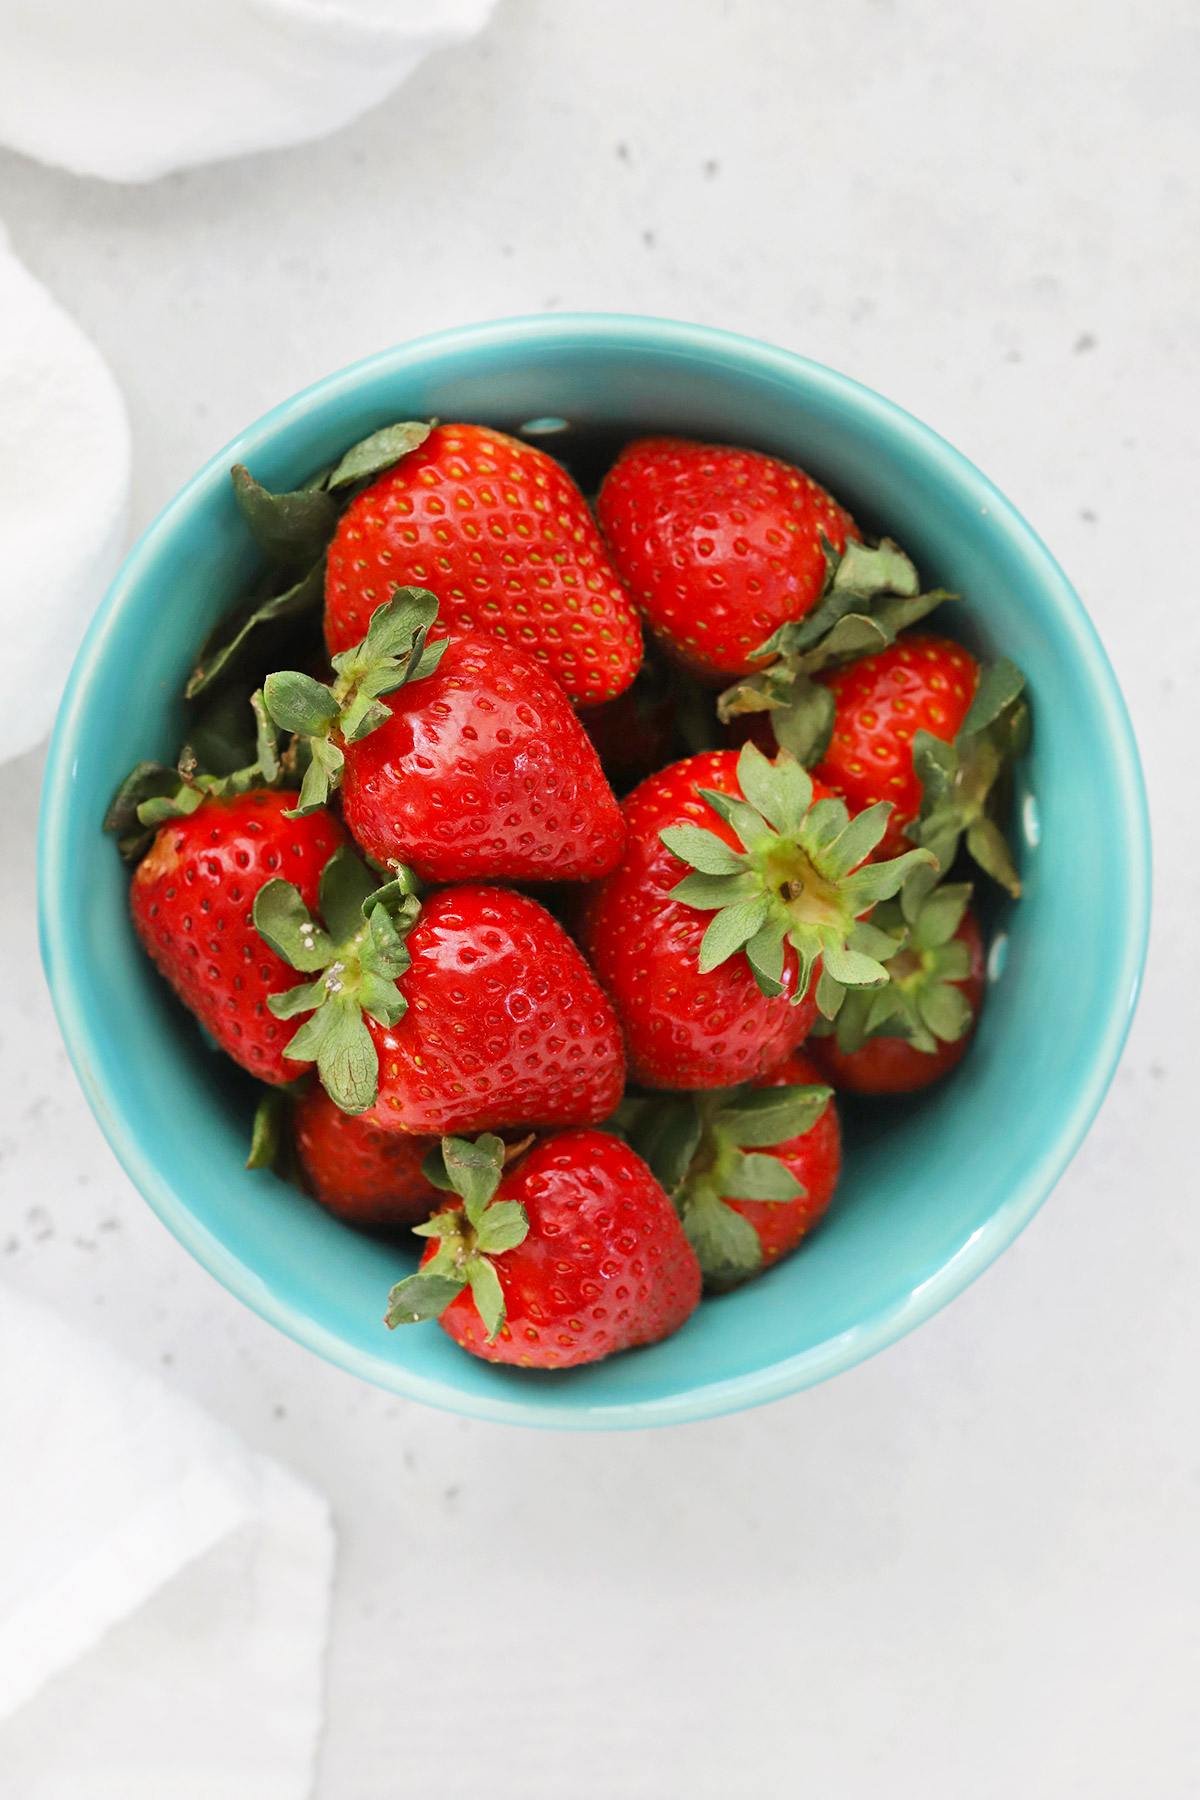
- RIPE, FRESH STRAWBERRIES. The more ripe your strawberries are, the better your chocolate-covered strawberries will turn out! You’re looking for red and ripe strawberries that still have some firmness. (Generally, the more red they are closer to the green tops, the more sweet they’ll taste overall.)
- SEMI-SWEET OR DARK CHOCOLATE CHIPS (DAIRY-FREE, AS NEEDED). Good old chocolate chips work beautifully for chocolate-covered strawberries! I love that they’re so low-maintenance. I usually reach for allergy-friendly semi-sweet or dark chocolate chips, but milk chocolate chips and traditional white chocolate chips also work! You can even try them with stevia-sweetened chocolate chips if that’s your jam. Chocolate bars also work, if you prefer. You’ll just want to use the same weight. See the FAQ below for some of our favorite brands of chocolate!
- COCONUT OIL. Coconut oil helps you temper the chocolate so that it’ll be shiny and uniform in color when it’s finished and easier to bite into once they’re set. Sometimes, without adding a little oil, your chocolate can “bloom” (get a harmless powdery or streaked appearance) when it dries. Since chocolate is the star of the show here and you really want everything to look pretty, I recommend adding the coconut oil! (It’s a small enough amount, so it doesn’t really impact the flavor, but see the recipe card for alternatives if you need them.)
- ANY DECORATIONS YOU’D LIKE TO USE. If you plan to add any other finishing decorations, be sure to have those ready with a clean plate so you can quickly add the garnishes or decorations when you’re ready. (I’ve got ideas for you below)
How To Make Chocolate-Covered Strawberries, Step-By-Step
As always, you can find the full recipe, with ingredient amounts, detailed instructions, and tips in the recipe card below!
- Line a baking sheet or large plate with parchment paper.
- Wash and dry your strawberries. Use a paper towel or very clean dishcloth to dry each strawberry. Make sure each strawberry is completely dry before dipping. (Chocolate can’t stick to wet strawberries and water can make the chocolate seize.)
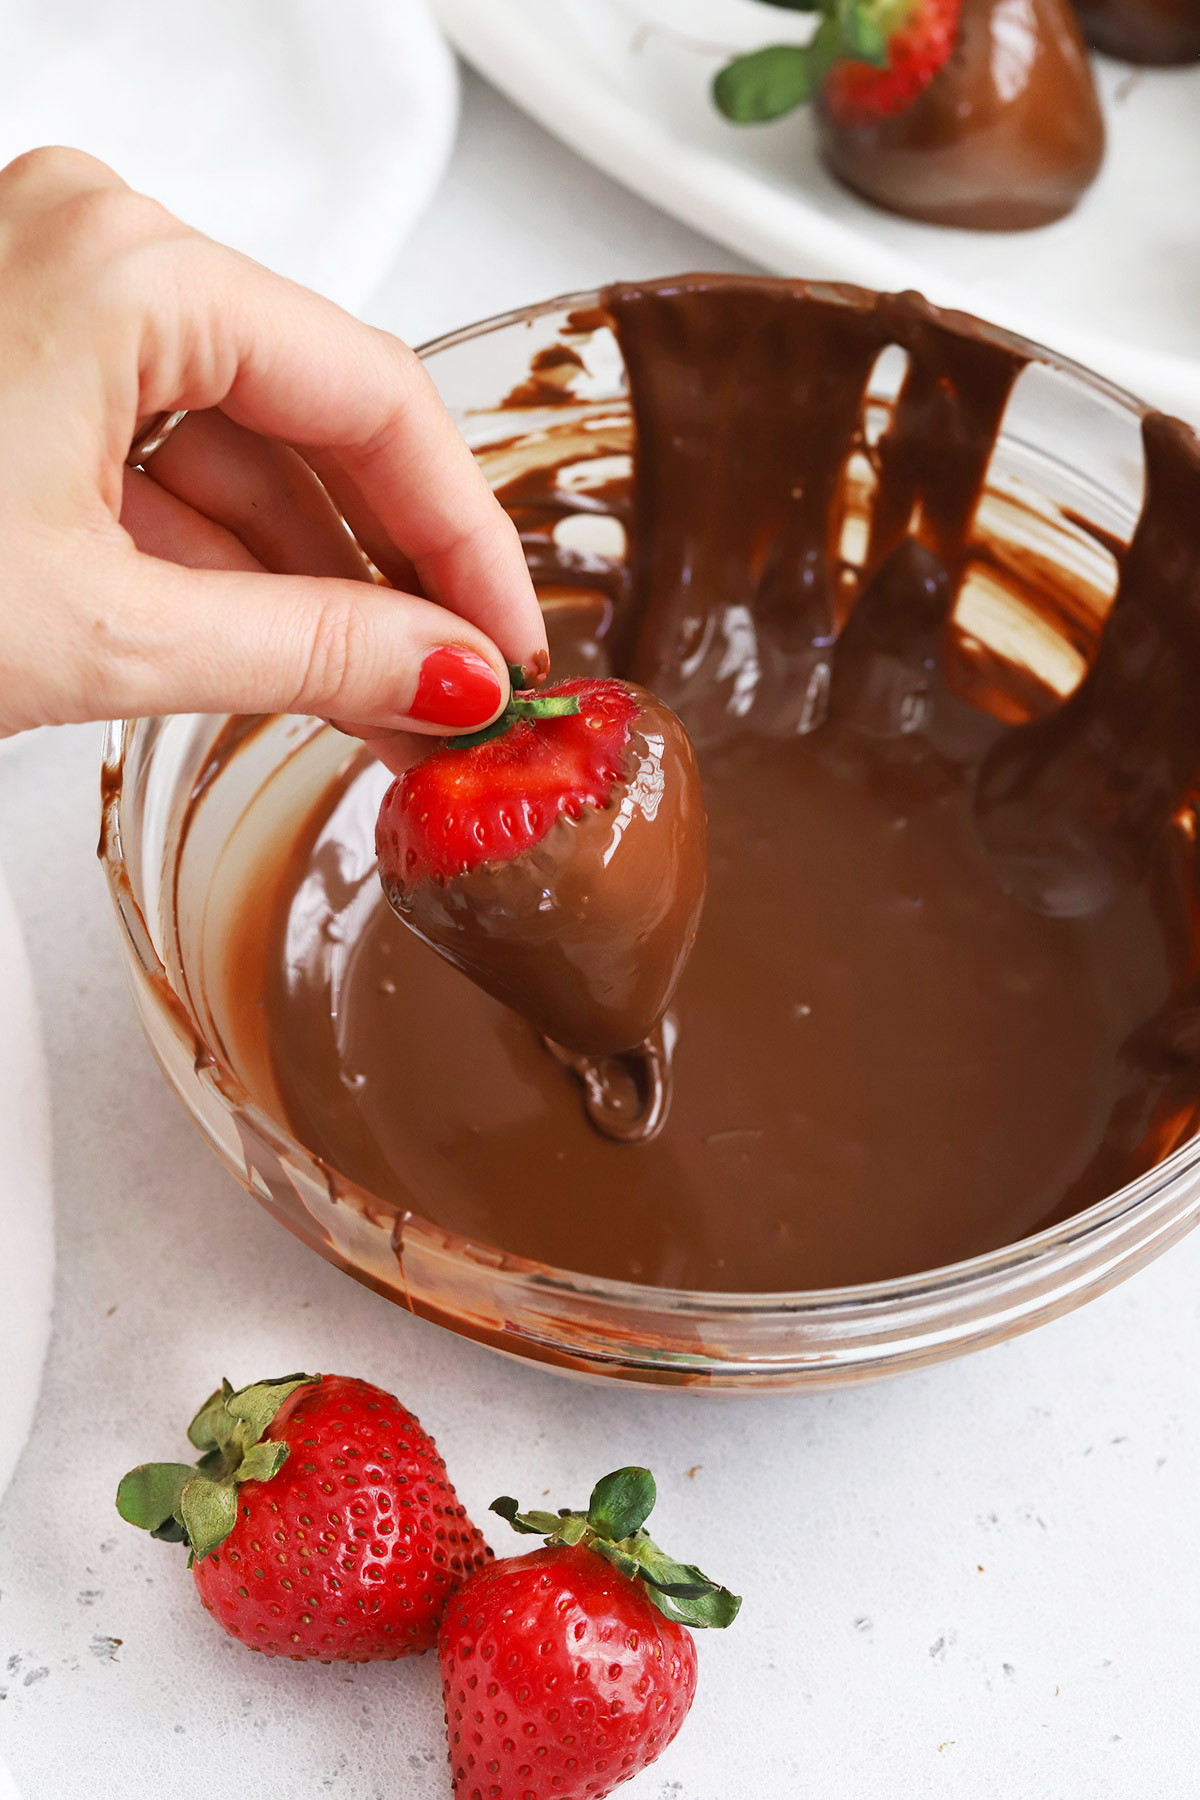
- Melt your chocolate. Add chocolate chips and coconut oil to a microwave safe bowl, and microwave* in 20 second increments, stirring in between each increment, until the chocolate is smooth and glossy. (I typically pull it out of the microwave when there are only a few small bumps remaining. They’ll finish melting as you stir and you don’t risk scorching the chocolate!)
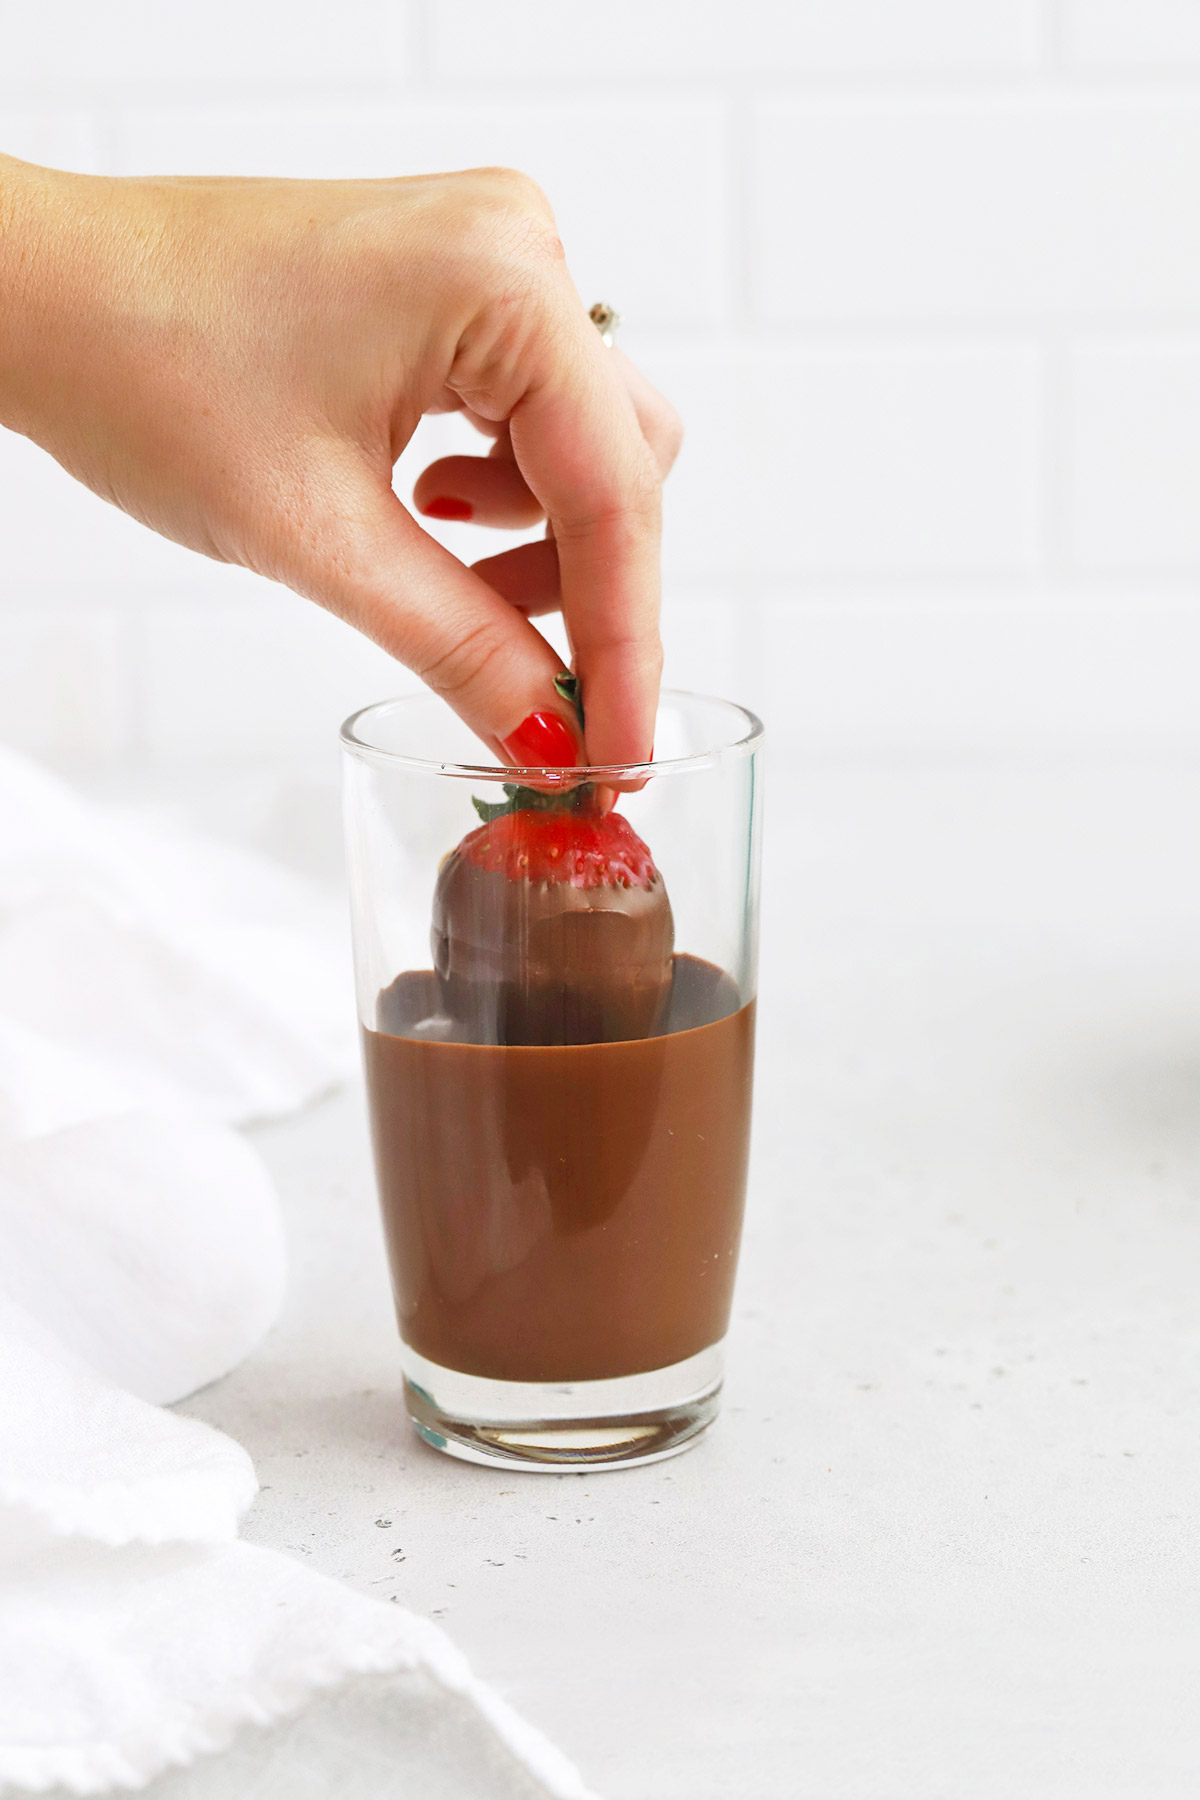
- Now, you’re ready to dip! Hold each strawberry by the stem and dip it into the bowl of melted chocolate to coat, letting excess chocolate drip from the strawberry before transferring it to the prepared baking sheet. (Add any decorations other than a chocolate drizzle at this point.) Alternatively, you can pour the melted chocolate into a narrow glass or shot class to dip if you prefer. I find a bowl easier for me.
- Repeat with remaining strawberries until they’re all coated.
- Chill the strawberries at least 20-30 minutes, or until the chocolate is completely set.
- If you want to drizzle them with additional melted chocolate for an extra layer of decoration, add that drizzle at this point and return to the refrigerator until set. Leftover chocolate from dipping works great for this!
- Remove from the refrigerator about 10-15 minutes before serving, and store any leftover strawberries in a single layer in an airtight container in the refrigerator.
*Want to use a double-boiler instead of the microwave? Warm your chocolate like this:
- Add 1-2 inches of water to a saucepan and place a heatproof bowl (glass or metal usually works best) on top of the saucepan. (The bottom of the bowl should not touch the water.) Bring the water to a simmer over medium heat and add your chocolate chips and coconut oil to the bowl.
- Gently melt the chocolate chips, stirring regularly until the mixture is glossy and smooth.
- Carefully remove the bowl from the pan and set aside.


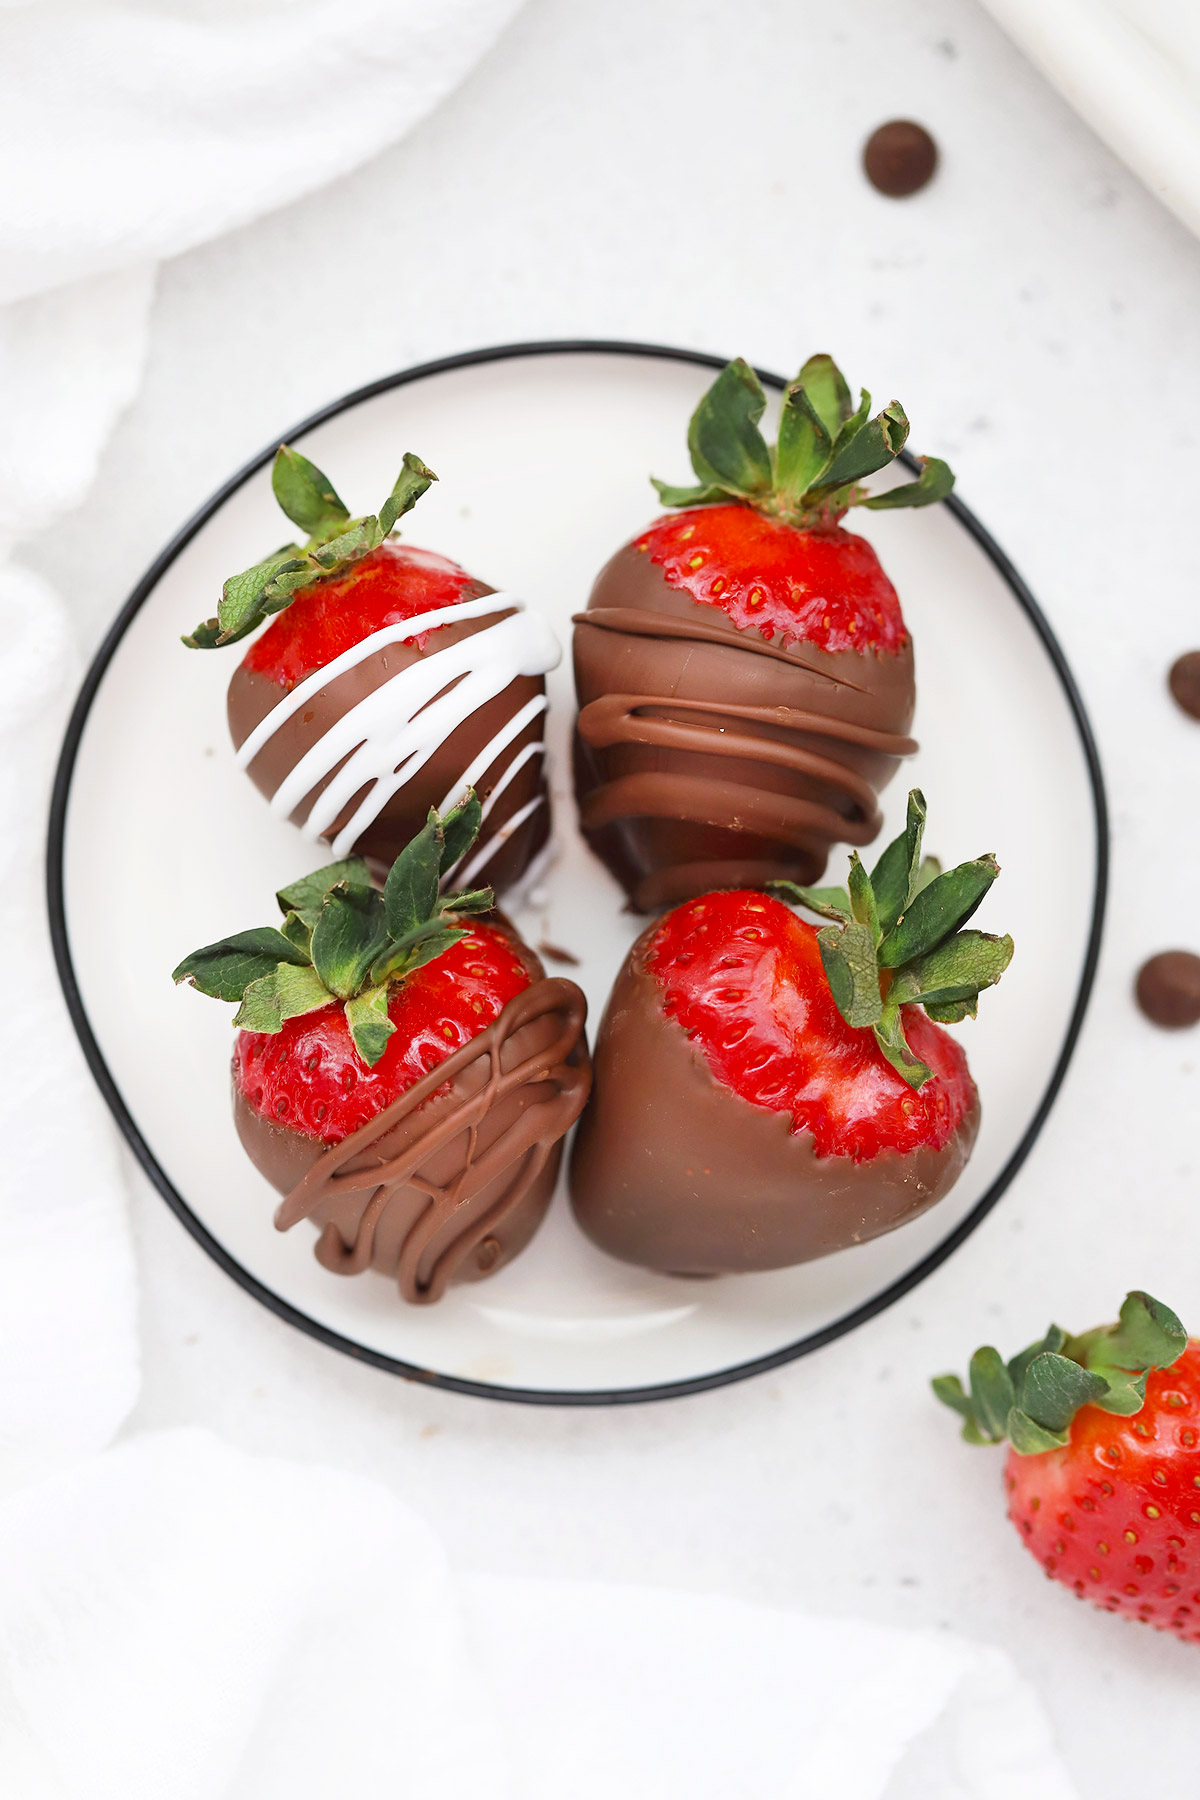
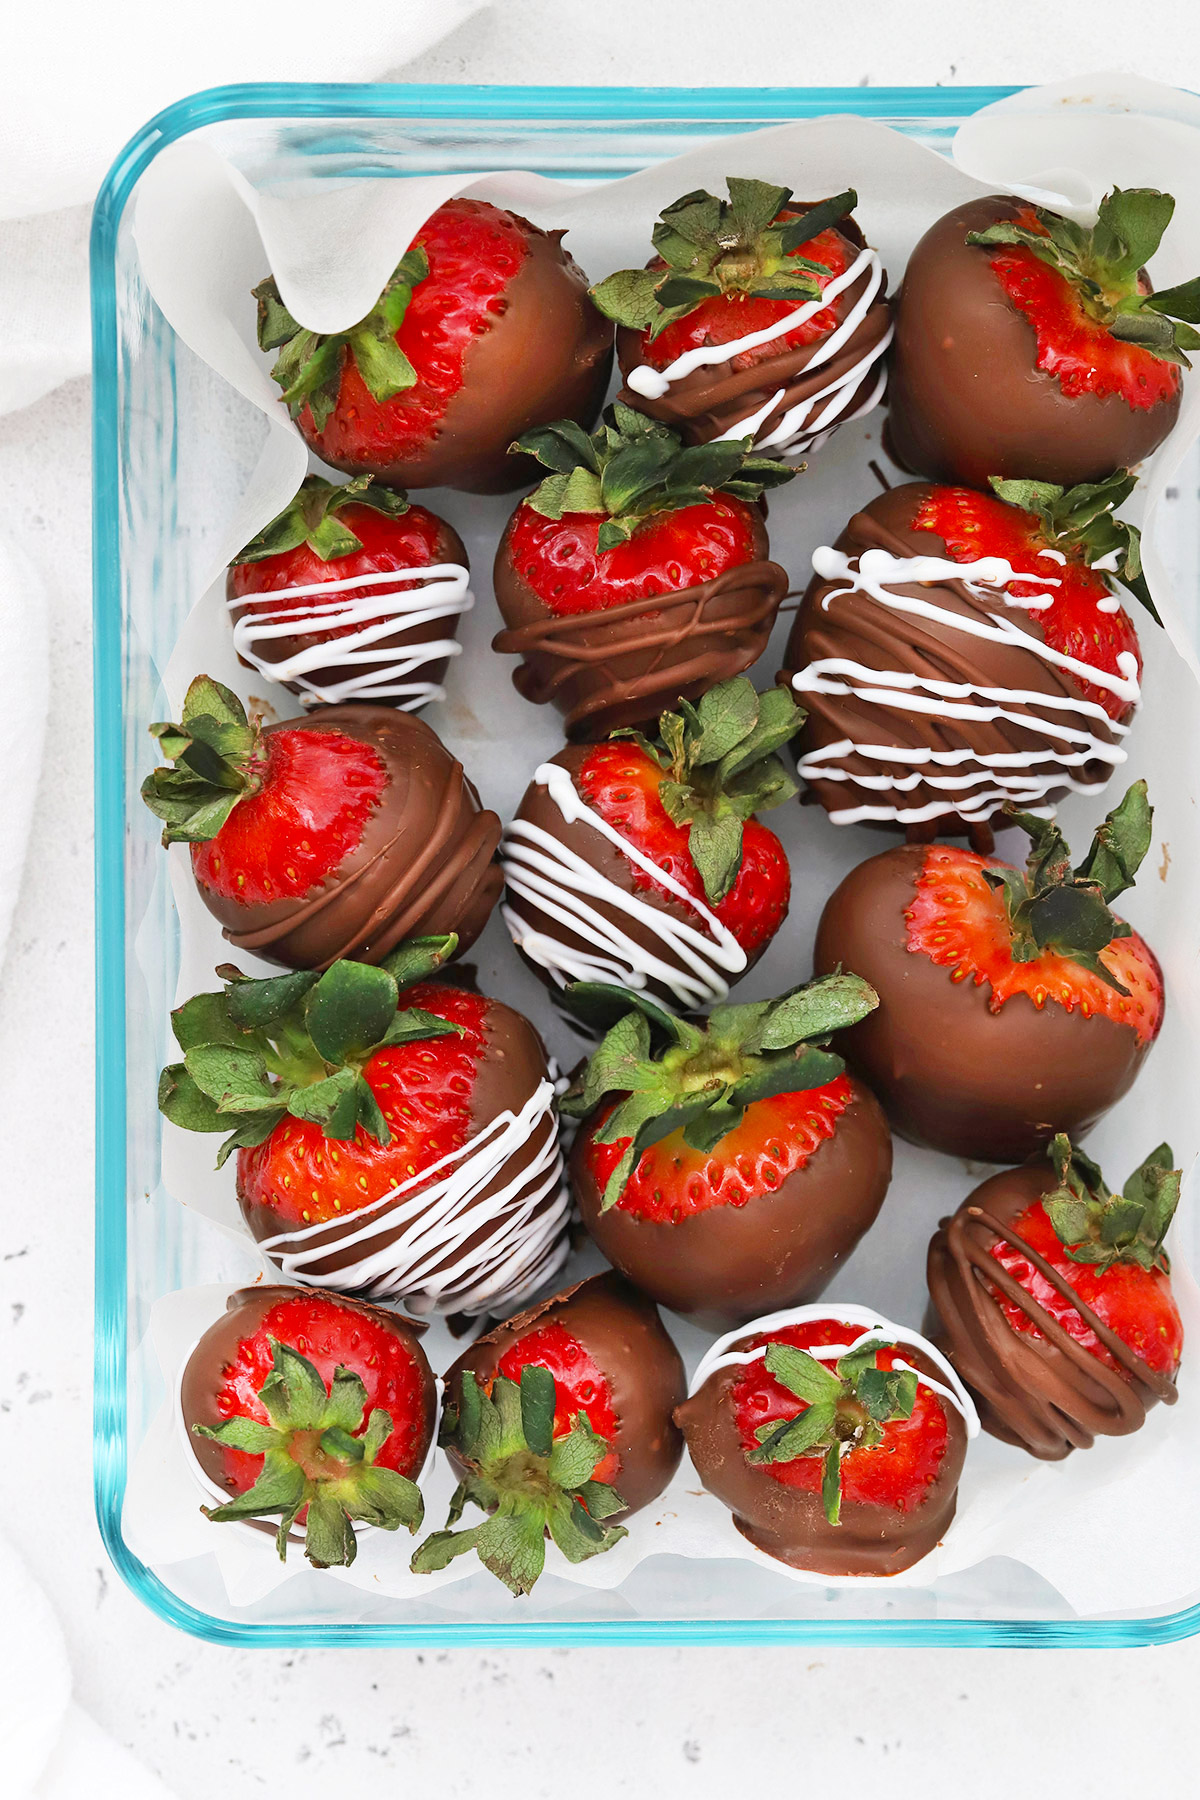
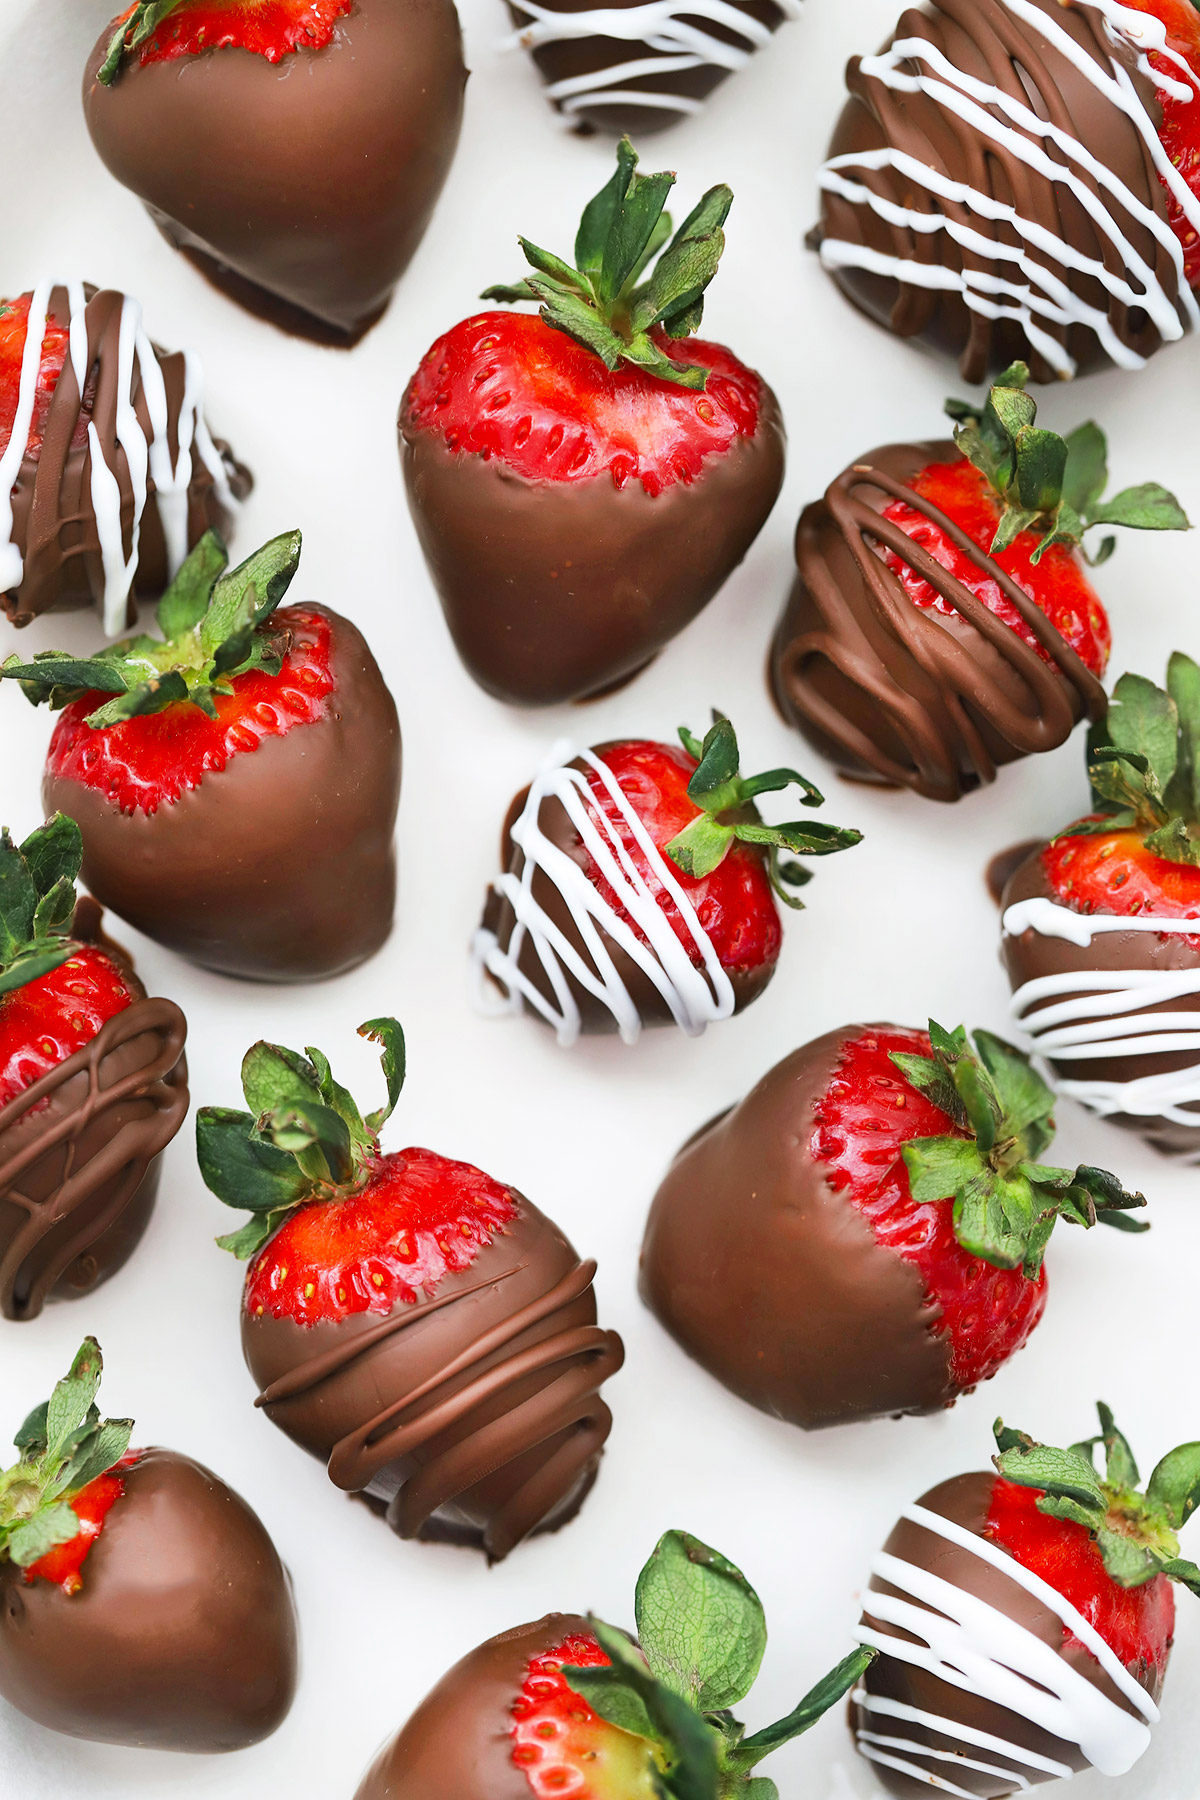
Make Them Pretty! Ways To Decorate Chocolate Covered Strawberries
- ADDITIONAL DRIZZLED CHOCOLATE. If you have a little chocolate leftover after dipping the berries, make sure it’s still pourable (warm up a bit if you need to), drizzle with a fork or transfer the chocolate to a small zip-top bag. Snip a *tiny* bit off the end of one corner, and drizzle the chocolate over the set strawberries. It looks beautiful! Make your drizzled chocolate stand out even more by using…
- DRIZZLED WHITE CHOCOLATE. My very favorite. Drizzling the finished chocolate-covered strawberries with a tiny bit of white chocolate looks beautiful! This brand is dairy-free + vegan.
- CRUSHED CHOCOLATE. Finely chopped or shredded chocolate is the perfect finishing touch for chocolate-covered strawberries.
- CRUSHED GRAHAM CRACKER OR PRETZELS. Gluten-free, as needed. These taste delicious.
- MINI CHOCOLATE CHIPS. Enjoy life makes great mini-chocolate chips that are allergy-friendly.
- SHREDDED COCONUT. So lovely. Look for as finely shredded as possible!
- CRUSHED NUTS. Crushed or finely chopped pistachios, pecans, or peanuts are all delicious on chocolate-covered strawberries! (Pistachios are my favorite)
- TOFFEE BITS. Not dairy-free or paleo, but toffee bits are phenomenal with fresh strawberries. YUM!
FAQ + Tips And Tricks For The Best Vegan Chocolate Covered Strawberries
HOW TO MAKE DAIRY-FREE, VEGAN + PALEO CHOCOLATE-COVERED STRAWBERRIES. The ingredients list is REALLY simple for this recipe, so the only thing you need to double check is your chocolate chips. Use chocolate that fits your dietary needs. Some of our favorite brands include:
- Enjoy Life. A go-to brand for allergy-friendly chocolate.
- Hu Kitchen. Naturally sweetened, vegan, and paleo! These are pricey, but amazing. They do run a bit more bitter (around 70% chocolate), but I love that!
- Lily’s. These are stevia-sweetened and would work well for you if you avoid all refined sweeteners.
- Guittard semi-sweet or dark chocolate chips. These don’t contain dairy and taste amazing.
MAKE SURE THE STRAWBERRIES ARE TOTALLY DRY BEFORE YOU START! You really do need to dry the strawberries well before trying to dip them in chocolate. Chocolate won’t stick well to wet berries, and any water on the berries can cause the chocolate to seize and go grainy. A paper towel or super-clean kitchen towel will do the job!
HOW LONG DO CHOCOLATE-COVERED STRAWBERRIES STAY FRESH? Chocolate-covered strawberries are best eaten within 1-2 days. The chocolate creates a sort of seal, which traps moisture under the chocolate, so they’ll start to soften and condense fairly quickly. Sometimes, the’ll last up to 3 days, but usually 1-2 days is best.
WHAT’S THE BEST WAY TO STORE CHOCOLATE-COVERED STRAWBERRIES? I store my vegan chocolate-covered strawberries in a single layer in an airtight container in the refrigerator. A paper towel on the bottom of the container will help absorb extra moisture.


Did You Make This Recipe?
Tell me all about it! Leave a star rating below when you try our Vegan Chocolate Covered Strawberries recipe. I can’t wait to hear how it goes!
Chocolate Covered Strawberries (Dairy-Free, Vegan, Paleo)
Ingredients
- 1 lb. strawberries, washed and dried thoroughly*
- 1 cup semi-sweet or dark chocolate chips (allergy-friendly or dairy-free, as needed) (6 ounces)
- 1/2 Tbsp. coconut oil or avocado oil
Optional, for decoration:
- White chocolate mini chocolate chips, toffee bits, shredded coconut, crushed graham crackers or pretzels, chopped nuts (pistachios, pecans, peanuts, etc.)
Instructions
- Prep Your Station. Line a baking sheet or large plate with parchment paper. If you haven't already, wash and dry your strawberries. Use a paper towel or very clean dishcloth to dry each strawberry. Make sure each strawberry is completely dry before dipping.*
- Melt your chocolate. Add chocolate chips and coconut oil to a microwave safe bowl, and microwave** in 20 second increments, stirring in between each increment, until the chocolate is smooth and glossy. (I typically pull it out of the microwave when there are only a few small bumps remaining. They'll finish melting as you stir and you don't risk scorching the chocolate!)
- Now, you're ready to dip! Working quickly, hold each strawberry by the stem and coat it in chocolate, letting excess chocolate drip from the strawberry before transferring it to the prepared baking sheet. (Add any decorations other than a chocolate drizzle at this point.) Repeat with remaining strawberries until they're all coated.
- Chill the strawberries at least 20-30 minutes, or until the chocolate is completely set.
- Decorate, As Desired. If you want to drizzle them with additional melted chocolate for an extra layer of decoration, add that drizzle at this point and return to the refrigerator until set.
- Serve & Store. Remove from the refrigerator about 10-15 minutes before serving, and store any leftover strawberries in a single layer in an airtight container in the refrigerator.
Notes
- *Thoroughly dry your berries before dipping! Dry each strawberry with a paper towel or very clean kitchen cloth to ensure they’re completely dry before starting to dip them. Chocolate won’t stick well to wet strawberries, and the water on the berries can cause the chocolate to seize which will make it gritty and unusable. See the video for a visual if you need one!
- **Want to use a double-boiler instead of the microwave? Add 1-2 inches of water to a saucepan and place a heatproof bowl (glass or metal usually works best) on top of the saucepan. (The bottom of the bowl should not touch the water.) Bring the water to a simmer over medium heat and add your chocolate chips and coconut oil to the bowl. Gently melt the chocolate chips, stirring regularly until the mixture is glossy and smooth. Carefully remove the bowl from the pan and set aside.
Video
Nutrition
Nutrition facts are an estimate only and will vary based on brands and amounts used.
Find it Online:
https://www.onelovelylife.com/chocolate-covered-strawberries/
These are perfect for Valentine’s Day! Delicious and elegant.
My favorite Valentine’s Day treat is covered strawberries. I love your instructions, clear and easy to understand. I think I’ll give them a try.
These were fantastic. Luckily I found some super red and sweet strawberries. Made them for Easter, and they were gobbled up in no time. My grandniece, despite having candy all over the place, ate like 5 of these! So good. Thank you!
THIS REVIEW!!! I’m so glad they were a hit!