


Our easy gluten-free focaccia recipe has a perfect crispy crust & tender, fluffy center. It’s the easiest gluten-free bread around! (Vegan-Friendly!)
This delicious gluten-free rosemary focaccia has been one of our top posts for the last several years, and it’s better than ever, thanks to updated, more thorough directions & helpful tips!
Before we went gluten-free a decade ago, I used to bake bread all the time. But gluten-free bread is a totally different ballgame! Since there’s no gluten, gluten-free bread dough can be trickier to work with and takes a little extra skill & know-how to get just right.
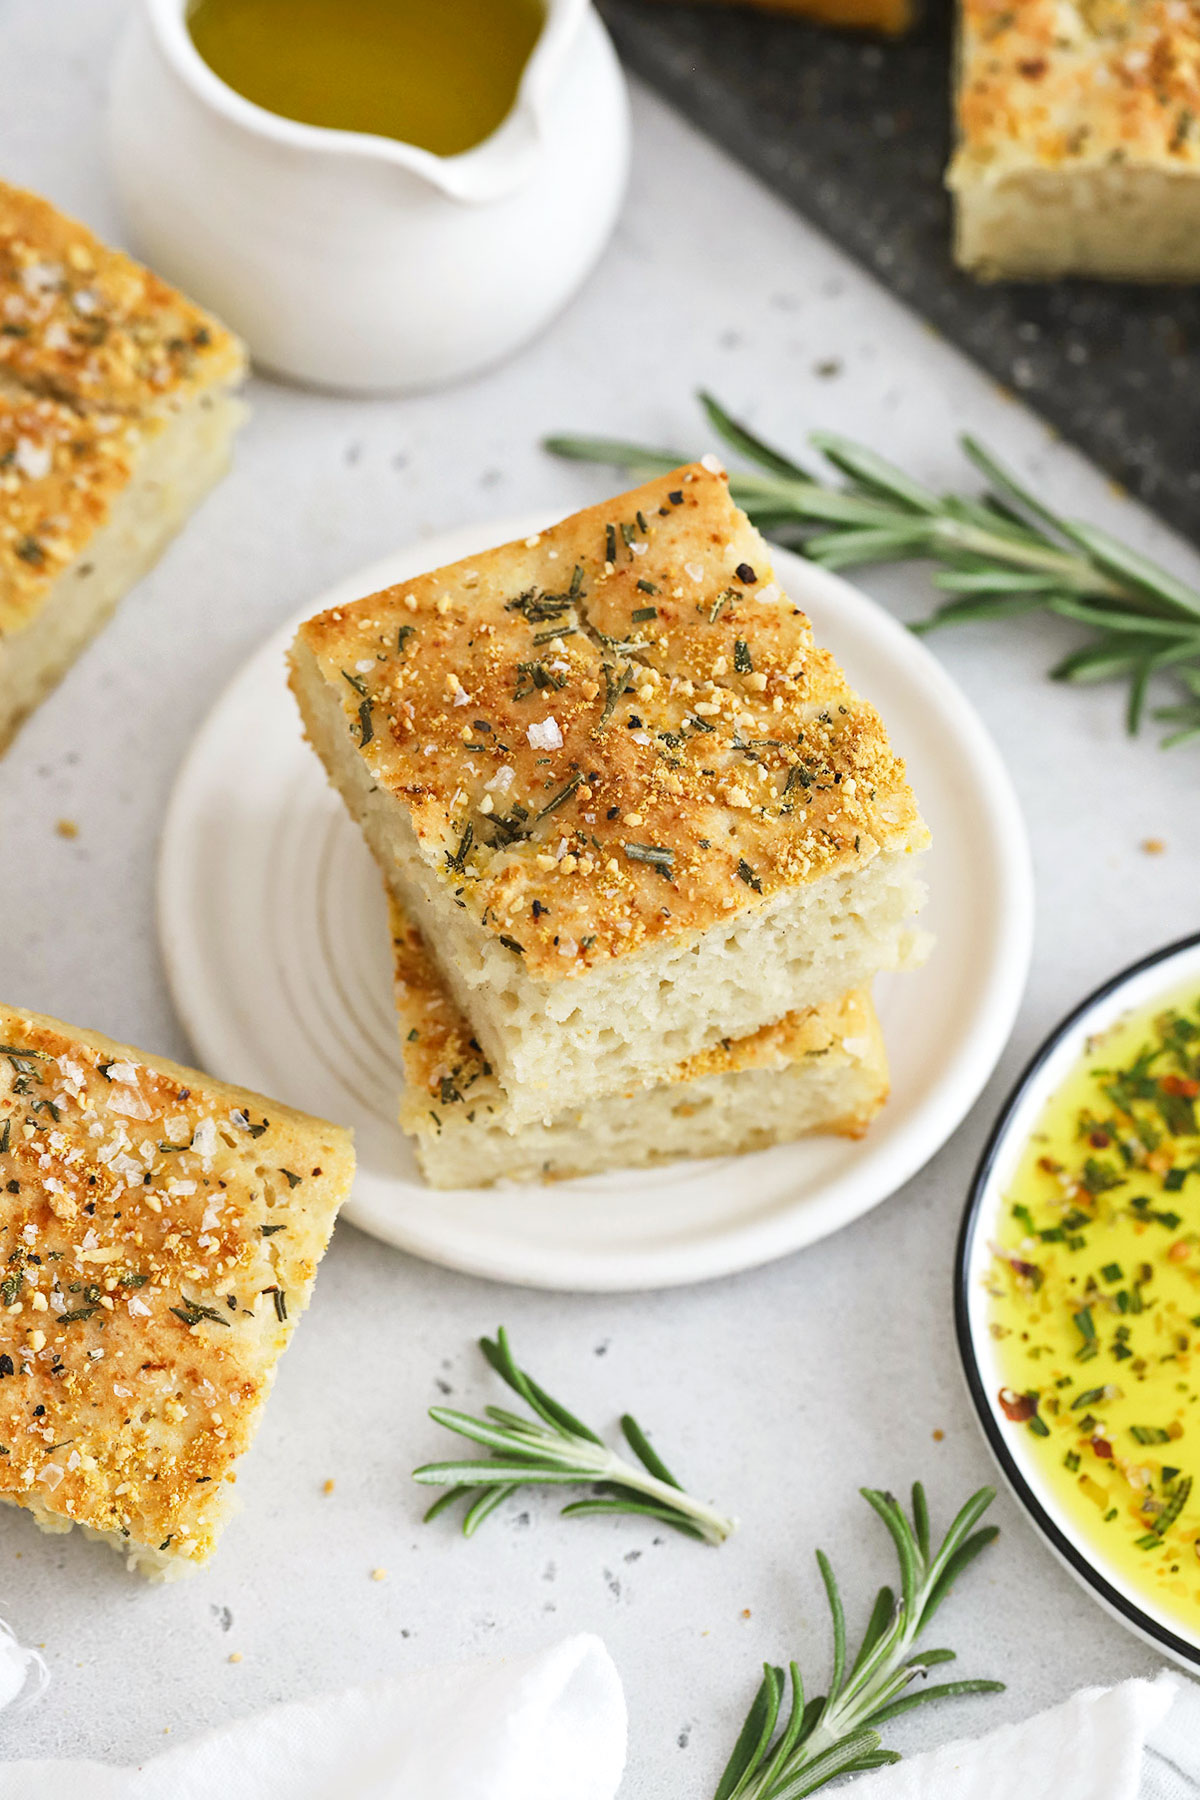
But do you know what’s probably the easiest gluten-free bread recipe around? Focaccia! This gluten-free focaccia bread recipe has a crisp, golden top and bottom, a soft & pillowy center, and just the right seasonings. It’s enough to send me into a swoon!
If you’re new to gluten free baking or haven’t made gluten-free bread recipes before, don’t worry! We’ve got everything you need to be successful. You’ll be baking loaf after loaf of this delicious Italian bread in no-time!
Lets jump in, yes? The carbs are calling!
Simple Ingredients For Gluten-Free Focaccia
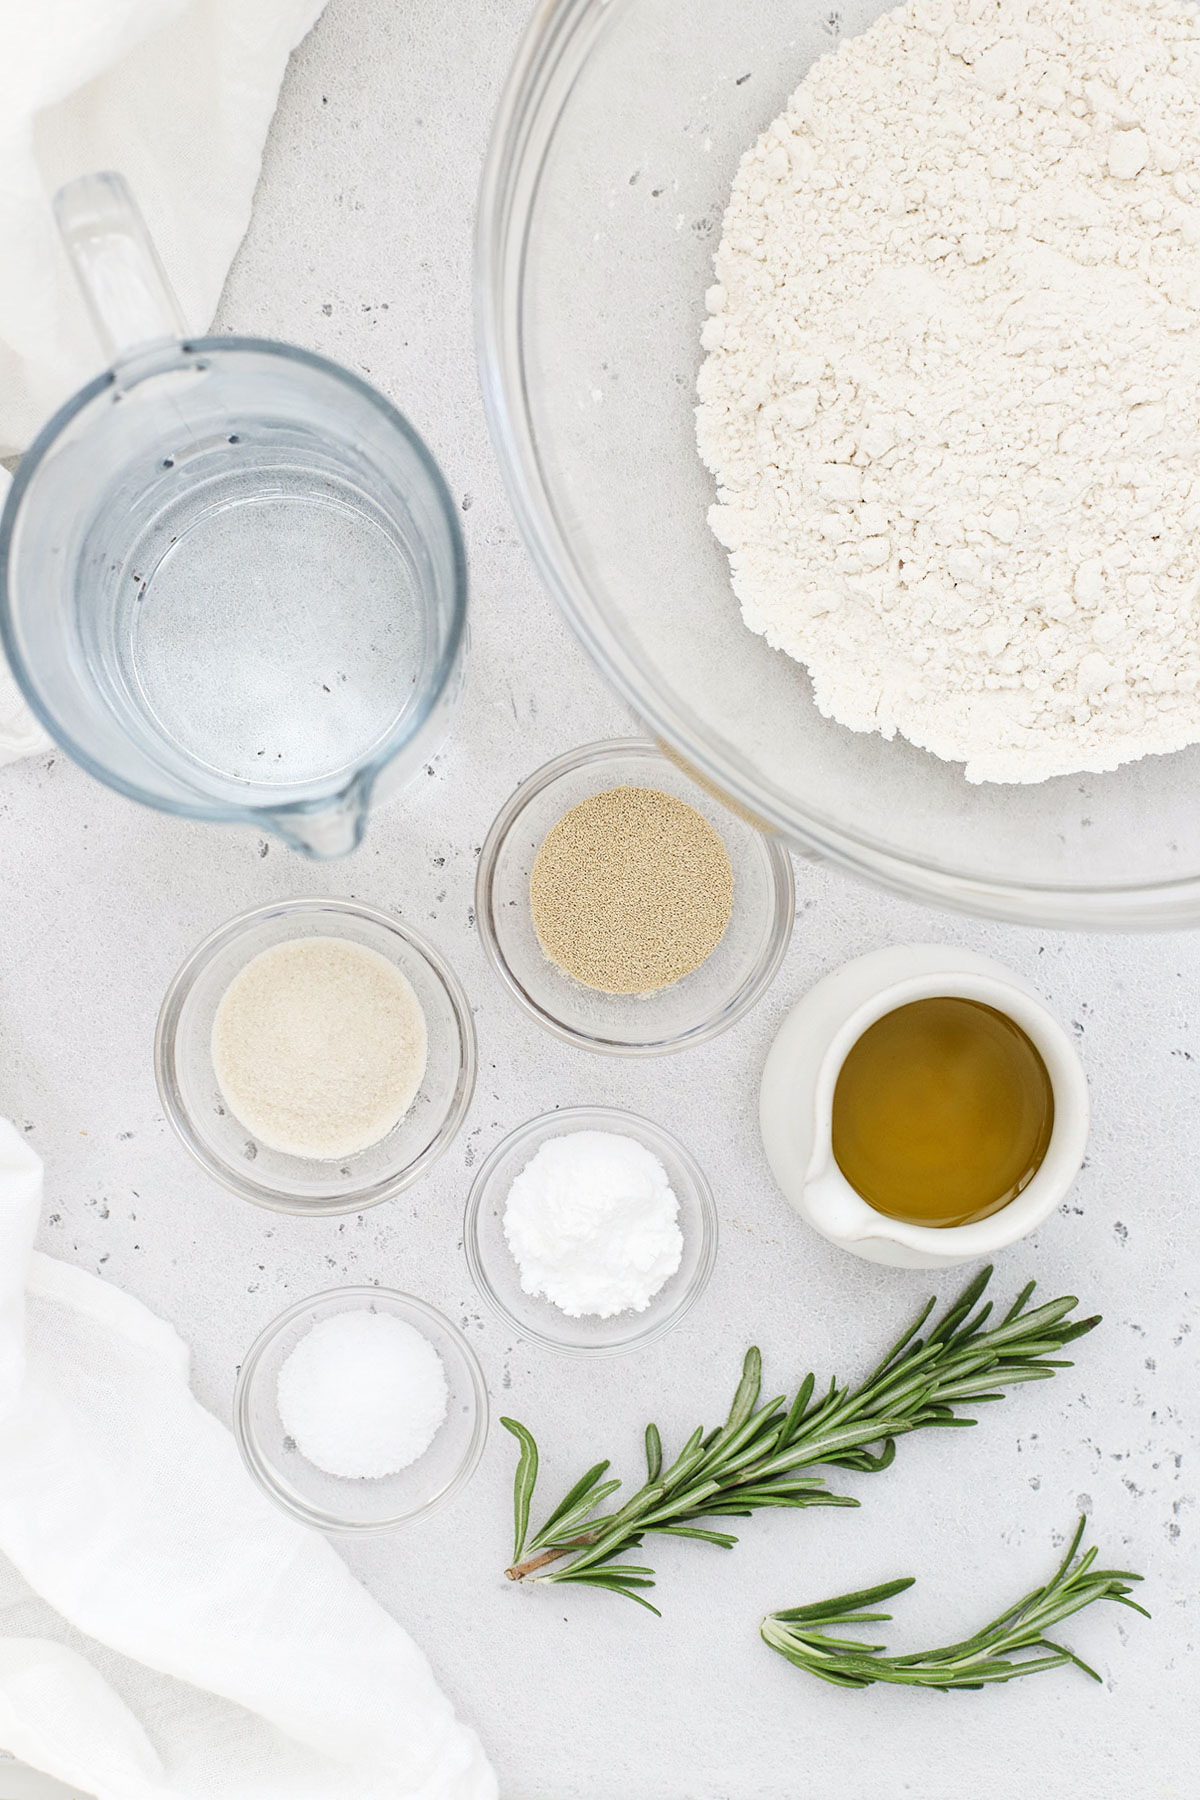
- Gluten-Free Flour. You’ll keep things simple with a 1:1 gluten-free flour blend. We HIGHLY RECOMMEND King Arthur Measure For Measure Baking Flour with xanthan gum because it gets nice and golden on top and has the best texture inside. I have also tried it with Bob’s Red Mill 1-to-1 gluten free baking flour with decent results, though the Bob’s Red Mill blend usually doesn’t get quite as crisp or “done” as the King Arthur Blend, and some readers report their focaccia stays wet or gummy in the center when they use the Bob’s Red Mill blend.
- Baking Powder & Salt. Using baking powder with the yeast gives this focaccia a little extra lift and really improves the texture. Then, salt comes in to make the flavor amazing!
- Warm Water. Ideally, the water will be between 120-130 degrees to help activate the yeast. I recommend an instant read thermometer for best results, but you can use the touch test, too. If the water is too warm to comfortably keep your finger in it for a few seconds, it’s too hot!
- Honey or Sugar. Adding a little honey or sugar not only helps with the flavor of this bread, but it also helps activate the yeast. Don’t skip it!
- Active Dry Yeast. We’ve made this with instant yeast and regular yeast. Instant yeast will bloom and rise faster (great when you’re short on time!), and regular dry yeast works well, too.
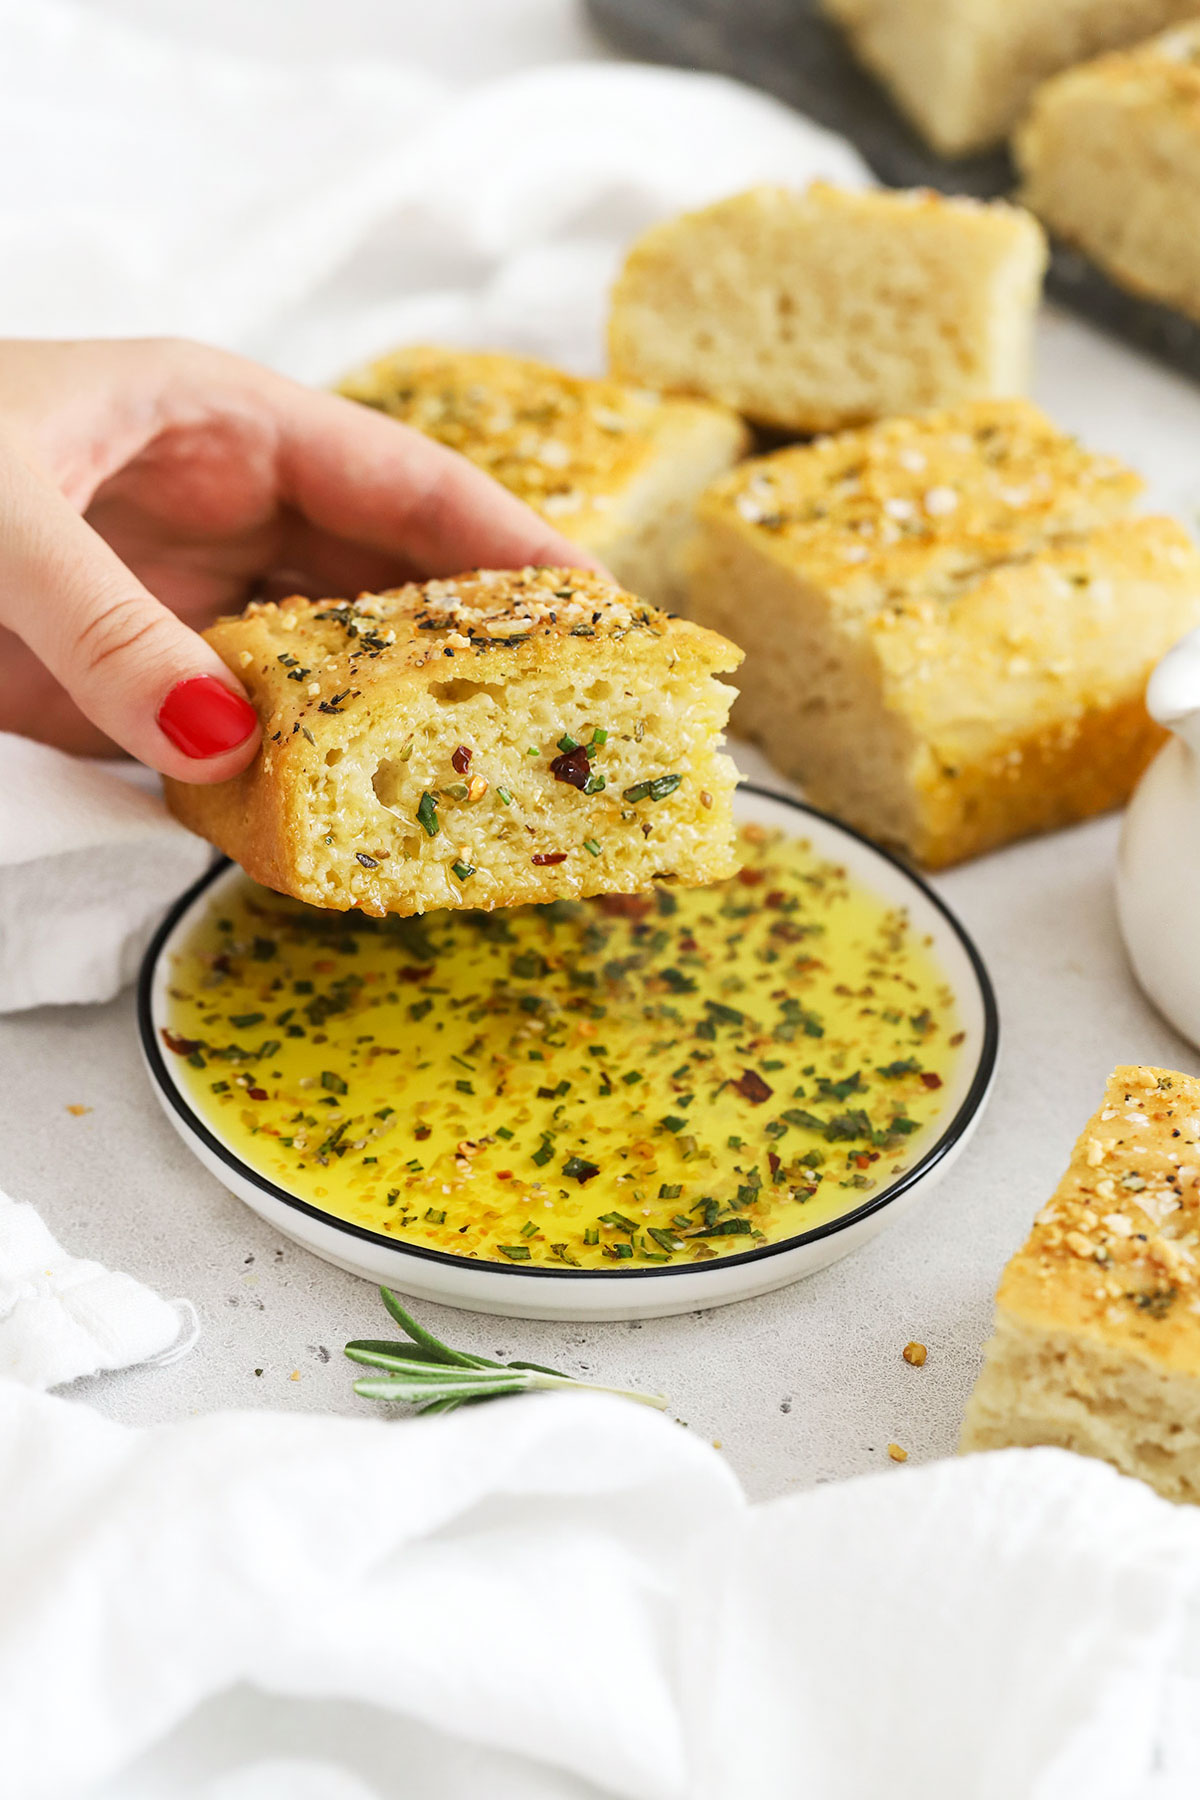
- Olive Oil. You’ll need plenty of extra virgin olive oil for this focaccia recipe! You’ll use some in the dough, some on the pan, some on top, and some to dip!
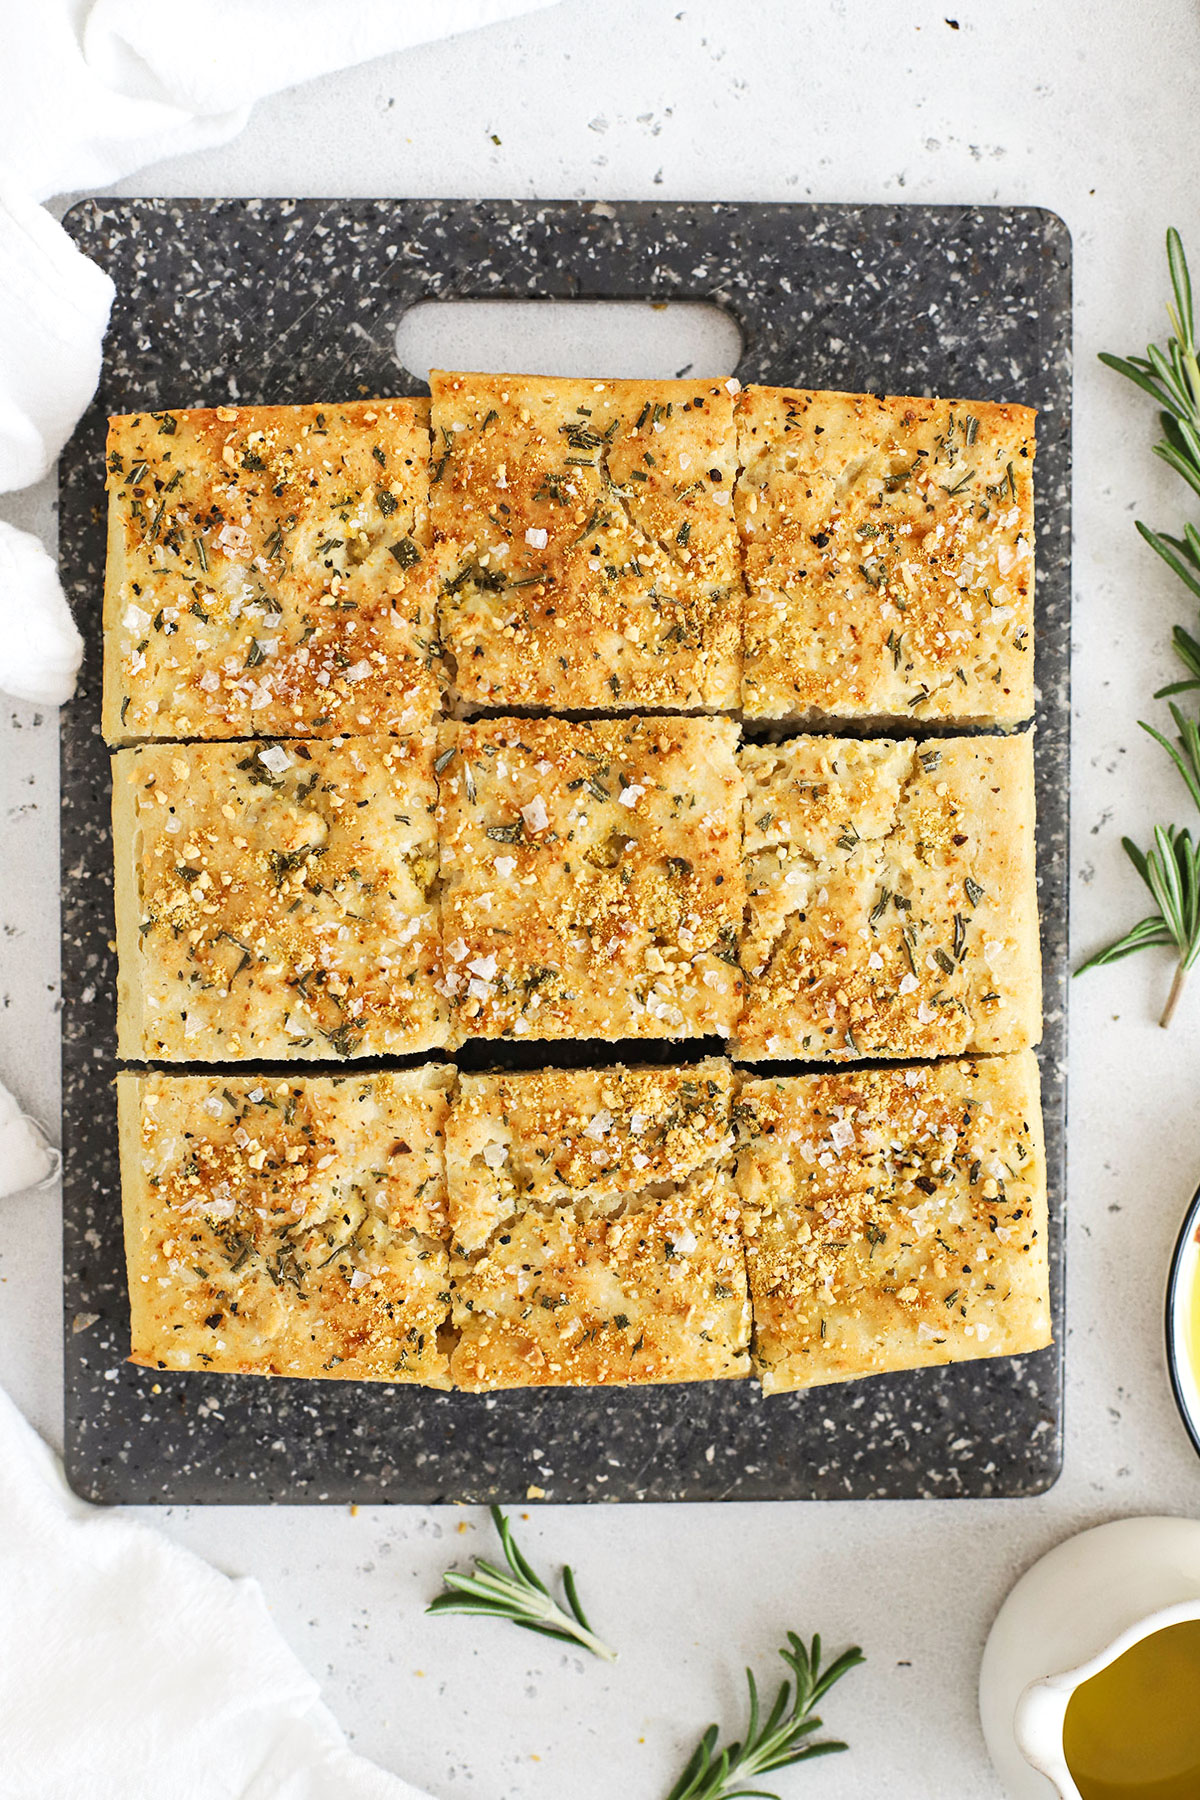
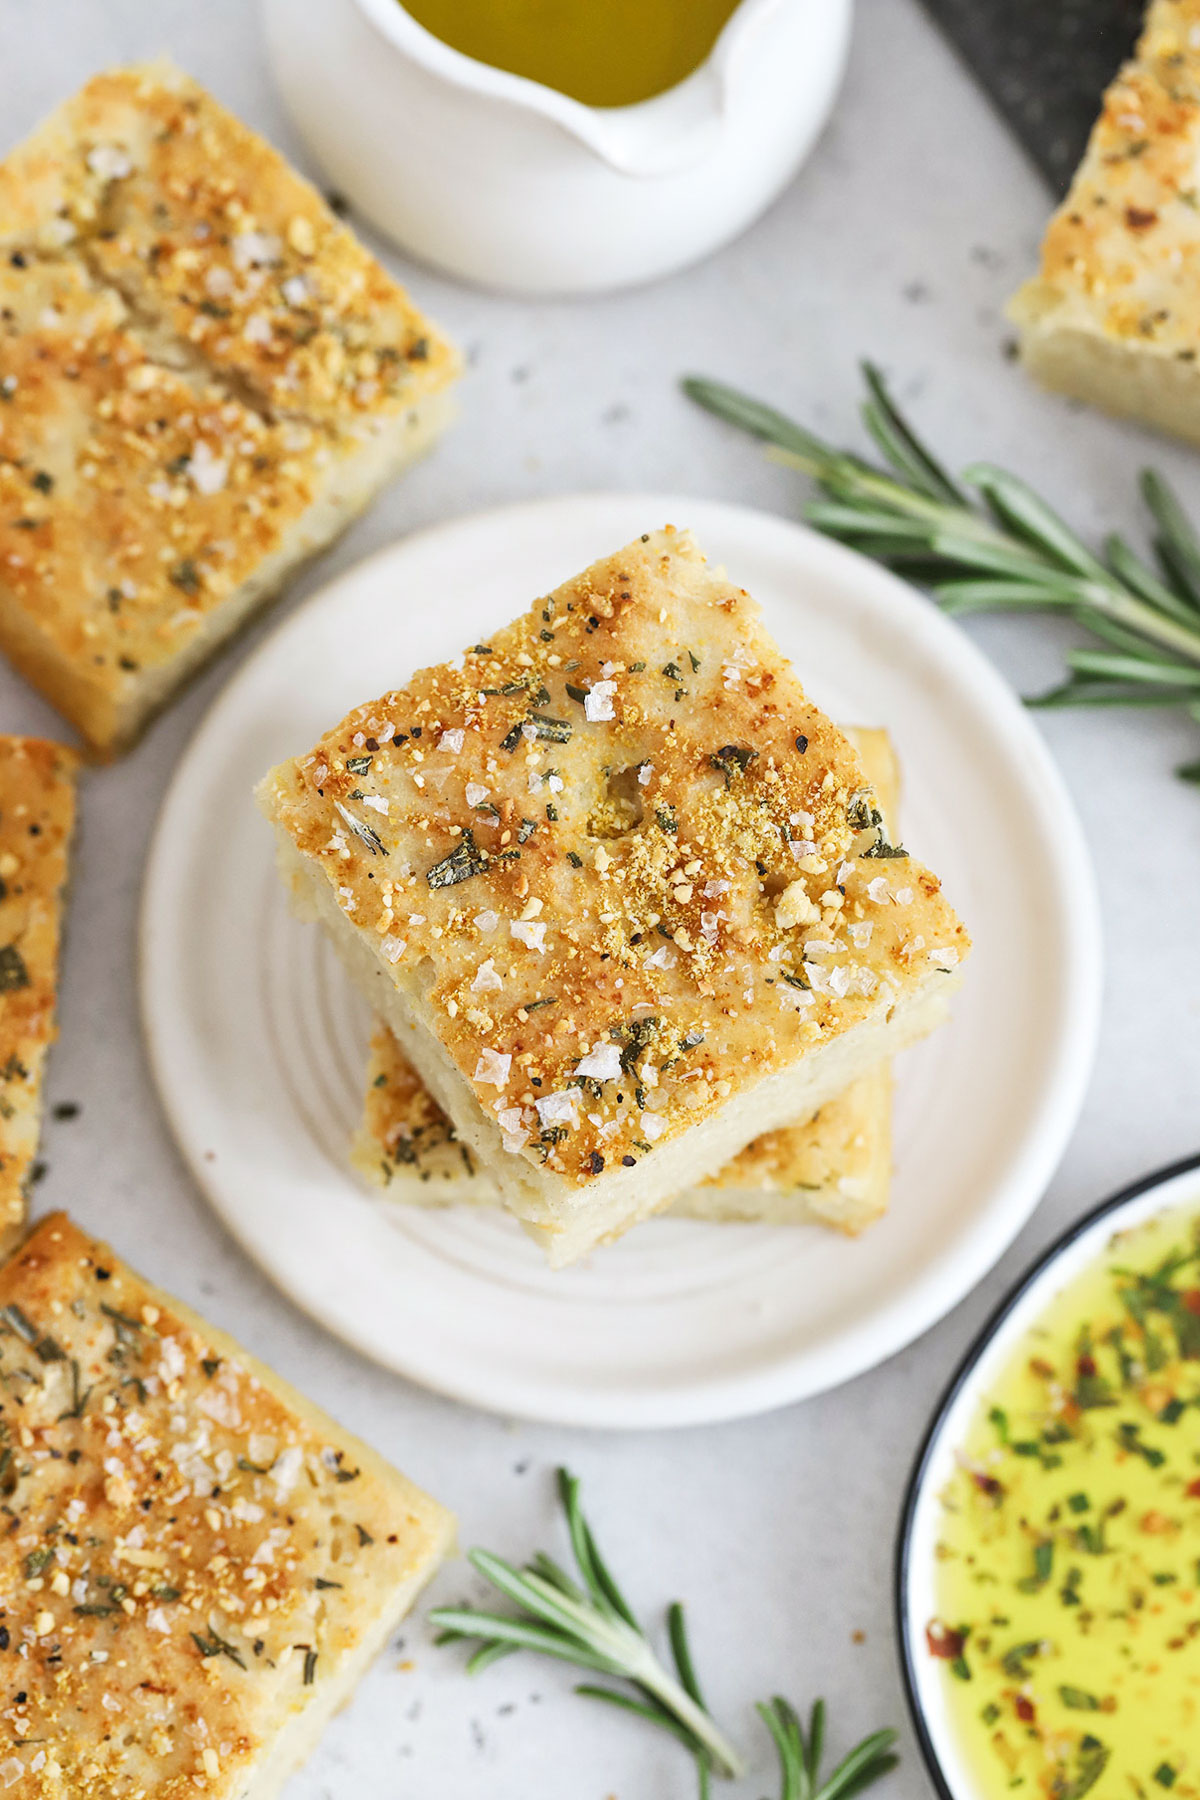
- A Few Toppings. Then, you’ll top the focaccia with a few little extras before baking. I like a mix of fresh rosemary, parmesan cheese (or vegan parmesan cheese), flaky salt, and black pepper.
How To Make Gluten-Free Focaccia Step By Step
As always, you can find the full recipe, with ingredient amounts, detailed instructions, and tips in the recipe card below!
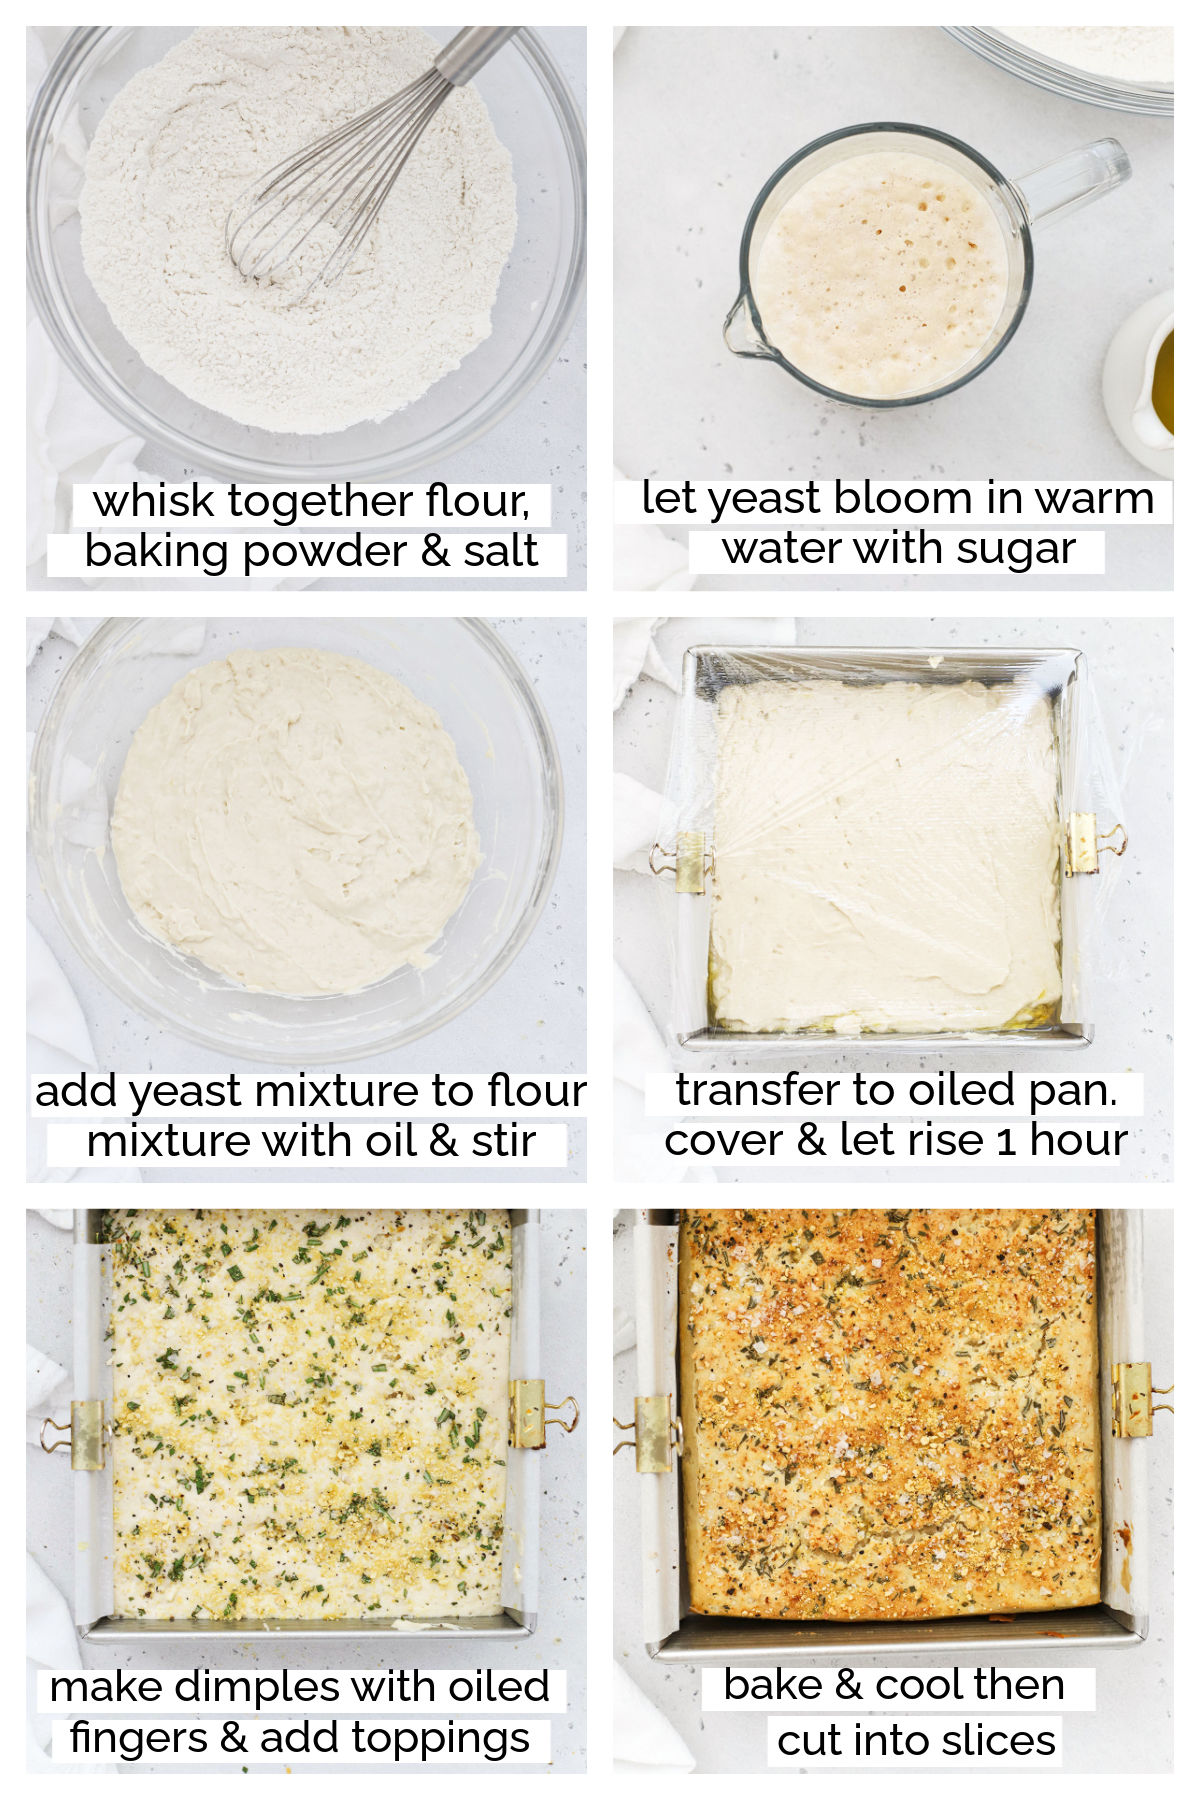
- Combine Dry Ingredients. In a large mixing bowl, whisk together flour, salt, and baking powder. Set aside.
- Warm The Water. Warm your water in the microwave or on the stovetop until it’s warm but not hot. (Ideally, the temperature should be between 120-130 degrees F, but you can use the touch test to tell if it’s ok. If the water is too warm to put your finger in comfortably for several seconds, it’s too hot)
- Bloom The Yeast. Add yeast and honey or sugar to the warm water. Stir to combine, then let it bloom by setting it aside to rest for for 3-5 minutes. (It’ll start to look foamy on top)
- Combine Wet Ingredients & Dry Ingredients. Pour 2 Tablespoons olive oil and the the water/yeast mixture over the flour mixture and stir to combine. Note that the dough will actually be more like batter than dough. You will not knead it.
- Transfer To The Pan. Line an 8×8 or 9×9 metal baking pan with parchment paper. Drizzle 2-3 Tablespoons of olive oil onto the parchment. Gently transfer the focaccia dough to the prepared pan and pat it out or spread it with a spatula. (I usually find it easiest to dip my fingertips into the oil and pat it out by hand). Drizzle the top of the dough with 1 more Tablespoon of olive oil.
- Let The Dough Rise. Cover the pan with plastic wrap or a clean dish towel and set it to rise in a warm place for at least 30 minutes if using rapid rise yeast and about an hour if you use regular yeast. The batter/dough will be roughly double in size.
- Preheat The Oven. During the last 20 minutes of the rise time, preheat the oven to 400 degrees F.
- Dimple The Dough. Coat your fingertips with olive oil and use greased fingers to poke several holes in the dough to form the characteristic “dimples” of focaccia. I find this easiest if I drizzle the surface of the dough with a little olive oil first, then use my fingertips to gently spread the oil before making the dimples. (Try not to smash the dough down)
- Add Toppings. Sprinkle the surface of the dough with fresh rosemary, parmesan or vegan parmesan (if using), coarse sea salt and pepper.
- Bake at 400 degrees 25-30 minutes, or until golden brown. Remove from oven and let cool at least 10-12 minutes before slicing and eating. Store leftover focaccia in an airtight container at room temperature 2-3 days, or store in the freezer and freeze up to 2 months.
ANOTHER OPTION FOR SHAPING: We used to make this rosemary focaccia free-form, by letting the dough rise in a bowl, then pouring it out onto a parchment lined baking sheet on top of 2 Tablespoons of olive oil. I’d shape the dough into roughly an 8×10 shape, then top and bake as directed. This will give you a more organic look, but the focaccia will be much thinner. In the last few years, I’ve exclusively made it in a square pan for a higher rise.
A Few Tips To get This Recipe Just Right
Use Fresh Ingredients
It might seem silly, but it’s important to know you’re using fresh ingredients. If you’re using old baking powder or old yeast, this bread WILL NOT rise no matter what you do. Use this quick test to check your baking powder to see if it’s still active, and watch for the foaming, bubbling reaction in the recipe instructions to make sure your yeast is still active.
Know How To Handle The Dough
If you’ve ever baked with wheat-based flours (white all-purpose, wheat, bread flour, etc.) you’ll be able to tell right away that gluten-free focaccia “dough” is really more like batter. It’s not pliable (there are no gluten or wheat proteins to give it that structure!), and you won’t knead it–you can’t! It’ll be a rather sticky, wet batter instead of a cohesive, stretchy dough. Don’t panic, and DON’T add extra flour!
Use Parchment On Your Pan
Your gluten-free focaccia batter will be sticky, and it can stick to the baking sheet if you don’t prep it. A surefire way to keep your dough from sticking to the pan is to use parchment paper, then drizzle the olive oil on top of it, as directed. I highly recommend you don’t skip the parchment. If you don’t like using parchment paper, at least use a reusable silicone baking mat to help prevent sticking.
Don’t Skimp On Olive Oil. Seriously.
Don’t do it! I know it’ll feel like a lot (especially on the baking pan), but I promise the olive oil is essential for the texture of the interior and exterior of gluten-free focaccia bread. Olive oil helps give that gorgeous crispy crust on the exterior and keeps things light on the interior. I promise your results will not be as good if you try to skimp on the olive oil. It’ll be more dry and spongy. And it won’t get the same gorgeous color. Trust me!
FAQ + More Ideas For This Gluten-Free Focaccia
HOW TO SERVE FOCACCIA – I’ve got to say it: my favorite way is when it’s burn-your-mouth hot from the oven. But. After it’s had enough time to actually cool down somewhat, my favorite way to enjoy gluten-free focaccia is dipped in olive oil. We love to make a seasoned dipping oil to serve with it! (It’s also great with marinara sauce!)
HOW TO STORE FOCACCIA – Like most gluten free baked goods, this gluten-free focaccia bread is best enjoyed in 1-2 days. I store mine wrapped tightly or in an airtight bag with extra air pressed out in the refrigerator, then heat it up in the oven (you can use the microwave or a toaster oven) before serving again.
MORE FOCACCIA TOPPINGS TO TRY. Part of what’s so fun about making this focaccia is choosing the toppings! Since this recipe was originally published in 2019, I’ve had dozens and dozens of readers send me their focaccia photos! Play around with the toppings! Readers have tried:
- Sun-Dried Tomatoes
- Caramelized Onions
- Roasted Garlic
- Olives – black, green, Kalamata, Castelvetrano, etc.
- Edible Flowers
- Fresh Herbs – sage, basil, rosemary, dill, parsley, thyme, etc.
- Dried Herbs & Spices – dried oregano, Italian seasoning, dried basil, red pepper flakes, etc.
- Different cheeses – asiago, parmesan, aged white cheddar, and more!


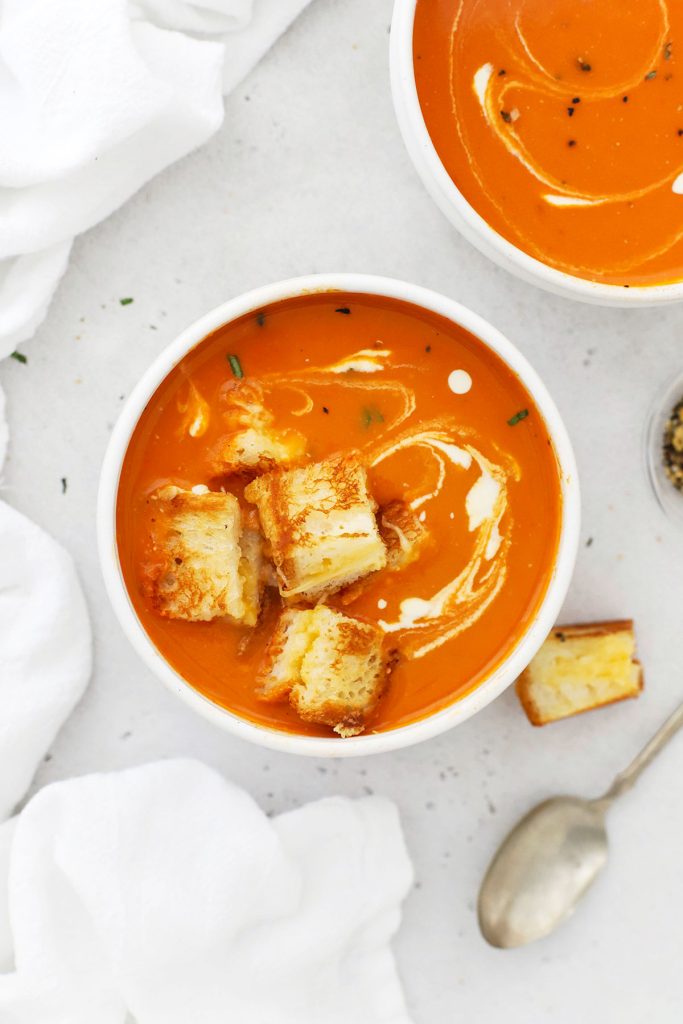

Or, try it with: Autumn Squash Soup, Gluten-Free Caesar Salad, or Italian Chopped Salad!
Did You Make This Recipe?
Tell me all about it! Leave a star rating below when you try our Gluten-Free Focaccia recipe. I can’t wait to hear how it goes!

Gluten-Free Focaccia with Rosemary
Ingredients
For Gluten Free Focaccia:
- 2 1/2 cups 300 grams gluten free 1:1 flour (I highly recommend King Arthur Flour Measure-for Measure flour)*
- 2 teaspoons baking powder
- 1 1/2 cups warm water ideally 120-130 degrees F.
- 1 1/4 oz. package instant or rapid rise yeast (2 1/4 teaspoons)
- 1 Tablespoon sugar honey, or agave
- 1 teaspoon kosher salt
- 4 Tablespoons olive oil divided
For Topping:
- 1 Tablespoon fresh rosemary
- 1-2 Tablespoons vegan parmesan or Parmesan cheese
- 1/2 teaspoon flaky sea salt like Maldon
- 1/4 teaspoon black pepper
Instructions
- Combine Dry Ingredients. In a large mixing bowl, whisk together flour, salt, and baking powder. Set aside.
- Warm The Water. Warm your water in the microwave or on the stovetop until it’s warm but not hot. (Ideally, the temperature should be between 120-130 degrees F, but you can use the touch test to tell if it’s ok. If the water is too warm to put your finger in comfortably for several seconds, it’s too hot)
- Bloom The Yeast. Add yeast and honey or sugar to the warm water. Stir to combine, then let it bloom by setting it aside to rest for for 3-5 minutes. (It’ll start to look foamy on top)
- Combine Wet Ingredients & Dry Ingredients. Pour 2 Tablespoons olive oil and the the water/yeast mixture over the flour mixture and stir to combine. Note that the dough will actually be more like batter than dough. You will not knead it.
- Transfer To The Pan. Line an 8×8 or 9×9 metal baking pan with parchment paper. Drizzle 2-3 Tablespoons of olive oil onto the parchment. Gently transfer the focaccia dough to the pan and pat it out or spread it with a spatula. (I usually find it easiest to dip my fingertips into the oil and pat it out by hand). Drizzle the top of the dough with 1 more Tablespoon of olive oil.
- Let The Dough Rise. Cover the pan with plastic wrap or a clean dish towel and set it to rise in a warm place for at least 30 minutes if using rapid rise yeast and about an hour if you use regular yeast. The batter/dough will be roughly double in size.
- Preheat The Oven. During the last 20 minutes of the rise time, preheat the oven to 400 degrees F.
- Dimple The Dough. Coat your fingertips with olive oil and use greased fingers to poke several holes in the dough to form the characteristic “dimples” of focaccia. I find this easiest if I drizzle the surface of the dough with a little olive oil first, then use my fingertips to gently spread the oil before making the dimples. (Try not to smash the dough down)
- Add Toppings. Sprinkle the surface of the dough with fresh rosemary, parmesan or vegan parmesan (if using), coarse sea salt and pepper.
- Bake at 400 degrees 25-30 minutes, or until golden brown. Remove from oven and let cool at least 10-12 minutes before slicing and eating. Store leftover focaccia in an airtight container at room temperature 2-3 days, or store in the freezer and freeze up to 2 months.
- Our original instructions called for making this focaccia free-form on a baking sheet. This produces a more organic shape, but a thinner dough. If you prefer to follow the old instructions, mix up the dough as directed, but let the dough rise in the mixing bowl covered with plastic wrap. Pour 2 Tablespoons of olive oil on a baking sheet lined with parchment and shape the dough into an 8×10 rectangle. Top & bake the bread as directed.
Notes
- CHOOSE THE RIGHT FLOUR. I *highly* recommend King Arthur Flour Measure-for-Measure flour for this recipe. Bob’s Red Mill 1:1 flour is my other favorite, but will not get as light, as browned, or as “done” in the center as King Arthur Flour. Some readers report their focaccia stays wet or gummy in the center with Bob’s.
- FOR A YUMMY DIPPING SAUCE: Pour 1/3 cup olive oil over granulated garlic, coarse salt, pepper, red pepper flakes, and rosemary, oregano, and/or basil. I usually use 1/4 tsp dried flaked garlic, 1/2 tsp fresh rosemary, 1/4 tsp oregano, 1/4 tsp coarse salt, 1/4 tsp pepper, and 1/4 tsp red pepper flakes
Video
Nutrition
Nutrition facts are an estimate only and will vary based on brands and amounts used.
Originally posted June 2019. Fully updated with video, photos, and updated instructions Aug 2023.
My go to….all my Gluten eating friends want the recipe!!
I’ve only been able to replicate this once. Every other time I’ve made it the dough was too thick. The one time I made it it was really good though.
Idk if you have a recommendation of how to thin the batter out a bit.
Hi, Crystal! I’m so sorry you’re running into trouble. A few things to check: 1. Are you using King Arthur Measure-For-Measure flour or another brand? 2. Are you weighing the flour? It’s the surest way to get an accurate measurement. If you don’t have a scale, are you using the scoop and level method to spoon flour into the measuring cup, or are you scooping WITH the measuring cup? If you use the measuring cup to scoop, you may accidentally be adding too much flour. 3. Are you by chance at high elevation?
Made this recipe with Caputo fioreglut , absolutely the best. Also made with Robin Hood gluten free not as soft but good also had to add more liquid tho.
I’ve made this recipe several times and it’s perfection!! I use it with a copycat carabbas copycat dipping seasoning. I always make it as written. Thank you!
YUM! I’m so glad you love it! (I LOVE that dipping seasoning!)
This gluten-free focaccia recipe turned out perfectly. I made a few small tweaks and it was a total hit with my family, they seriously cannot stop eating it!
I used half Caputo gluten-free flour and half Bob’s Red Mill gluten-free flour, and I also added one teaspoon of apple cider vinegar. The texture was incredible, soft and fluffy on the inside with a beautiful crust, and the rosemary flavor was spot on.
Honestly, if you didn’t know it was gluten-free, you would never guess. This bread disappeared almost immediately and everyone went back for seconds (and thirds).
Thank you ever so much for sharing this recipe. It was an absolute success and will be on repeat in our house. Highly recommend!
I have made this single batch. I have made it double batch. And I have made it for deep dish pizza crust. I weight my flours (I split the weight of bobs red mill 1-1 and caputo gf) it works every time. Every single time. Thank you! It’s a favorite recipe for my household now.
YUUUUM! I’m so glad it’s such a win for you!
Followed the recipe exactly and it was amazing! My husband is wheat, corn, and sesame allergic and hasn’t had fresh bread in over 6 years. He cried. Thank you!!!!
Sammy, you MADE MY DAY with this review!!! I’m so, so glad your husband loved it. THANK YOU for taking the time to share!
I was skeptical to make this bread. A gluten free bread with high ratings, but no stand mixer required? No psyllium husk or a hundred steps to mimic gluten? Commence the cautious side eye.
It was delicious though. Not as pretty or delicate as a traditional focaccia, but alas is any gluten free alternative ever a perfect replication?
I made it twice actually, because the first time was so good. The second time, I added apple cider vinegar to give it a more open crumb and added a brush of egg wash on top to make it brown a little more near the end.
This is a great recipe that also happens to be easy and straightforward. Thanks for sharing!
Hi! I am planning on making this and was wondering if I could do an overnight rise in the fridge? I am also making focaccia with regular flour and was wondering if I can do them on the same timeline (at least 12 hours rise) or if I ought to just make and bake this the day of?
Thank you!
Alicia
Hi Alicia! Gluten-free bread baking is pretty significantly different than traditional, and it’s pretty different than making traditional focaccia. Unless you are a very experienced gluten-free bread baker, I wouldn’t recommend making any changes to the recipe to avoid disappointing results.
The best and most simple GF focaccia recipe! Tried and true. Thank you! I’ve made it so many times and it keeps getting better! I use Pamela’s all purpose GF flour. Sometimes I look at the crumb and texture and I can’t believe it’s GF and I baked it myself! Been GF for 10+ years.
I’ve made this recipe twice without success but not total failure. The inside texture is not as light as focaccia and the flavor is okay but not delicious. I’ve followed the recipe and ingredient recommendations – the only ingredients I’ve used that weren’t specified are Fleischmann’s Rapid Rise Instant Yeast fast acting and Graza “sizzle” olive oil. Could either of these ingredients be the reason I’m not getting desired outcome??
One thing I noticed during the yeast blooming stage is my water/yeast combo did get foamy but it never looked like the photo. On my second attempt, I even let it bloom for 15 minutes.
Hi Mary! I typically use SAF brand Instant Yeast, so there is a chance that while yours foams, it won’t look precisely like mine. You can double-check your water temperature with a thermometer if you have one to make sure it’s not too warm, which can impact the activity.
I think the olive oil should work just fine, but if you want more flavor, you can absolutely include more herbs, increase the salt, etc. to suit your tastes!
Thank you so much for this recipe!!! It is absolutely fantastic and disappears quickly in my house. We have even used it as pizza crust in a 12” round pan and we won’t be using any other crust from now on. Perfect deep dish style pizza. Delicious!!!
I only have available to me the Active Dry gf Yeast (both Red Star and Bob’s). How much do I use and will it work similarly?
I made a different version using the KA Measure for Measure flour w/o yeast but with baking powder and it came out hard chewy and not browning. I followed their recipe but no good.
I haven’t found a recipe that comes out as shown, and have tried several.
Hi! You can make it with active dry yeast, I just find it can be finicky to work with for some people. Follow the same instructions here, just plan on it taking closer to 1 hour for the dough to fully rise.
This recipe is a winner! super soft and delicious! some ideas….could use this as bread for a sandwich or make it sweet and drizzle chocolate. I used dairy free Cup4Cup and it turned out great. highly recommend!
I really don’t like the thickening agents in this flour, but what’s my choice?
I can’t believe this is gluten free! This really is the closest thing to regular, glutinous bread that I’ve found, and it was so easy! Thanks for my new favorite recipe!
Thank you so much for this kind, thoughtful review! I’m so happy to hear it was a win for you, Elissa!!!
Made this tonight for my dad’s birthday. Never made focaccia bread before and I’m so glad I found this recipe! It turned out absolutely delicious. Will definitely be making this again. M
I’m so glad it was a win for your dad’s birthday!
I’m hoping to make this as a base for pizza; how would the baking time change so as to not overbake the bread?
It will depend on what size pan you’re using! I usually switch to a 9×13 if I’m making it as pizza so it’s not quite as thick. The bake time will be similar. I par bake the dough without any toppings for 12-15 minutes, add sauce & toppings, then bake another 12-15 minutes or so.
Question: I see you mention right off the bat that you recommend King Arthur Measure for Measure, I guess I was wondering why you suggest that when they also have an actual bread flour (King Arthur Gluten Free Bread Flour).
I use Bob’s Red Mill and they seem to be MUCH stricter as to what they offer vs what they offer and what it’s for and you can’t interchange regular 1v1 GF flour for like cookies and cakes and use it for bread.
As far as I thought, King Arthur Measure for Measure was for cookies, cakes, muffins, etc.
Anyway, I was just wondering. I tend to be neurotic when it comes to making something I never have and want to make sure I get the right things lol.
Thank you Emily,
Kristi
Hi Kristi!
The first reason is this recipe was developed before King Arthur released their bread flour blend, so it was specifically developed for the balance of proteins & starches in a 1:1 gluten-free flour blend, as opposed to the King Arthur Gluten-Free Bread Flour, which behaves MUCH differently.
Second, the bread flour is a GREAT option for other recipes (we love it in gluten-free Cinnamon Rolls, for instance), but because the bread flour is made with a blend that includes a gluten-free wheat starch, the actual chemistry of working with that blend is very different. I’m sure it would make a GREAT focaccia, but it would require some adjusting since this recipe is made for 1:1 flour blends. (You can find more info about working with their bread flour on the King Arthur site, if you want to experiment.)
Hope that helps clear things up!
Those of us with wheat allergies definitely appreciate that this recipe does NOT use the gluten free bread flour as that contains wheat.
Made this yesterday and enjoyed it. The crust was terrific – very crusty! The interior had great bubbles, but even after baking it for 45 minutes, rather than 30, the interior was just this side of being too moist. I know that will help it last longer, but I wondered if using say 1 1/4 cup of water, or even 1 cup would affect the rise. I’ll try that myself, once i restock my KA measure for measure flour. I make a lot of the Smitten Kitchen Focaccia, which uses 2 cup water for 4 cups of flour, although i don’t always add all the water. There’s some fermentation science that I should know – but might less water make this loaf even better? THX
Hi, Holly! This is exactly how I like it, but you are welcome to play with the recipe to see if you can get proportions that work better for you! Gluten-free 1:1 flour absorbs between 10-15% more liquid from a recipe than white flour does, so the ratios for gluten-free bakes are often a bit different than for a traditional wheat flour recipe.
Just wanted to say “Thank you!” for a great recipe. I made this tonight for me and the wife to pair with our TJs GF raviolis. So good! I topped the focaccia with some sliced olives to go along with the salt, rosemary, Parmesan and fresh ground pepper. This recipe is a keeper!
Yum! I bet it was GREAT with the olives! So glad you enjoyed it.
I love this recipe. I make sure to have fresh yeast since it make a huge difference in how lofty it gets! We’ve started making it in a bigger pan (9×13) and using it as the base for pizza. We use Caputo GF flour for this recipe and even the non GF members of the family love it!
Yum!
Good flavor, but the bread was a bit dry.
May try adding more olive oil to the dough.
Amazing!!! While I’ve been conscious of how much gluten and dairy I consume for a while now, I recently went strictly gluten & dairy free. I tried this recipe and it was absolutely delicious! I weighed out the flour and used the brand you suggested. When a recipe calls for yeast, I normally don’t even consider making it, as I’m so leery of not getting the water temperature right and completely messing up the recipe. But I decided to be brave and it was well worth it. I will definitely be making this frequently! Thanks for such great recipes!
I’m SO GLAD it was a win for you Lynn!!! Thank you SO much for taking the time to leave this review!
Made this for the first time today. The batter did not rise as much as I hoped but I also don’t think I had it in a warm enough place since my oven was being used.
After taking it out, I felt it tasted dry. I added more oil and salt to the top and popped it back in the oven for 5 minutes. I would make this again but would add more oil.
Sounds like a great plan for next time to get it just where you want it! A few things to check, too:
1. Make sure you weigh the flour or use the scoop and level method to spoon flour into the measuring cup rather than scooping WITH the measuring cup, which packs extra flour into the measuring cup. Adding even a little extra flour can make your bread dry or gummy.
2. Are you at high altitude? This can impact the rise & moisture of your bakes. I find these tips from King Arthur are helpful when adjusting recipes for high altitude!
And lastly, did you use the recommended flour or another brand? I find results can vary if you use another brand of flour!
This was my very first Gluten free Focaccia attempt. I Read all the reviews/ tips before starting and Followed the recipe exactly as it is written, however I had the same issue as few others. The “dough” was not a batter consistency at all but much more thick and it did not rise as regular Focaccia does. With that said the recipe still yielded a crisp delicious “flat-bread” that filled my house with a wonderful aroma while baking! I will definitely try this recipe again and even if I get the same results it is well worth the time! Thank you for sharing!
Hi Jessica! So glad you enjoyed the bread. I have a few questions for you if you have time:
1. Which flour blend did you use?
2. Did you weigh your flour? If not, did you use scoop the flour with your measuring cups or spoon the flour into the measuring cups?
3. Are you by chance at high altitude?
I’d love to know why this happens!
hello can I make the dough a day ahead of time and bake the next day? would much rather eat this fresh out of the oven but won’t have time to make the dough on thanksgiving
Hi Emily! I don’t recommend making the dough in advance. It *does* reheat really well once baked, so you can pop it back in the oven (in the pan!) for 5-10 minutes right before eating!
Used gluten free flour for the first time today and made this recipe. OMG- so, so good. The recipe I found on Pinterest said to use King Arthur’s flour but researched the best GF flours and saw Pamela’s or Cup4Cup. Found Pamela’s at my local Kroger and went for it. Served tonight and my son said it was the best focaccia he ever had. We discussed the things that could be done with the dough throughout the meal. Will definitely be trying more recipes from this site.
I’m SO glad it was a win for you Jayne!
I have made this recipe 3 times now. First time was a complete success and everyone loved it. Second and Third times, not so much. I am not getting a batter like consistency as mentioned; mine was very thick, almost like I didn’t use enough water, but I did. My yeast is not blooming like your picture; I am using fresh yeast, rapid raise.
Any suggestions would be greatly appreciated
Hi, Tracey! I’m sorry you’re running into trouble. I’d LOVE to help!
A few things to check:
1. Measuring The Flour Ideally, you want to weigh it, but if you don’t have a scale, you’ll want to use the scoop and level method, where you spoon flour into the measuring cup and level it off, rather than scooping WITH the measuring cup. Using the measuring cup to scoop can pack extra flour into the measuring cup which can throw off the dough’s texture.
2. Water Temperature. If the water is too hot, it can kill the yeast. If it’s too cold, it can prevent the yeast from activating properly. An instant read thermometer can help you get the temperature just right.
3. Brand of Flour. Which brand of flour are you using? We love and recommend King Arthur Measure-For-Measure gluten-free flour. Other brands can weigh more or behave slightly differently depending on the blend of flours used in their mix.
4. Yeast. You mentioned you’re using rapid rise yeast that’s fresh. Great! Rapid rise yeast, sometimes blooms differently than dry active yeast. Is the bread rising at all? If yes, then you’re probably just fine, even if it doesn’t bubble and bloom like my photo. If not, then there’s likely an issue with the yeast–either it’s being killed by the water being too hot, not activating because the water is too cold, or not blooming because it’s not as fresh as it seems.
5. Altitude. Are you at high altitude? High altitude changes the chemistry of baking, so it can have a significant impact on the rise & bake of your baked goods. I find these tips from King Arthur to be super helpful!
I ABSOLUTELY LOVE THIS RECIPE!!! I WOULD RATE IT 1000 STARS IF I HAD ENOUGH STARS!!!!
This is easy to make and tastes like focaccia. have shared with friends who have also loved it.
So glad it was a win for you!!!
This was an AMAZING recipe!! I cooked it 375 for an extra 15 minutes to cook at the same temp as my lasagna. Everyone gave it rave reviews – and I was the only GF person. I also used the oil olive dipping sauce, which was also phenomenal!
This review!!!! You completely made my day Karissa!
I’m not sure what I did wrong but mine was SUPER runny batter. Should I use less than 1.5 cups of water?
Hi Allie! I’d love to help, but I need more information. Here are a few things to check:
1. Flour – What brand of flour did you use? How did you measure the flour? Did you weight it? We highly recommend a kitchen scale when possible so you get an accurate results, and we recommend using the scoop and level method if you don’t have a kitchen scale.
2. Water – Did you use a liquid measuring cup for your water? And you’re sure you measured accurately? Did you check the water temperature? If it was too hot, it can make the batter seem thinner than it is (and it can also kill the yeast).
3. Altitude Are you baking at high altitude? This can impact your bakes. These tips from King Arthur can help!
This was my second time making gluten-free bread and the recipe was SO easy to follow and the instructions were very clear. It came out perfectly and is the best gluten-free bread I have tried to date! Thank you, I will 100% make this again.
I am SO GLAD TO HEAR THAT!!! My goal was that it would be really easy to make and follow the directions. I’m SO glad you loved it!
This recipie is AMAZING. I turned this bread into a pizza and it was so thick and fluffy. It tasted like a true deep dish pizza! Make this bread either as a focaccia or as a pizza and you will be so impressed. Thank you for this magic recipie!
YAY! I’m so glad you loved it!!!
Just made this bread, I used a 8×8 glass pan at 375 for 10 minutes longer because I didn’t have a metal pan. I turned it into a pizza with the toppings going on halfway through the cooking and it was AMAZING. This recipie is magic. Make this today!
Amazing recipe! impressed my italian wife and her family!
I’m so glad!!! You totally made my day with this review!
1. I need to make 8 of these at once/ same time frame. If I top with sundried tomato, basil & Parm (along with oil, spices) – can I freeze these ahead of time and thaw on the day of pick up? OR – would you suggest freezing the bread, thawing the day of pick up and topping/baking just to melt/incorporate toppings?
2. I’m making 9×13 size pans. Would I just double this recipe for that?
EEK ! I’m so excited to try your recipe. Thank you for your tips.
Hi Mary! A few things to help you:
1. I recommend making a test batch as written once before changing it up, so you feel confident in the recipe before switching up the toppings, doubling the recipe etc. Be sure to weigh the flour (or use the scoop and level method) so you measure everything just right and don’t pack in extra flour. We highly recommend King Arthur Measure for Measure flour when possible.
2. If you’re making 9×13 pans, you would double the recipe. Measuring properly is extra important with a doubled recipe!
3. When it comes to toppings, keep in mind that anything wet (fresh onions, tomatoes in oil, etc.) will add additional moisture to the recipe and can impact the rise and texture of the bread.
4. I freeze this all the time, and usually freeze it with toppings on. If you store it carefully, it’ll work just great as far as the toppings staying on. As always, the bread will be best fresh, but you can absolutely thaw it the day of. (Any fresh ingredients on top will soften after thawing, so keep that in mind as well.) If I’m going to serve it after freezing, I love to warm it in the oven for a few minutes to crisp it back up.
I am cheering you on!
Hi Emily, thank you for getting back to me! I don’t see the video anymore on the blog, maybe it’s my settings! I appreciate you linking the new video. I used the KA Measure-To-Measure flour. For the flour, I used measuring cups and spooned the flour into the measuring cup. I might have not put enough water in the water/yeast mixture. I am going to make it again today!
Cheering you on and hoping you LOVE it!
Hello Emily,
It must have been because I used active dry yeast instead of instance/rapid rise yeast. Using active dry yeast did not give me a crumb that was expanded or delicate. I will try instant/rapid rise yeast next time. Thank you!
I followed this recipe just now, but my “batter” was not very wet. It was more like biscuit dough? I had to add a few more tablespoons warm water to get it wet and cohesive. Fingers crossed. It seems like the dry to wet ratio is a little wonky? I’d reeeeally want to see an updated video that uses this new recipe.
Hey, Christian! The video should start playing automatically in the blog post. If, for some reason, you can’t see it in the blog post, here’s the link to it on YouTube.
A few things to check:
1. What flour blend did you use?
2. Did you weigh it or measure by volume (cups)? If you used cups, did you use the scoop and level method (spooning the flour into the measuring cup and leveling it off), or did you use the measuring cup to scoop? If you used the measuring cup, you almost certainly packed extra flour into the measuring cups, which can impact the ratio of wet:dry ingredients.
I made it but don’t know how I feel about it?
I use an oven thermometer, 8in pan at 400F but my bread finished at around 15-20mins. I’m not sure what it’s suppose to taste like but it wasn’t very “yeasty” tasting?
Loved this recipe! So easy to make and so delicious! Thank you!
I haven’t made much gluten-free bread, but this was good. I think I’ll add more garlic and olive oil next time.
FIVE STARS FIVE STARS FIVE STARS!!! Follow the directions and this will make your day!
Great focaccia bread. Easy process as well. Question, how can you reheat the focaccia without it drying out? I love making extras but every time I try and reheat it in the oven, airfryer, or microwave it tastes dry and crumbly.
Ooh, great question. I haven’t really noticed this issue, but a couple things to check:
1. How are you storing it? An airtight container at room temperature works, but I often keep mine in the fridge or even freezer to keep it fresh.
2. What brand of flour are you using? Different brands can behave differently over time.
3. When re-heating, you can get a paper towel wet, wring out all the extra water and cover the focaccia loosely with the damp paper towel in the microwave, etc. It’ll help create a more humid environment!
I made the recipe as written, but even after baking it for about 15 minutes longer than was recommended, it was very doughy in the middle. The outside had a great crust, but very tacky and uncooked in the middle.
Hi, Ashley! I’m sorry you ran into trouble. A couple questions–what flour did you use? Did you weigh the flour, scoop it into the measuring cup with a spoon or use the scoop to scoop up the flour?
It sounds like you may have used too much flour (which can lead to a gummy bake)
Another thing to ask about would be altitude. If you’re at high altitude, that can impact the time & effectiveness of your bakes.
I’m going to make this next weekend. Will a round pan work?
You’d likely have to adjust the bake time, especially if your pan isn’t metal. But several folks have made it in round pans over the years!
Today is the first time I’ve ever made focaccia and WOW it is incredible!!! My husband and my kiddos LOVED it with dinner! Thank you for such an amazing recipe! KA measure for measure flour made the best crust ever! Going to practice with new toppings next time.
YAY! I’m so glad to hear that!
This was amazing! Recipe was easy to follow and didn’t require a lot of steps. Highly recommend.
Hooray! So glad you loved it!
Used Robin Hood flour ( with xanth gum)here in Canada, the weight of 2.5 cups flour was vastly different so I went with grams rather than cups, batter very wet but the finished result was great.
Hi
This looked so yummy that I had to try it! Trouble is the batter was more like a soup. The consistency definitely improved after rising but was still too thin for me to poke any dimples into.
I am in New Zealand and we don’t have King Arthur 1:1 blends so I used a Becky Excell gluten free blend that hasn’t let me down before. I used her Plain Flour blend… should I have used Self Raising as that has Xantham Gum added?
Any other thoughts/suggestions??
Hi, Adrienne! I’d definitely recommend a blend with xanthan gum for best results.
I am just making this now for the 1st time also in NZ using the free from flour which has xantham gum added already! fingers cross d it turns out.
Made this foccacia for a family member who is celiac and she said it was such a treat! I didn’t have 1:1 flour so had to add xantham gum to my GF flour. It turned out fantastic (not gummy) and was a great dipper for soup!
YAY! So glad it was a win for you!
Hi Emily Great recipe I used the King Arthur Flour GF Bread flour. It was great.
What size pan did you use for a single recipe?
thanks
Hi Denise! A square pan works best for a single batch, so an 8×8 or 9×9 pan!
Hi Emily- are there any specifications you can offer for high altitude? I’m in Colorado. The bread was still awesome- but want to make it even better if possible. Thanks!
Hi Riley! I have basically zero high altitude experience, but everyone I know who’s used these high altitude tips from King Arthur RAVES about them!
Excellent!
Made using Aldi plain g/f flour. Easy prep. Trying for my wife who is gluten intolerant. Looks great.
Love, love, love this recipe!!! I have made it three times in the last month.
I’m SO HAPPY to hear that! It’s my daughter’s absolute favorite. We LOVE it!
OMG thank you!!! This was amazing! Not dry or gritty, perfect texture and flavor!
My body just decided it wasn’t going to tolerate gluten and it’s been a sad existence until today!!!
This REVIEW!!!! I’m so glad you loved it Tawny. It’s my absolute favorite!
This is amazingly good! Who knew gluten free could taste so great?
Wow. I honestly haven’t been so happy since having to go gluten-free. This is the BEST bread I have tasted. It’s moist, not too oily, great flavour and crunch! Also, super affordable. I’ll be making this a staple and I’m excited to test different toppings 🙂 thank you!!!
Delicious! Like another reviewer I added some garlic powder and Italian seasoning in the flour mix. Focaccia was soft on the inside crispy on the top. Will definitely make again. Non gf friends who ate it said how delicious it was too.
I’ve made this 4 times this week. Once was spread out on the pan a little thin, baked for 15 minutes, pulled it out and tossed on pizza toppings, then baked another 10 minutes. Pizza Perfection!
Oh YUM!!! I’m so glad you loved it!
Hi! Has the video link been removed? Can you please repost it? Thanks!
Hi, Kate! Try refreshing your page. You may have accidentally closed the window. It’ll pop up and play right away (at the top of your screen on mobile, or it’ll follow you as you scroll on desktop.)
I haven’t made focaccia since going Gluten Free and I miss it. OMG this was so good. Yes it looks more like the consistency of brownie batter when you put it on the cookie sheet, but then it bakes up just like focaccia. I used Krusteaz 1 to 1 blend as that is my go to and it was great. I used fresh rosemary from my garden and used shredded Asiago instead of Parm and it was so yummy.
I’m so glad it worked well with Krusteaz! That’s great to know!
Loved it! Had trouble not eating JUST this for dinner!
That’s me EVERY time we make it!
I made this bread last night with Bob’s Red Mill 1-1 (the blue bag, not the red), and even though it came out a little gummy in the middle I would still say it was a hit!!! I think the key things that gave me a successful/edible bake with this flour blend was really mixing the dough for a good while when combining the wet ingredients and also doing a double rise like recommended in a few comments below. I let it rise for about an hour (used regular active dry yeast, not rapid rise) on top of my oven set to 300 degrees to give it a warm spot, then dumped it into my 12” cast iron skillet lined with parchment paper and gave it another hour. Believe it or not, it completely expanded to fill the whole skillet! It did take around 30-ish minutes longer to bake at 400 than the recommended time, but I think next time I might set my oven to 375 for a more even bake — the crust, while beautiful, definitely formed faster than the insides cooked. I’ve also heard that getting the internal temp up to 210 is a good indicator of doneness for GF goods. Would highly recommend adding some dried herbs/spices to the batter itself bc I find that the Bob’s Red Mill has a very strong “flour” taste on its own. I did garlic powder and Italian seasoning and it was delicious. Thanks for the recipe!!!
Lily – Thanks so much for taking the time to share your tips and tricks! I appreciate you!
So salty, it was inedible. Followed the recipe exactly as written.
Rena – I’m sorry it wasn’t a win for you. I’ve never had that feedback about this recipe before, so I wonder if there may have been an accidental mix-up somewhere along the way. Either way, I hope you’re able to adjust it for your tastes for next time!
After several tries with this recipe, success! I did add a quarter teaspoon of xanthan gum to the flour mixture. However, instead of having it rise in a bowl and then try to put it on parchment paper, I used an 8 inch cake pan with a circle of parchment paper in the bottom. I drizzled the olive oil on top of it, then took the bowl of batter and poured it into the pan. I let it rise on a heating pad, covered with a towel, and it rose up evenly. It baked for about 27 minutes at 400.
Thank you so much Judy! Thanks, too, for sharing your tips 🙂
Great recipe – made it before with a lot of success. Wondering if it will work making the dough the night before and keeping it in the refrigerator overnight, then baking in the morning? Any suggestions?
Susan – I have done that, and it worked for me! I usually pop it in an 8×8 or 9×9″ baking pan if I’m going to proof it overnight. It’ll end up thicker but will hold its shape like a dream!
OMG!!! Thank you so much for this recipe. This is CRAZY delicious with all the tenderness and crispiness of focaccia, really easy, and is gluten free! My family demolished this in one sitting and were fighting over it and wanted more soon, LOL. And thank you for letting us know this is very “batter” like and sticky and even tho you mentioned it I was surprised that it was so batter like and thought I had done something wrong, but I tossed it in the oven anyway and it came out incredibly. Also I used the 1/4 tsp of Xantham gum with my Bob’s 1:1, divided the dough thinly and into 2 servings and it was perfect! Thanks again, amazing recipe, and this is going to be a staple for sure.
I’m so glad you loved it Kia!!!
My whole family loved this! It’s one of the quickest, easiest, and most delicious GF bread recipes I’ve made. No fuss, just yummy-ness 😋
Yay!!! I’m so glad it was a win Tina! Thank you SO much for taking the time to leave a review—I appreciate you!
I just made this bread and it’s amazing. It has a fluffy and soft inside with a crunchy outside, perfection! I read the other reviews and agree that you should add some seasoning to the flour mix. I added 2tsp of Italian seasoning and 1tsp of garlic powder but for next time I’ll do 1tsp of Italian seasoning and 1tsp garlic powder. It came out a tad salty probably because I used table salt on the top along with melted butter which I brushed on. So I will omit the salt next time if I decide to use butter. I will definitely make this again though. Thank you for making gluten free items delicious!
So glad you loved it Rebekah!
This was a winner. So moist with a nice crust. Definitely will cook again. I’ve been looking for a good GF Rosemary Focaccia bread and this is it!
Yaaaay! I’m so glad you loved it!
I made a half recipe with the Simple Truth gluten free flour for a friend and he liked the results a lot! I tried a little piece myself first and it had a crispy bottom and spongy middle which was really tasty! I make foccacia with regular flour a lot and found it to be impressively close.
Isaac – I’m so glad it turned out for you! Thank you for sharing with me!
My GF husband loves this so much that we want to use it as our pizza crust. Do you think we should bake 5-10 minutes first, then add toppings? My concern is that interrupting the baking process may stop it from rising in the oven.
Marci – I haven’t tried this, but it sounds delicious. If you’re using it as pizza crust, I think pre-baking it is a great idea! (That way it can really hold the toppings.) I’d love to know how it goes if you give it a try!
Have made this as pizza crust several times, and pre-baking for 15 minutes seems to be the best. Then add toppings and back in the oven. Also, slightly pre-cooking the veggie toppings also helps, so the crust doesn’t get dried out while you wait for the veggies to cook enough. Best pizza: pesto sauce with fresh sliced mozzarella! My GF husband loves this crust above all others we’ve tried to make or buy!
I’m so glad you love it! We’ve made it as pizza crust too a couple times—so good!
I used bob’s red mill without any problems. It’s what I had on hand. I sifted all dry ingredients and I think that’s an important step with any baked goods.
Made it just as instructed with the only variation being sifting the dry ingredients and then also sprinkling garlic powder on top with the rosemary and Parmesan. It came out perfectly and will definitely be making it again and again!
I’m so glad you loved it!
👀 omg. Finally a gluten-free recipe that produces good bread. This came out so soft and springy that I ate half of the focaccia bread and I now have a stomach ache because I ate too much. 🥰
I LOVE hearing these success stories! Thank you so much for taking the time to leave a review Emma!
This is SUCH a great recipe! My husband loved it (and normally hates all GF things). It doesn’t taste gluten free!
WOW! What a nice comment! Thank you so much for sharing this with me–you totally made my day!
I suggest splitting the dough into two different pans, because the bottom crust is perfect, and it’ll save you the effort of trying to cut that chewy inside part without tearing it up.
Thanks for the tip Michelle! 🙂
This is the best gluten free bread I’ve had in a long time!! I added a garlic herb seasoning on the top and brushed it with olive oil & added the “dimples” with the back of a tsp measuring spoon about 10 min before taking it out. Thanks for a great recipe!
Oh, I’m SO GLAD to hear it! Your garlic herb seasoning sounds delicious–yum!
Thank you for taking the time to leave a review! It’s so helpful!
This was the best gluten free crust ever!! I used Bob’s 1-1 flour but added 1/4 tsp. xanthan gum just for good luck since someone else found it was too gummy, and all the rest as written. Instead of your topping (which we will try later) we used carmelized onion, a ripe pear and stilton cheese since we had six ripe pears on hand. My husband says we should use this recipe from now on. It came out crispy on the outside, tender on the inside, perfectly done and soooo good! Thank you!!
Pam – Thank you so much for taking the time to leave a review! I’m so glad you liked it. Your pear + cheese + caramelized onion topping sounds AMAZINGLY good. Yum!
It’s delicious
I’m so glad you liked it Maggie! Thank you for sharing!
This Gluten free Focaccia was so very good, that I made a second one RIGHT after tasting the first one!
Thank you so much. I didn’t use parchment, but did use olive oil on a GreenPan non-stick pizza tray/cookie sheet. I drizzled olive oil on top of the dough, and found it was easy to spread with my fingers that way. They did not stick to the dough. The focaccia did not stick to the pan either and I had a lovely crisp brown bottom crust. I look forward to trying so many other recipes! Can some one do my laundry, while I stay in the kitchen?
oh, I’m so happy you loved it! Love your olive oil on top trick!
I made another one today!!! This is getting pretty obsessive with me. But I wonder if your website has an easier way to search for recipes…I forgot to put that recipe in my Favourites. I love your website and plan to work my way so many recipes of yours. But, scrolling through the Categories is a little time consuming. However, then I see something else I want to make…and so on, and so on.,,,
Marisa – I’m so glad you’re enjoying it all over again! I’m SO SORRY the current search function is so difficult to navigate. I’m actually in the middle of a redesign that should make this MUCH easier in the future. I hope you’ll stick with me till it’s done! 😉
I never bother to comment on food blogs but after tonight I felt compelled to do so.
Holy moley, this is hands-down the best gluten-free bread I have ever made (or eaten!). Soft, fluffy, flavorful, crispy on the edges. I made two pans this evening and between four people there are just a few crumbs left. It was so easy, too! We topped it with some fresh herbs, brushed it with olive oil, and devoured. I have more than my fair share of Pinterest fails so I was just delighted at how well this turned out!
Quick question: I have some garlic lovers in my house; I’m wondering how best to incorporate garlic flavor into the bread. Do you think it would be better to sprinkle fresh garlic on top before baking, or maybe using garlic powder in the dry mix?
Thank you so much for this amazing recipe!
That’s SO NICE of you to say!
For your garlic lovers, you could totally add some garlic powder on the topping or mixed in with the dry ingredients, or you could fold in roasted garlic cloves into the batter before it rises. (Or you can use roasted garlic oil as part of the olive oil in the dough!)
Seriously so good. Used bobs 1-1 was a little gummy, but not bad. I think lowering the temperature and letting it bake a couple minutes longer and it would be perfect. I cut the rest of the bread into breadstick and toasted them in the oven for five minutes and holy cow. So good. Taste like Pizza Hut crust/breadsticks but yummier. Recipe was super easy to follow too. Definitely going to be a staple in my house. Thank you for this recipe!
I’m so glad you liked this! I love your breadstick idea. I’ll totally need to try that!
Emily, THANK YOU. This recipe was such a hit, my family has been dying for some good bread to snack on with dinner, I tried making gluten free bread 7 times with no success. For the first time I made something gluten free and delicious that my whole family enjoyed.
Also, I’d like to add that this recipe was amazing as someone with gluten, dairy, soy, nuts, AND egg allergies.
Thank you so so so much for sharing I cannot wait to bring this to potluck dinners.
That’s FANTASTIC to hear! I’m so glad you loved it! We LOVE it!
Hi- We made this for our Sunday lunch. It our second recipe we attempted with the San proportion of water to flour. The first recipe was just a soupy slurry. So we reduced the water to 1-1/4 cup and the dough looked a little thicker than yours on the video but more like “normal” biscuit dough. Also we use a mix of 1-1/2 cup rice flour, 1/2 cup potato starch, 1/4 cup tapioca and 1-1/2 tsp of xandamum gum. It came out well! We even topped it with roasted garlic and fresh grape tomatoes.
Thanks for sharing the recipe
I’m so glad it worked out well with your flour blend and adjustments! Way to go!
Can’t rate yet, my first batch came out flat and gluey. However I did notice that the batter deflated quite a bit when I spread it on the plan. Thinking I should have let it rise again. Will try again
I’m sorry to hear that. I hope the second try is a HUGE win. (Out of curiosity, what kind of flour did you use?)
I am trying to make this right now, and I followed all the measurements, but it is SO liquid. It looks more like crepe batter than a thick pancake batter. I don’t know what the heck I did wrong. I used a kitchen scale to measure everything, so I am at a loss. I added more flour to thicken it before rising, so hopefully that does something? If not, I still have 5 hours before family dinner, so I can try again!
Fingers crossed!
Tsianina – Oh dear–My fingers are crossed for you! Out of curiosity, what brand of flour did you use?
thank you for this recipe it turned out perfectly, i actually used a slight raised tray so it moulded nicely into it , can’t tell its gluten free…
Delicious !!!
Ooh–great idea! We made it in a cast-iron pan once and I loved how the crust turned out. 🙂
Thank you, I made the recipe delicious and the ingredients are correct it’s really wonderful
So glad you enjoyed it Haya!
Oh my gosh! This is amazing! I just made it for dinner and I don’t want anything but this. Even my gluten eating husband said it was amazing- like real focaccia. LOL. The dimples didn’t come out well but who cares, its not ugly and the flavor makes up for it. If I could attach a picture, I would. Thank you!
WOW! That’s fantastic!!! I’m so glad.
Made this today and can’t believe how well it turned out. Thank you!
I’m so glad you liked it! It’s our FAVORITE!
Hi Emily,
Made this exactly how stated until the toppings. Used bread art ideas for toppings. Cooking time was longer, waited until the focaccia was browned on top. Erin DM’d you on Instagram with the pics. Ate the entire bread with dipping sauce for breakfast 10/10😍
The pictures were GORGEOUS!!! I LOVED how you were able to decorate it!
It’s been a long time since I made focaccia. I remember loving it with spaghetti and salad. I think I will make this tomorrow.
Hope it’s a huge hit!
What a disappointment! I’m taking dinner to a family who just had a baby and the mother is celiac. The bread turned out gummy and raw inside. I am a chef by profession, but do not cook gluten free. I followed all instructions very carefully but this will have to go straight in the garbage! Now I don’t know what I’ll serve this family in 20 minutes. What a disaster!!!!!
Aubrey, I’m so sorry to hear this. That sounds SO frustrating. Gluten-free bread baking is definitely a different experience than traditional baking. Did you use King Arthur Flour measure-for-measure blend flour or another blend? Other flour blends will produce different results, which may have contributed to the gummy center. Again, so sorry it didn’t work out for you, especially since you were planning to bring it to a friend.
Emily, this bread was absolutely fantastic! I just made it for the first time and everyone in my family enjoyed it. I loved the texture and taste very much. Thank you for another winner recipe to go in my recipe book.
WONDERFUL!!! I’m so glad you liked it, Kristen! It’s our family’s favorite.
Made this with Bob’s Red Mill gluten free flour and it turned out awesome!
I used bread maker yeast and let it ride for about an hour on the stove (with some cookies in the oven.) The batter doubled in size.
Instead of a cookie sheet I used two cast iron pans (highly reccomend trying this!) I only put about an inch of batter in each and made sure they were well oiled.
Everybody loved it and it baked perfectly at 400 for 25 mins.
Kels – We made it in a cast iron pan a couple of weeks ago and it was DELICIOUS! I loved how crispy the bottom got! So glad you enjoyed it! 🙂
This smelled delicious while baking- but unfortunately I had similar results to some others. I’m hoping maybe you have some suggestions so I can troubleshoot. I followed the recipe exactly and used Bob’s 1-1 mix. I spoon my gluten free flour into the measuring cups when I bake. The yeast was beautiful and frothy after 5 minutes, and the dough more than doubled in size after 30 mins in a warm spot. The batter/dough looked beautiful and I baked on a silicone mat in an 8×10 stainless steel water pan. The dough barely rose in the oven though and while it smells great, the inside is gummy/raw looking and textured. The outside is done but not really a full golden brown, more light. I baked for 30 minutes and am popping it back in for an extra 5. All of the ingredients I used were fresh as we bake a lot here. Thoughts?
Jacque – That’s so frustrating, I’m so sorry. It sounds like you did all the right things.
A few things I can think of that could possibly be at play here:
1. Oven temperature. Many (if not most) ovens vary from their stated temperature, so if you don’t have an oven thermometer, it might be worth looking into. (My current oven is 25 degrees below the stated temperature, for instance, so I have to compensate until my thermometer shows the correct temp.)
2. Altitude – Sometimes, if you’re at a high altitude that can impact a bake. Are you by chance at a high altitude?
3. Lastly, one other suggestion. Another reader who wanted a higher rise (and had a similar experience to yours) allowed hers to rise a second time (until it had doubled again) on the baking sheet before putting it in the oven. She said it made a huge difference in getting the height and “fluff” she was looking for. Maybe that would be worth trying?
Again, I’m so sorry you ran into trouble. Bread baking (especially gluten-free bread baking) is notoriously finicky, and I know how frustrating it can feel when a recipe doesn’t turn out. Wishing you ALL the best luck if you give it another go!
Thank you for the thoughtful tips! I tried putting it back in for another 20 minutes and despite the outside being super crunchy, the inside is still gummy and has a raw taste. An inaccurate oven temperature could definitely be a problem for us. I’ve noticed previously that it seems to run a little hot, and perhaps that is what I’m running into here. I’m also wondering if I did not mix long enough. I don’t have a stand mixer, so used a wooden spoon and just mixed until everything was well incorporated. Maybe if I try again I’ll mix longer and add a second rise. It looks so good and I would love to have some success with it. I’ll have to change a few things on my end and see how it goes. Thank you!
Fingers so crossed for you!
Can I use GF all purpose flour?
I’ve only tested it with King Arthur Flour Measure for Measure and Bob’s Red Mill Measure-for-Measure, so I can’t 100% guarantee your blend if you choose to use a different one. If you give it a try, I’d love to know which one you use and how it goes!
I made this recipe with Bob’s Red Mill 1-to-1 gluten free baking flour. Unfortunately, it appears that both Bob’s 1-to-1 and King Arthur’s Measure-for-Measure have Xanthan gum in the mixes. That means this focaccia comes out rather chewy and not really focaccia textured. That said, this came out about as good as the focaccia other GF restaurants serve. I think next time I might use a little more yeast and baking powder to leaven it a bit more and mitigate the chewiness?
Ocean – I’m sorry it wasn’t quite what you were looking for. I’d love to know if your adjustments solve the problem for you!
Can I leave out the sugar? I don’t have any sugar, honey, or any sweetener handy, so will the yeast still activate with just warm water?
Thanks for the recipe! Can’t wait to try!
Jen – Totally understand. You can risk it if you like, but it may not turn out the same. Sweetener helps activate the yeast, which can be helpful with gluten-free bread baking (which is notoriously finicky). Traditional bread recipes do without sugar regularly, so it might work? I just can’t guarantee the results without having tried it first. I’m sorry!
It turned out great! I decided to give it a try yesterday, and the focaccia is almost gone and it has only been 24 hours! My husband and daughter loved it.
Thanks again!
Jen – Oh GOOD! I’m SO glad it turned out for you!!! That’s fantastic!
I am in love with this bread and have made it like 8 times this past week alone! I cannot beluce how satisfying it is, as I have been searching for something so delicious since I developed sensitivities almost 10 years ago! Thank you so much for sharing this 🤤
I dip my fingers in olive oil over and over while I’m making the dimples.
I also add garlic and onion powder to the top before I put it in the oven!
I have also baked it half-time and covered it in pizza toppings and continued to bake it…OMG🤤
So obsessed with how delicious it comes out, as is everyone I have shared it with 🤤
Thank you again!
💗🙏🙌
Madison – You TOTALLY made my day! Thank you so much for sharing this with me! We’ve done it as pizza before too and LOVED it. SO GOOD!
I want to try this recipe but really don’t want it to fail! I have a question: I don’t have that size of baking sheet, can I do it in a cast iron pan instead (I have an 8” and 10” I think). Thanks so much!
Sara – Honestly, cast iron would probably make for fantastic crust! If possible, I still recommend lining it with parchment and adding oil on top of the parchment as directed in the recipe to prevent sticking, then just keeping an eye on it. I usually pat my dough out into an 8×10″ rectangle, so I’d probably go with the 8″ over the 10″ for thicker focaccia. If you prefer it thinner, you can use the 10″ size.
This is an awesome recipe but your website is broken.
I did the 2x button however the grams of flour did not double… so I made some really nice flat bread because I didn’t put the necessary amount of flour in.
I demand compensation! ( ha ha kidding )
Love you Karen
Karen – So sorry you ran into trouble! I’ve tried the 2x button in two browsers on my phone, tablet, and computer and can’t replicate the problem. I’ll try to circle back with the recipe plugin folks to see if there’s an issue they know about on their end.
We love this recipe. I have used it l to make hamburger and hot dog “rolls”. Since my husband, who is GF, has not found some he has liked in stores.
Thank you for creating an easy go to recipe that we all like.(little ones included.)
Wow, that sounds great! So glad you’re enjoying it!
Hi Emily! This recipe was great! I used bob’s red mill 1:1 and regular yeast (rested for 1 hour as instructed). Mine didn’t rise as much as yours. Do you think I should go for King Arthur or was it because i used regular yeast?
Connie – I’m so glad you enjoyed it! And I’d love to help on the rise… Did you feel like your dough rose to double its size during the 1-hour wait time? How thick was your finished bread?
If it rose properly (and just about doubled in size while it was rising), it could be that yours was spread onto the baking sheet in a larger rectangle than mine was. Mine usually ends up about 1″ tall after baking, but if I spread it in a larger rectangle, it rises less since the dough is spread thinner.
My “batter rectangle” is usually around 8.5×10″ or so (sometimes a little wider or longer), if that helps.
Thanks so much for your tips! I made it again and it turned out so much better. I let it proof in the bowl for 1 hour and another 1 hour in the pan and it’s risen much more. I do think my spread was too thin earlier! Xx
Connie – I’m SO, SO glad to hear it. Thank you so much for circling back with me! I’ve thought about you and your comments a lot!
I am on a gluten free diet due to Ibs I was wondering can I use a warm oven to let it rise or where else would u suggest thanxs
Lauri – On a countertop in a warm room is fine, or in an oven with the light on, but you don’t want it *too* warm in the oven or it can start to cook and mess up the rise. Hope that helps!
This sounds great. Could this recipe be used for focaccia with a crushed tomatoes and green onions topping?
Jacquie – That sounds tasty! You’d probably need to be careful about crushed tomatoes since they’d likely add a lot of moisture and could disrupt the texture of the bread, but sun-dried tomatoes would be delicious!
Thanks Emily! I would probably make a marinara… !? Will absolutely use sun dried tomatoes 🍅 at some point.
But I’ve decided to make it as described in recipe. First batch came out more like a flatbread/ scone ish! I think I didn’t add enough liquid and a semi kneaded it! :/ But flavor was awesome and my kids and grands loved it and will definitely have to make two batches at a time. Will share when I make it again.
Five star for flavor:)
Tasty! I hope the next batch is even more successful! 🙂
What if my water with the quick rise yeasts and sugar and salt do the really foam? And the water was warm
Doesn’t foam *
If it doesn’t foam, after several minutes, it most likely means your yeast is dead and the bread will not rise. I’m so sorry!
I’m surprised this recipe has you add the salt in with the water, sugar and yeast. Salt kills yeast. Your yeast could be old or dead, but I’d just add the salt to the dry ingredients rather than the yeast mixture to be sure it’s not accidentally killed.
Can we use almond or coconut flour
Sadly, not for this recipe. You’d have to make a lot more adjustments to make that work.
Hi Emily, I tried this recipe but it didn’t turn out at all. It was gluey and didn’t rise. I used new baking powder and Bob’s GF. Hate to admit but it went into the garbage but it sure smelled amazing while it was baking. I followed the directions carefully…any suggestions? PS – the only thing I can think of was I keep my flour in the freezer to stay fresh, could that be it?
Sandra – Hmm. That’s frustrating! New baking powder and Bob’s GF are both good… and you’re sure you had active yeast, let it proof with the water/honey before adding it to the dry ingredients and allowed for enough rise time?
Hi Emily, yes to all your questions, maybe I should let it proof longer? It was about an hour but maybe the flour was still cold before it mixed it in?? I’ll try again and see if that fixes the problem.
I may also just buy another yeast, could be that it was a bit older.
I’m just so sorry! The dough is definitely pretty liquid going onto the pan (you can see in the video that it doesn’t stick together like traditional dough–it’s more like batter), and it doesn’t rise a ton, but it should definitely puff up a bit during cooking. I’m so sorry you had trouble, and *really* hope the second test is a huge win. Another reader has been making this at a college cafeteria and the students are loving it!
I tried it and it was gummy in the center and raw like. It was brown on the outside!
I’m sorry to hear that!
The KAF flour you used (Measure for Measure) actually does have Xanthan gum in it.
I am Celiac and a Chef was lucky enough to find a job being the Avoiding Gluten Chef at a local college. I tried this recipe to see if we could start adding bread items to the AG area….My Chef ate 4 pieces of the test run and gave a double thumbs up on it. I tried making it 6 times the amount and baking it on a large sheet pan! Yes it works great! I have to add this are also serves food that avoids the top 8 allergens so this was right on spot. Thank You
Pam – WOW!!! That’s incredible! Thank you so much for sharing this with me!
The students devoured it!
Can this recipe be cold fermented and took out to proof before baking
I have never tried that before. I’d love to know how it goes if you give it a try!
Did I miss the size of baking sheet? I want to make this for a bake sale and may adjust to smaller size pans
Marylue – Sorry! Just a standard cookie sheet (half sheet pan). It doesn’t fill the whole baking sheet (as you can see in the video), but that size has plenty of room to spread out the focaccia. 🙂
I’m confused on the amount of yeast. A package of instant yeast is 1/4 oz. you have listed 1 package but 1 oz. is that a typo somehow? thanks . Am looking forward to making it
Andy – Oh my goodness!!! Thank you! I DID make a typo. I’m SO glad you said something. It should read 1/4 oz for 1 package. I’ve corrected it!