


Our easy Gluten Free Pie Crust recipe is perfect for your favorite pies–savory or sweet! Naturally vegan and dairy-free, our homemade gluten-free pie crust works just as well for Thanksgiving dessert as it does a gluten-free quiche.

Your search for an easy homemade gluten-free pie crust recipe stops here! We’ve been making this one since shortly after we went gluten-free, more than 10 years ago. There’s so much to love:
- LIGHT TEXTURE. I’ve gotten open-mouthed, jaw dropped responses when guests have bitten into this crust and are SHOCKED that it’s gluten-free. It’s a light, crisp, flaky crust, just what you’re looking for.
- DAIRY-FREE & VEGAN. Bonus points: this gluten-free pie crust recipe is also dairy-free and vegan! That makes it even more accessible for guests with different needs at the holidays.
- WORKS FOR SAVORY PIES & SWEET PIES. Making a quiche or chicken pot pie? Check! Gluten-free pumpkin pie, cherry pie, pecan pie, or apple pie for Thanksgiving pie? Check! This recipe can do it all!
- RELIABLE RESULTS. If you measure correctly, and don’t make substitutions, this pie crust recipe works consistently every time in all kinds of delicious homemade pies.
And best of all, this homemade gluten-free pie crust starts with SIMPLE INGREDIENTS!
Start With Simple Ingredients
So what is gluten-free dairy-free pie crust made of? Just a few simple ingredients! Let’s take a look:

- Shortening. Before you grab pitchforks, keep reading. Yes, we are using shortening for this gluten-free pie crust recipe. I use Spectrum brand non-hydrogenated shortening, which is vegan and avoids hydrogenated fats. It’s easy to work with here, and keeps this gluten-free pie crust dairy-free. (I find it at Sprouts, Amazon, and Walmart)
- Gluten-Free Flour. We highly recommend King Arthur Gluten-Free Measure-For-Measure Flour blend. If you use another 1:1 gluten-free flour blend (like Bob’s Red Mill), be sure it contains xanthan gum. Coconut flour, oat flour, and almond flour will NOT work in this recipe.
- Sugar, Honey, or Agave. If it works for your dietary needs, we actually do recommend granulated sugar here since it’ll brown the best. Otherwise, honey or agave works!
- Salt. Just a bit, to help balance the flavors. Don’t forget it!
- Cold Water. To help bind the crust together.
Can I use Butter Instead?
One question I get every year if you can use cold butter instead of shortening in this crust recipe. Here’s my answer after 10+ years of getting this question:
How To Make Gluten-Free Pie Crust, Step By Step
As always, you can find the full recipe with ingredient amounts, detailed instructions, and tips in the recipe card below.

- Make The Slurry. In a small bowl, combine cold water, and 1/3 cup gluten-free flour. Whisk or stir until well blended and evenly combined. Set aside.
- Combine. In a food processor, combine 2 cups gluten-free flour, the shortening, sugar, and salt. Pulse briefly to combine–there will still be clumps! (Alternatively, you can use a pastry cutter to mix the shortening into the dry ingredients.)
- Add Slurry. Pour the slurry over the pie dough mixture and pulse to combine until the mixture starts to come together. It will still be quite sticky–this is normal! Don’t add extra flour!

- Shape The Dough. Sprinkle about 1 Tablespoon gluten-free flour onto your countertop and scoop the dough mixture out onto the floured countertop. Use your hands to gently shape the dough into a ball.
- Divide The Dough. Use a knife to divide the pie dough ball in half. Shape each half into a disc shape. If not using the dough right away, wrap each dough disc tightly in plastic wrap and chill or freeze until ready to use.
- Roll. If using right away, place one disc of dough between two large sheets of parchment paper and use a rolling pin to roll pie dough out into a 9-10 inch circle (about the size of your pie pan). Transfer the dough to your pie pan–I remove the top sheet of parchment, then place my pie pan face down onto the rolled out dough. Then, I flip it over right side up.
- Crimp The Edges. Adjust the crust so it’s evenly placed in the pan, using your fingers to gently patch up any cracks. Even out the border of the crust with your fingers, then crimp the edges of the crust. I use two fingers from one hand in a pinching shape, then indent the crust with one finger from the other hand. (See photos & video for visual)
- Bake. Then, follow the baking directions of your pie recipe–fill with pie filling and bake, or blind bake the crust (if directed), and fill after cooling. On that note…

How To Blind-Bake Pie Crust
Some pie recipes call for “blind baking” the crust. Blind baking simply means baking the crust before adding the filling. It’s a common step if your pie filling is thick and dense and you want to make sure the crust bakes through properly, or when you’re adding a cool or cream filling to a cooked crust.
If you’ve never done it before, it’s easy! Here’s what to do:
- Prepare Pie Dough. Follow our prep steps above, all the way through rolling the dough out and adding it to the pan. Crimp or style the border of the pie crust any way you like.
- Prick The Bottom. Use a fork to gently prick the bottom of the pie crust. This allows any trapped air to escape and helps keep the bottom of the crust flat as it bakes.
- Line With Parchment. Cut a 9 or 10-inch square of parchment paper, and gently tuck it into the bottom of the crust.
- Add Pie Weights. Top the parchment paper with ceramic pie weights, dry beans, or uncooked rice to weight down the parchment.
- Bake. Then, bake according to your recipe instructions. Some recipe call for you to blind-bake the crust just 10-15 minutes. If you need a fully baked crust, bake at 375 degrees F for 25-30 minutes, or until the crust is set and the edges are just turning golden brown.
- Cool & Add Filling. Carefully remove the parchment paper and pie weights (I gather up the corners of the parchment square and lift it all out at once like a package). Cool the crust, then use as needed.
What Weights Can I Use For Blind-Baking Pie Crust?
I have a set of ceramic pie weights I’ve had for YEARS. They last forever! If you don’t have any on hand, you can also use dried beans, uncooked rice, or even white sugar in a pinch.
You can use the same pie weights over and over again. Just set them aside and store in an airtight container. I do NOT recommend cooking & eating beans or rice that have been used for blind baking, since they’ll be more dry and hard and may not soften properly later.

FAQ + Tips And Tricks For The Best Gluten-Free Pie Crust
Measure Your Flour Correctly! One thing that will make or break your gluten-free pie crust is the way you measure the flour. It might seem simple, but a LOT of people don’t realize you are NOT supposed to use the measuring cup to scoop the flour. This packs extra flour into the measuring cup, which can lead to dry, crumbly pie crust. For best results, weigh the flour with a kitchen scale, or use the Scoop & Level Method, using a spoon to scoop flour into the measuring cup and leveling it off.
Which Gluten-Free Flour Is Best For Pastry? For gluten-free pie crust, we highly recommend King Arthur Measure-For-Measure Gluten-Free Flour. It’s light enough to give you flaky results and has a neutral flavor that works well.
A Tip About Pie Pans. Different materials conduct heat differently and can have a big impact on the timing and quality of your bake. I highly recommend these light colored metal 9-inch pie pans because they are remarkably nonstick and bake evenly and gently. If you use a glass or ceramic pie plate, your pie crust will take longer to bake through.
Can I Freeze This Pie Dough? YES! This is a recipe for a double-crust pie, meaning it makes both a bottom crust and a top crust. If you only need one, or you want to make the crust in advance, you can wrap each half of the dough in plastic wrap, then store in a freezer-safe bag and freeze up to 2 months. Thaw in the refrigerator, then bring to room temperature before rolling out and using.
For More Browned Crust. Gluten-free pie crust doesn’t brown as much as traditional pie crust. If you want, you can brush the edges of the crust with an egg wash made of 1 egg + 1 Tablespoon water. You won’t need all of it! Just lightly brush the edges of the crust with a pastry brush and save the rest for another use.


Did You Make This Recipe?
Tell me all about it! Leave a star rating below when you try our Gluten-Free Pie Crust recipe. I can’t wait to hear how it goes–Happy Baking!

Gluten Free Pie Crust (Vegan Friendly)
Ingredients
Tools:
- 9-inch pie plate we recommend metal*
- Rolling pin
- Parchment paper
- Food processor or pastry blender
For The Slurry:
- 1/3 cup Measure-For-Measure Gluten-Free Flour Blend* 40 grams
- 1/2 cup cold water
For The Pie Dough:
- 2 cups Measure-For-Measure Gluten-Free Flour Blend* 240 grams
- 1 cup shortening we prefer Spectrum non-hydrogenated shortening
- 1 Tablespoon sugar honey, or agave
- 1 teaspoon kosher salt
- 1 Tablespoon Measure-For-Measure Gluten-Free Flour Blend * for the countertop
Instructions
- Make The Slurry. In a small bowl, combine cold water, and 1/3 cup gluten-free flour. Whisk or stir until well blended and evenly combined. Set aside.
- Combine. In a food processor, combine 2 cups gluten-free flour, the shortening, sugar, and salt. Pulse briefly to combine–there will still be clumps! (Alternatively, you can use a pastry blender to mix the shortening into the dry ingredients.)
- Add Slurry. Pour the slurry over the pie dough mixture and pulse to combine until the mixture starts to come together. It will still be quite sticky–this is normal! Don’t add extra flour!
- Shape The Dough. Sprinkle about 1 Tablespoon gluten-free flour onto your countertop and scoop the dough mixture out onto the floured countertop. Use your hands to gently shape the dough into a ball.
- Divide The Dough. Use a knife to divide the pie dough in half. Shape each half into a disc shape. If not baking right away, wrap each dough disc well in plastic wrap and chill or freeze until ready to use. (Thaw chilled or frozen dough and bring to room temperature before using.)
- Roll. If using right away, place one disc of dough between two large sheets of parchment paper and roll pie dough out into a 9-10 inch circle (about the size of your pie pan). Transfer the dough to your pie pan–I remove the top sheet of parchment, then place my pie pan face down onto the rolled out dough. Then, I flip it over right side up.
- Crimp The Edges. Adjust the crust so it’s evenly placed in the pan, using your fingers to gently patch up any cracks. Even out the border of the crust with your fingers, then crimp the edges of the crust. I use two fingers from one hand in a pinching shape, then indent the crust with one finger from the other hand. (See photos & video for visual)
- Bake. Then, follow the baking directions of your pie recipe–fill with pie filling and bake, or blind bake the crust (if directed), and fill after cooling. (aka if your pie recipe says to bake 45 min, bake for 45 min)
How To Blind Bake Pie Crust
If you are baking the crust alone to fill with a cold filling later, or are directed to blind bake a crust in your recipe (such as with a quiche, or a pie with a very thick or wet filling):
- Prepare Pie Dough. Follow our prep steps above, all the way through rolling the dough out and adding it to the pan. Crimp or style the border of the pie crust any way you like.
- Prick The Bottom. Use a fork to gently prick the bottom of the pie crust. This allows any trapped air to escape and helps keep the bottom of the crust flat as it bakes.
- Line With Parchment. Cut a 9 or 10-inch square of parchment paper, and gently tuck it into the bottom of the crust.
- Add Pie Weights. Top the parchment paper with ceramic pie weights, dry beans, or uncooked rice to weight down the parchment.
- Bake. Then, bake according to your recipe instructions. Some recipe call for you to blind-bake the crust just 10-15 minutes. If you need a fully baked crust, bake at 375 degrees F for 25-30 minutes, or until the crust is set and the edges are just turning golden brown.
- Cool & Add Filling. Carefully remove the parchment paper and pie weights (I gather up the corners of the parchment square and lift it all out at once like a package). Cool the crust, then use as directed for your recipe.
Notes
- Gluten-Free Flour. We highly recommend King Arthur Gluten-Free Measure-For-Measure Flour blend. If you use another 1:1 gluten-free flour blend, be sure it contains xanthan gum. Coconut flour, oat flour, and almond flour will NOT work in this recipe.
- Measure Your Flour Correctly! One thing that will make or break your gluten-free pie crust is the way you measure the flour. It might seem simple, but a LOT of people don’t realize you are NOT supposed to use the measuring cup to scoop the flour. This packs extra flour into the measuring cup, which can lead to dry, crumbly pie crust. For best results, weigh the flour with a kitchen scale, or use the Scoop & Level Method, using a spoon to scoop flour into the measuring cup and leveling it off.
- Freeze This Pie Dough: This is a recipe for a double-crust pie, meaning it makes both a bottom crust and a top crust. If you only need one, or you want to make the crust in advance, you can wrap each half of the dough in plastic wrap, then store in a freezer-safe bag and freeze up to 2 months. Thaw in the refrigerator, then bring to room temperature before rolling out and using.
- A Tip About Pie Pans. Different materials conduct heat differently and can have a big impact on the timing and quality of your bake. I highly recommend metal 9-inch pie pans (like USA brand) bake evenly and gently. If you use glass or ceramic pie plates, your pie crust will take longer to bake through.
- For More Browned Crust. Gluten-free pie crust doesn’t brown as much as traditional pie crust. If you want, you can brush the edges of the crust with an egg wash made of 1 egg + 1 Tablespoon water. You won’t need all of it! Just lightly brush the edges of the crust with a pastry brush and save the rest for another use.
- If Using Butter (More Difficult!). Cut the butter into tiny cubes and use ice cold water. Combine the flour (including the extra 1/4 cup you’d use in the slurry), sugar, and salt in the food processor. Pulse to combine, then add butter cubes. Pulse just a few times, until the butter is in pea-sized chunks. Add the water and gently pulse a few more times to combine. It should look a bit shaggy and floury. This is normal! Turn the dough out onto the counter top and work to shape the dough into a ball. Divide the dough in half and form two discs. Wrap each in plastic wrap and chill about 30 minutes. Roll out between parchment paper as directed.
Video
Nutrition
Nutrition facts are an estimate only and will vary based on brands and amounts used.
Find it Online:
https://www.onelovelylife.com/gluten-free-pie-crust/Originally published November 2014. Fully updated and republished October 2024.
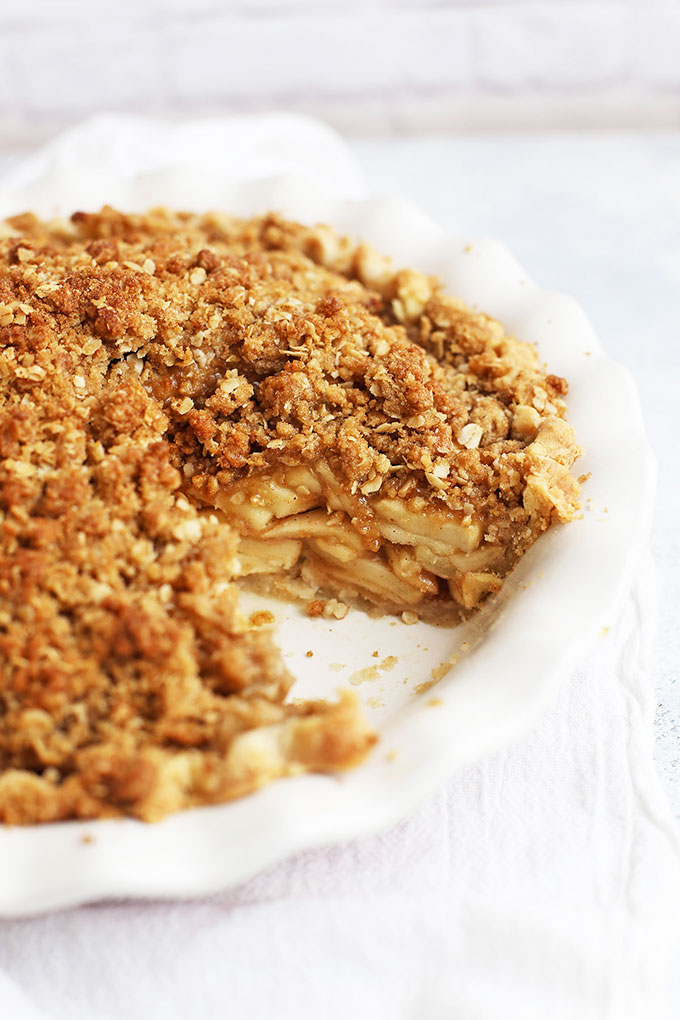
My grandsons who are both gluten and dairy free LOVED my cherry and apple pies!
Oh, wonderful! I’m so glad they were a win for you! Well done!
Thank you for making gluten free pie crust so accessible! Good gluten free crust is so hard to find, but this is perfect.
I have a quick question.
The recipe for the pie dough calls for 4 cups of the flour, but in the directions #2 it says to use 2 cups.
Where do I use the other 2 cups
Hi, Kim! The recipe calls for 1/3 cup (40 grams) for the slurry and 2 cups (240 grams) for the dough.
Over the last 2 years I’ve made at least a dozen of pie crusts using this recipe.
Using a slurry is clever and I think its what makes the difference between this and all the other GF pie crusts I’ve attempted. I do use the Spectrum organic palm oil rather and it turns out wonderful each time. The dough is manageable and if it cracks or crumbles, I simple squish it into place in the pie pan.
Thank you!
I’m SO glad you love it Kathy! Happy Thanksgiving!
THANK YOU!!
I have been gluten free (medical necessity) for almost 30 years. I have made bad stuff and good stuff, but pie crust was always just not right, even though I tested many different recipes. Like you I had given up on pie! But this crust is close enough to “real” that most of my extended family can’t tell. Your recipe has been in my notebook for some time and when I got it out today to make crust for chicken pot pie, I almost cried when I found my shortening was rancid (it got too warm.) I came back to your website to see if you had any notes about using butter and was happy to find the answer is yes. I’m anxious about the difference in moisture content but willing to give it a try. Thanks again for great stuff!!!
Esther – I’m so glad this pie crust recipe has been a winner for you! I hope the butter crust turned out okay for last night’s dinner. Many people have made and loved it with butter over the years–I hope you did, too!
This is the best gluten free pie crust I ever made, my sister will not stop talking about it and my family loves it!
I’m so happy to hear that Fiona! That’s fantastic!
Oh my goodness!! This is THE best GF pie crust I have ever tried (and boy, have I made many). Usually the most decent one was the Bob’s RM pie crust mix, but even that left much to be desired. I tried this recipe for my favourite blueberry pie and it was absolutely perfect! It was incredibly flaky and crisp. I couldn’t find the Spectrum shortening in store so I just got the store brand one and it worked fine (I chilled it in the freezer first). Used maple syrup instead of honey or agave (it’s all I had). WOW! Thank you so much for this recipe— my gluten eating family devoured it and couldn’t tell it was GF (they can usually detect it)!
Serra – You totally made my day! I’m so glad you loved this pie crust. I use it to make all our Thanksgiving pies every year, and none of our gluten-eating relatives notice which pies are GF and which ones aren’t!
Dear Emily, This has become my go-to crust recipe for a couple years now. NOTHING else I’ve tried is this good! It’s a hit with my non-gluten free family as well, so now I need to bake at least 3 double crust pies for Christmas. Big question is: Can I triple the recipe and do it all at once, or should I do each one separately? Thank you for your help!
Esther – I’m SO glad you love them! I’d probably do each double crust separately, since it’s so easy to overmix a triple batch (which leads to tough crusts).
Hope they’re just the thing for Christmas!
Super quick and easy, and turned out great! I used it for your BEST pecan pie (I froze the 2nd crust). I used King Arthur gluten-free flour blend, and honey. I used a glass pyrex pan, so I turned the oven down to 335 degrees F and baked the filled pie for about 35 minutes. It was flakey and golden at the top, and held together beautifully when the pieces were sliced! It also came out of the pan easily and I didn’t even grease or spray the pan (I did use a sharp knife to cut it, and the tip of the knife to loosen the top edges from the pan.
AWESOME!!! That’s fantastic!
I made crust for a pumpkin pie with this recipe . The crust looks great and the flavor is good but it is a little on the tough side. Any suggestions?
Debbie – Sometimes, it can mean a bit too much water. Since the exact weight of a cup of flour can vary based on how tightly it’s packed, it could be that yours was slightly less than mine and the water to flour ratio was slightly off. I’d try maybe a tiny bit more flour next time when rolling it out? Or slightly less water in the slurry?
This looks like a great recepie! Can I substitue the shortening for coconut oil?
Teresa – I haven’t tried subbing it in this recipe because their properties are so different. Several folks have made it with butter or vegan butter with great results! (If you do try it with coconut oil, I’d love to hear how it goes!)
Much salt? How much honey?
Marcia – All the amounts are in the recipe card 🙂 1 Tbsp honey and 1 tsp salt.
Thank you for this recipe. By chance if I freeze the apple pie after it’s baked, will the crust still hold up and still taste good after being thawed? I have 6 pies to bake for someone for delivery this Thursday however they will not eaten it until next Thursday. Typically I freeze my baked cakes and quick breads with no problem. Wasn’t sure about a cooked pie using this gluten free flour. Please advise.
Terra – I prefer to bake apple pies the day of myself for best texture (and would probably freeze apple pie assembled but unbaked). That said, I’ve done pecan pies fully baked and frozen in this crust with no problem. They would want to reheat them in the oven for best results (rather than just thawing) otherwise it may thaw on the soggy side. I hope that helps!
I made an apple pie with this crust over the weekend and it was amazing! Another guest brought 2 different cheesecakes and everyone skipped right over them and went for the pie! They couldn’t believe it was gluten free. It truly is better than any crust I’ve ever made and it was so easy! Thank you SO much!!!
Jill – I’m SO happy to hear that!!! You totally made my day!
Why can’t you eat butter? Do you have a milk protein allergy? Readers see a comment such as the one about “can’t eat butter” and wonder why no more info – makes people think there is something wrong with butter that we should know more about.
Georgia – I have many places on my site mentioned that our family is gluten & dairy free. No other reason than that! I always try to provide options when possible 🙂
How much cold water for the slurry? The recipe talks about the importance of measuring, but I’m not seeing a measurement here.
Hi, Ree! The very first section of ingredients in the recipe card labeled “For The Slurry” is the place to check! It’s 1/2 cup cold water + 1/3 cup (40 grams) gluten-free flour 🙂
OH, it works! And it’s delicious, flaky and just what I’ve been trying to achieve for years. Every year I make a blackberry pie to memorialize a childhood friend. This is the first edible gluten free crust I’ve managed and it’s magical. Thank you.
Schyler – I’m SO, SO happy to hear this! It’s the only one I’ve ever been able to get to work consistently. I’m so glad it could be used for your special blackberry pie. Thank you so much for sharing this with me. 🙂
I have been gf for 10 years now, and this is the very best pie crust recipe I have found. I used it to make a savory chicken pie, and the whole family loved it. Way better than my old gf pie crust recipe. Thanks so much for sharing!
That’s SO wonderful! Thank you for sharing that with me!!!
We successfully made this with butter! Had to add a little extra water, but it turned out perfect. We used it savory with a chicken pot pie.
Oh yum! Chicken Pot Pie sounds amazing right now!
Thank you for this recipe! I have been trying for several years to make GF pie crust. Usually have to patch a lot together, lol. The technique with the parchment (plus chilling) works so wonderfully! I just made this (we’re having a late Thanksgiving tomorrow) for pumpkin pie. I have to avoid numerous allergens for my son – and he loves pumpkin pie so much. Now it will look pretty, too.
Cathy – You made my day! I’m so glad you enjoyed this recipe!
The best, easiest, most flaky GF crust I have ever made. I have used them all, but this was amazing. I used a very lightly floured pie bag to roll and real butter, the ridiculously expensive one from Ireland. I have learned there is a place for all flour blends in GF baking and this is definitely my crust blend. Thanks from a combined celiac and non celiac family.
Oh my goodness, thank you! I’m SO so glad you enjoyed it!
Um…my daughter and I have the dough done. Great instructions. But there is NOTHING here about actually baking it! How can you leave those details out? Am I missing something? Was super happy to find a dough and way of making gluten free crust that seemed easy (and was) – now I am hacking around trying to figure out at what temp and how long to bake it. Bummer!
Christina – I’m happy to adjust the recipe. The reason I didn’t include instructions is because you would bake it according to your pie recipe directions. (i.e. If your apple pie bakes at 375 degrees for 45-50 minutes, you’d bake it at that temperature/for that time.) If you are baking the crust alone to fill with a cold cream later, you can bake it at 375 degrees for about 30 minutes, or until it’s just starting to color around the edges and it’s completely set.
I am excited to try this crust recipe. I am looking to make an apple pie. Will I need to double the recipe? Thank you.
Joy – This recipe is enough for a double crust (1 top and 1 bottom). You shouldn’t need to double it 🙂 Happy Thanksgiving!
Hello! I just found your pie crust recipe! I want to make my son a gluten free peanut butter meringue pie so I’m wondering would I bake the crust first or fill it then bake it all together. I’m not doing so well with my gluten free baking!
Monica – I know it can be tricky at first! Since it’s a cold-filling pie, I’d bake the crust first, let it cool, then fill it. Then, you’ll follow your recipe instructions for the meringue (some have you put it under the broiler, others have you use a kitchen torch, etc.).
Hi Emily,
I used your pastry recipe this weekend to make pies for thanksgiving. I substituted the shortening with equal parts cold cubes butter and margarine. I had to fold the dough twice to bring it together, which was easy to do. The pastry itself rolled out beautifully and evenly and held up well once baked and cut. I look forward to baking with this recipe again. Thanks for sharing this with us.
Jess – I am SO happy to hear that! Thank you so much for sharing. (And happy belated Thanksgiving!)
hi how long would you bake this for?
Gianna – Are you baking it by itself or with a filling? If you are baking it by itself (so you can fill it with a cold cream filling, for instance), I’d watch it carefully and start with about 12-15 minutes (per this tutorial). You want it to just be set and the edges are starting to get barely golden.
Made this today for my grandkids as they have several allergies. First time they have ever had pie! It was really good! thanks so much for the recipe and tips!
I’m so glad they enjoyed it! Here’s to many more pies to come!
Does the shortening need to be cold like butter is supposed to be when making crust?
It doesn’t need to be cold, but can be. Your choice!
I made this with butter – it was perfect! A little harder to work with when rolling than a wheat flour crust, but so worth the effort. Crust was flaky, browned nicely. Thank you so much!
I will give this a try. I am not sure what your dietary restrictions are with dairy, but I found I could use ghee as the protein has been removed. For me it has opened all doors (although its pricey)! Thanks for the recipe. I will try.
We’re HUGE ghee fans. I haven’t tried it in this recipe, but I bet the flavor would be awesome!
I had bought the 1 to 1 flour first, used traditional approach, and ended up with sticky mess and gave up that day. Then found your recipe since BRM did not have a crust recipe and tried again today! Success! It was for quiche so I omitted honey. The key was chilling the dough and rolling out between parchment paper, my new favorite way for rolling out dough. Had a little trouble peeling off paper once in tin, but a little patching isn’t unusual. The top piece of parchment peeled off easily–maybe I will try rolling it out, flipping and rolling from other side a couple of times, with the hope that both sides will peel off easily, having come in contact with the rolling pin. Thank you!
Oh, I’m so glad it worked for you! I had so many failed crusts before this one.
Made blueberry hand pies using this pie crust recipe yesterday substituting butter for shortening and it was amazing!
I have an illogical aversion to rice flour. I will try this with my sorghum blend and get back to you if it works. Even if I make it twice to turn out once, it is less than buying a crust from Sprout’s. (And i can choose my flours!)
Oh, okay. I was going to be extra sad if it hadn’t turned out for you with the Bob’s blend 🙂
Pecan pie is one of my favorites. My mother-in-law has celiac and usually just eats her pie crustless (I know…), I’ll need to tell her about this Bob’s Red Mill kind!
You DO make it look easy… and I’m going to hope for the best when I try this in a few short weeks.
Boy Howdy! Does this Pecan Pie look divine!
That pie looks delicious! I’ve always been super intimidated to make pie crust, but this looks pretty easy!
Paige
http://thehappyflammily.com