
How to Make Gluten Free Pie Crust (With VIDEO!)
This post may contain affiliate links. Please read our disclosure policy
How to Make Gluten Free Pie Crust (WITH VIDEO!) – A step-by-step tutorial for making gorgeous, flaky gluten free pie crust! Scroll down for the FULL RECIPE & HOW TO VIDEO! (Gluten free, vegan friendly)
True story friends: I didn’t eat pie for over a year and a half. Why? Nothing self-righteous, nothing against pie… I was just afraid.
I’d been a super confident baker before, but after we changed our diet to gluten free, I was *really* intimidated by most gluten free baking. Gluten free baking can get expensive (especially if you make a lot of mistakes!), and I let myself be afraid. So, I didn’t eat pie. Because I was too scared to try (and waste ingredients). SO DUMB.
But NO MORE! It’s been many years now since we’ve mastered gluten free pie crust, and life is–quite literally–so much sweeter. If you’ve been afraid, fear no more! Here’s how I make delicious, flaky, easy, consistent gluten free pie crust…
Why We Love This Gluten Free Pie Crust Recipe:
The Flaky Texture! I’m looking for light, flaky crust and this recipe DELIVERS. Whether you make it with shortening (like I do) or butter (like so many of you have), you’ll end up with light, flaky crust that’s great on sweet or savory pies.
It’s Pretty Darn Easy. Whether you’re a long-time gluten free baker, a total newbie or simply cooking for a friend or family member who’s gluten free, this is one of those recipes that gives consistent results, even if you don’t have a ton of experience. And, you only need one kind of flour!
This Crust Works for Warm or Cold Pies – We’ve used this crust for LOTS of different pies over the years and it works for all of them. For instance….
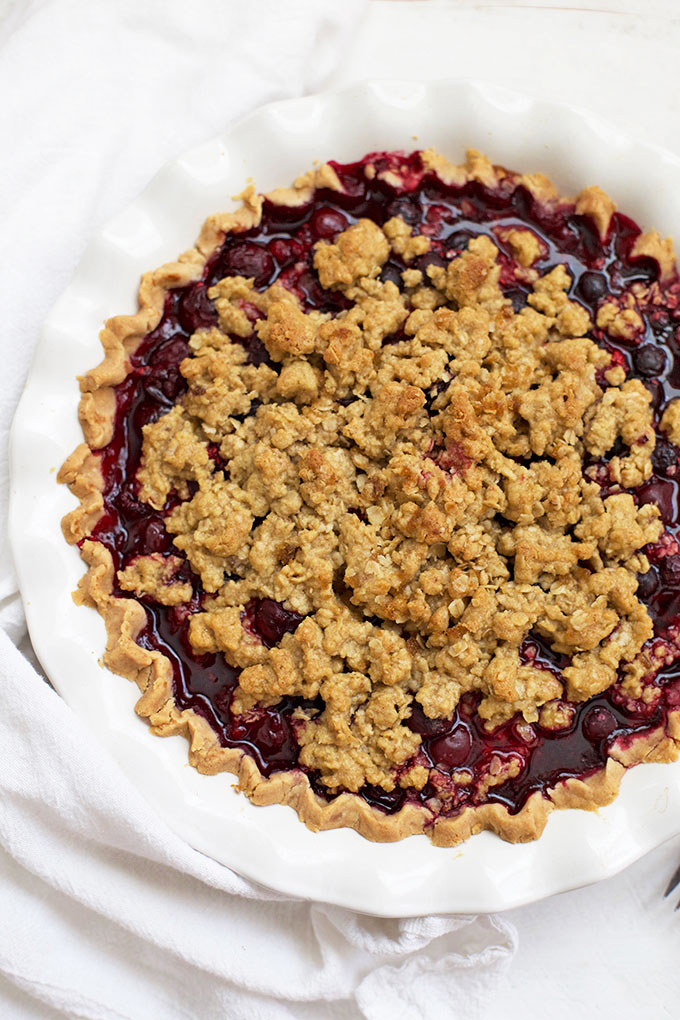
- Triple Berry Crumble Pie (Gluten Free, Vegan)
- The Best Cherry Pie (Gluten Free, Vegan Friendly)
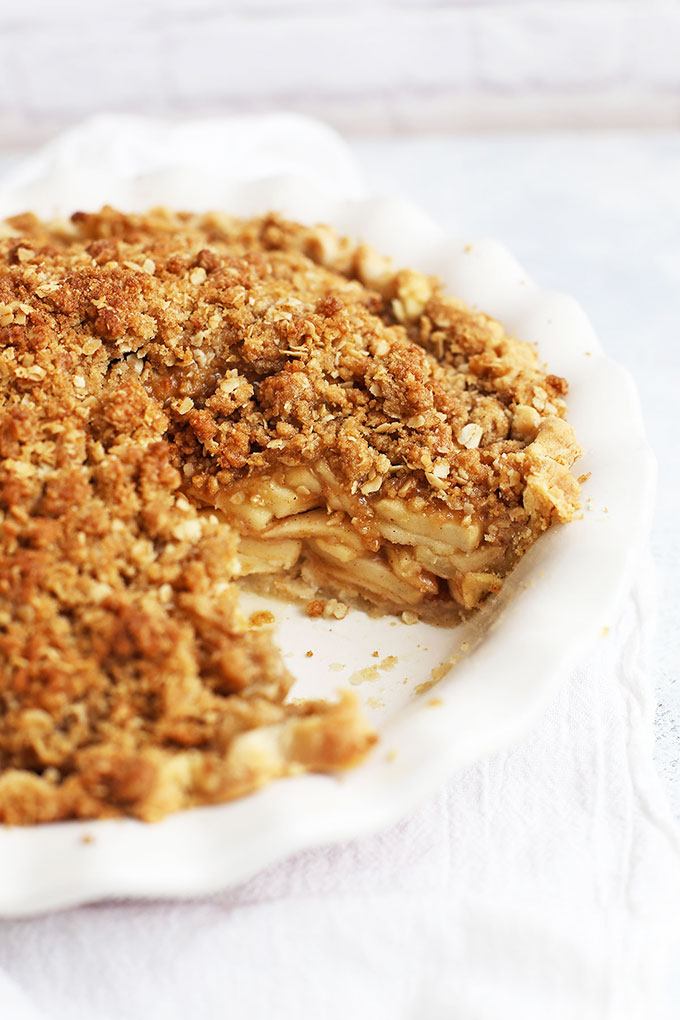
- Apple Crumble Pie (Gluten Free, Vegan Friendly)
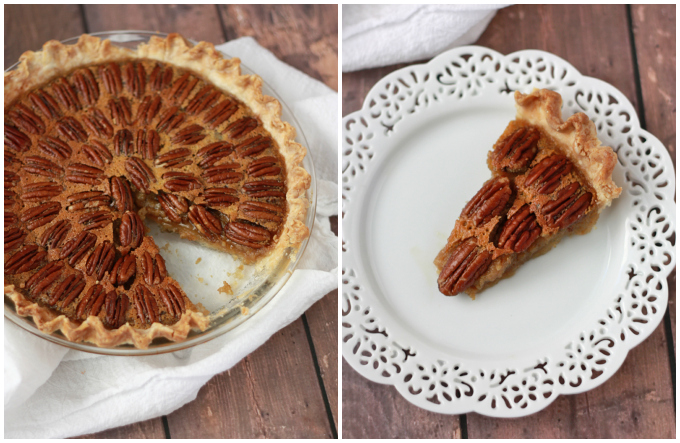
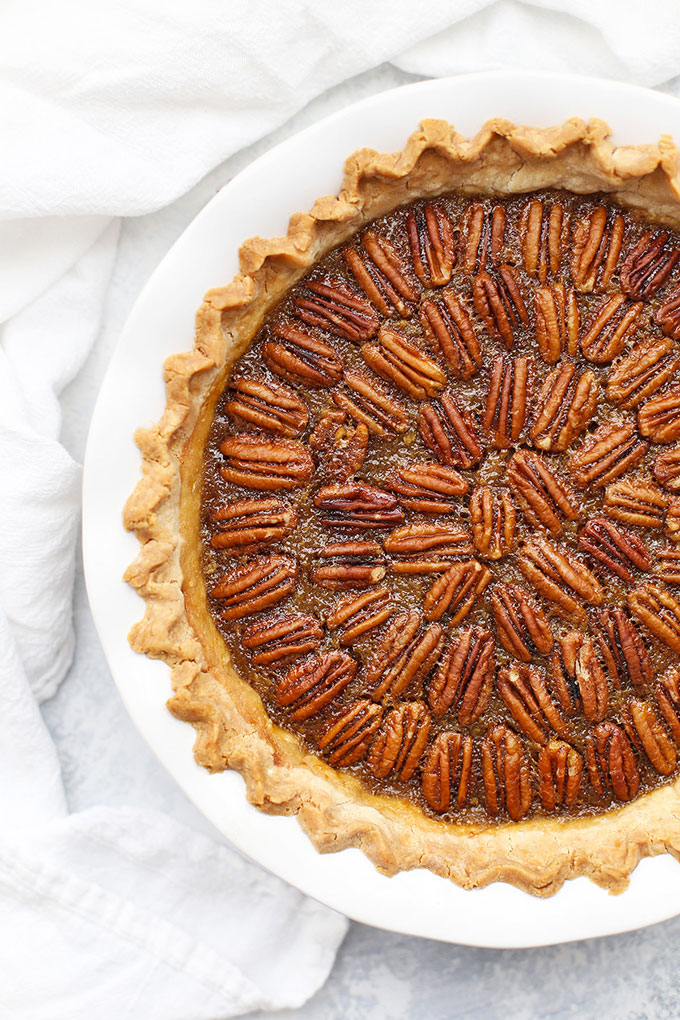
- Pecan (Gluten Free, Vegan Friendly)
- Pumpkin Pie (Gluten Free)
- Chocolate Cream (We use this vegan chocolate pudding recipe for the filling–it’s amazing!)
It’s Vegan Friendly. We use organic non-hydrogenated vegetable shortening for this recipe, so it’s naturally vegetarian and dairy free. To make it vegan, simply sub in agave for the honey. It’s that easy! Here’s how you make it…
How to Make Gluten Free Pie Crust (Step-By-Step)
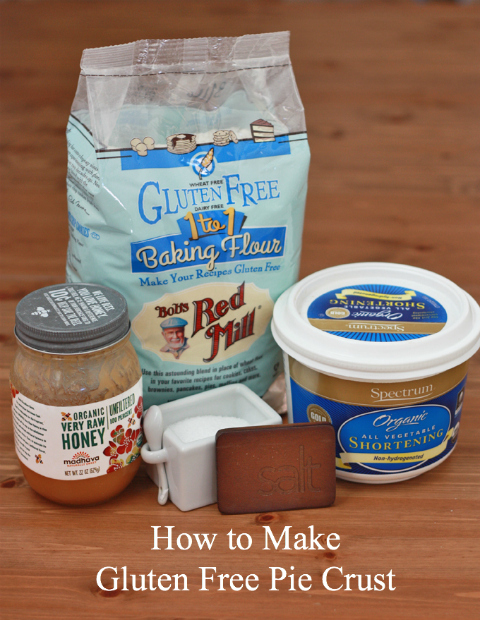
1. Gather Your Ingredients:
You’ll need shortening (I like this one–it’s non-hydrogenated), a 1-to-1 gluten free baking flour blend (we like this one), salt, honey, and water (not pictured yet). You can use butter in place of shortening–see my notes below for more information.

2. Blend 1 cup shortening into 2 cups flour.
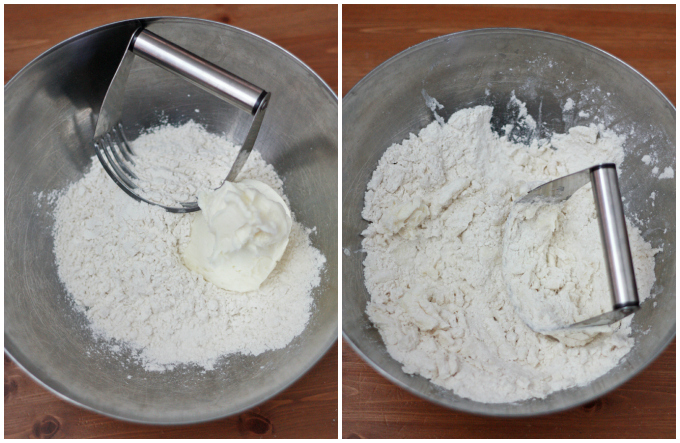
Blend shortening into your flour, using a food processor (see video–my preferred method) or in a large bowl, using a pastry blender. You’ll want to keep blending until it’s very fine and the mixture starts coming together. Add salt and honey to the shortening/flour mixture and stir or pulse to combine.
Note: if you are using butter, stop blending when the flour/butter mixture is pea-sized, which will help keep your butter cold. If you’re using shortening, you’ll keep blending until the mixture starts to come together.
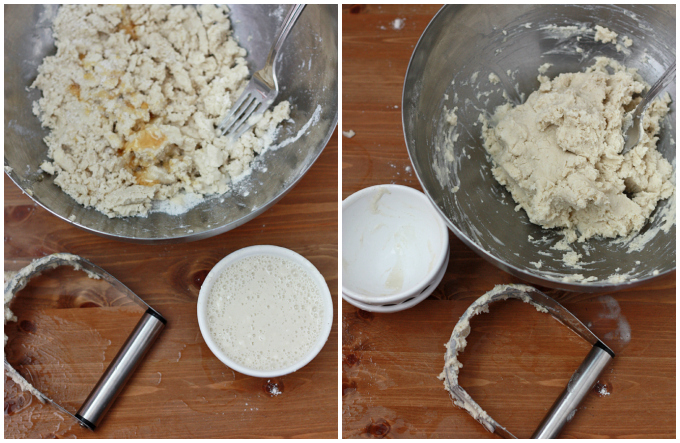
3. Make & Add Your Slurry.
A “slurry” is a flour/water mixture that can be used to thicken something. Here, it’s used to help bind the mixture together. Mix your slurry by combining 1/2 cup water and 1/3 cup flour mixture in a small bowl. Pour the slurry over everything and toss with a large fork until the mixture is one cohesive ball.
4. Divide & Chill.
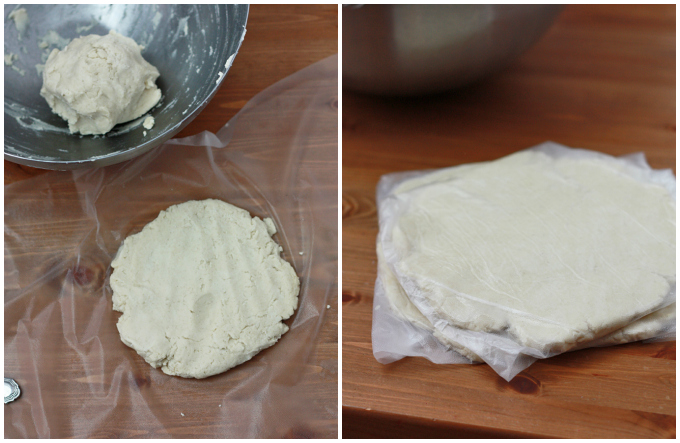
Divide the dough in half. Flatten each half into a little disc and wrap in plastic wrap. Refrigerate 20-30 minutes, or until mostly chilled.
NOTE: if you only need one crust for your pie recipe, place the second wrapped disc of dough into a freezer-safe zip top bag and freeze it for up to 3 months.
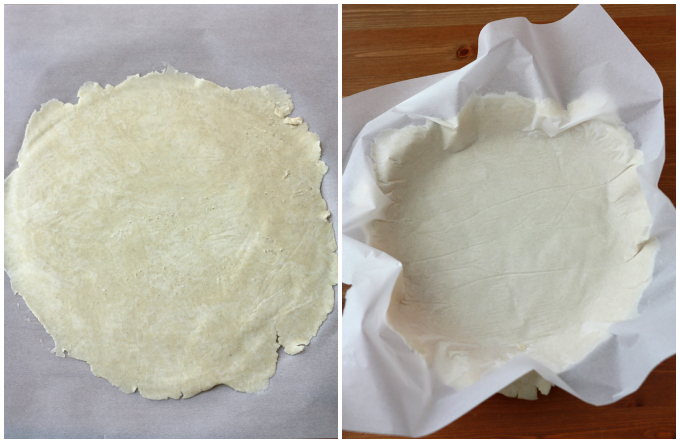
5. Roll out the crust.
Lay one piece of parchment paper down on the counter or work surface you’ll be using. Unwrap one disc of dough and place on the parchment. Cover with a second piece of parchment. Roll out to a 9 1/2-10″ circle, working from the center outward in all directions. (It doesn’t have to be perfect!).
NOTE: If the dough is cracking quite a bit, it’s just a bit too cold. Give it 2-3 minutes to warm up a bit, then try again.
6. Transfer to the pie plate.
Remove the top piece of parchment, and lay the open side down into your pie plate. Gently and slowly, peel back the second piece of parchment, then pat the dough down into the pie plate. If the dough has any cracks in it, use your fingers as needed to patch up any seams.
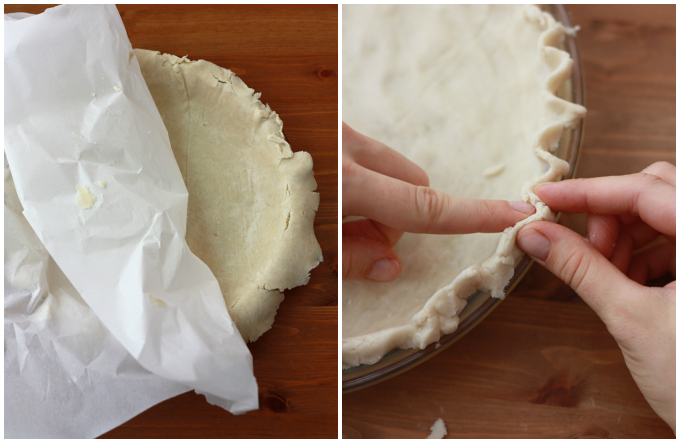
7. Patch and Decorate.

Even out the edges by either trimming them or folding any extra dough under. Then, crimp with your fingers (see the video for how I do this), or press down the edges with a fork.
Fill with your desired filling, and bake as usual. If you notice the edges browning at any point, you can tent them with foil.
And That’s It!
Notes on This Gluten Free Pie Crust Recipe:
This is a shortening-containing recipe. Before you grab pitchforks, keep reading. These days, I use Spectrum brand![]() or Nutiva brand because they’re organic, non-hydrogenated, well-sourced, and the best shortening choices I’ve been able to find. I pick them up at Amazon, Target, or Sprouts. It’s certainly not a health food, but it’s easy to work with. I also think if I eat shortening on 1-2 holidays in the year, I’m probably not going to die.
or Nutiva brand because they’re organic, non-hydrogenated, well-sourced, and the best shortening choices I’ve been able to find. I pick them up at Amazon, Target, or Sprouts. It’s certainly not a health food, but it’s easy to work with. I also think if I eat shortening on 1-2 holidays in the year, I’m probably not going to die.
If you want to try it with butter, it will work. Many of you have made this crust with butter over the years with great results! Now that we need to eat dairy free, butter’s not a choice for us, but it’s GREAT in pie crust if you tolerate it. The big trick is keeping your butter very cold. You’ll just want to dice it into tiny cubes, make sure they’re good and cold before combining them with the flour mixture, and then be sure to use very cold water for the slurry. Also, when combining the butter into the flour during the initial step, you’ll stop when the pieces are pea-sized rather than when it’s smooth and totally combined. (Again, you can do this in a food processor)
Our Favorite Flour Blend: We use a 1-to-1 gluten free flour blend, which works as a cup-for-cup substitution for white flour in most baking recipes (cookies, muffins, cakes, etc.). We mostly use Bob’s Red Mill’s blend because it gives such consistent results. It’s also pretty easy to track down. I order in bulk from Amazon or Thrive Market, or pick it up at Sprouts, Kroger, Safeway, or even Target or Wal-Mart.
Only Need One Crust? This gluten free pie crust recipe makes a double crust (top and bottom). If you only need one for your pie, place the second wrapped disc of dough into a freezer-safe zip top bag and freeze it for up to 3 months. Let it thaw in the refrigerator, then place it on the counter for 30-40 minutes until it’s soft enough to roll out.
PS – More Gluten Free Desserts to Love:
Gluten Free Pie Crust (Vegan Friendly)
- Total Time: 40 minutes
- Yield: 1 double pie crust 1x
Description
How to Make Gluten Free Pie Crust – My nearly fool-proof method for flaky, gluten free crust every time. (Gluten free, vegan friendly)
Ingredients
- 2 cups Bob’s Red Mill 1-to-1 Gluten Free Flour Blend
- 1 cup Spectrum shortening
- 1 Tbsp honey (or agave, for vegan)
- 1 tsp salt
For the slurry:
- 1/3 cup flour blend
- 1/2 cup water
Instructions
- Blend 1 cup shortening into 2 cups flour, using a pastry blender (seen in the photos) or a food processor (seen in the video). You’ll want to keep blending or pulsing until it’s very fine and the mixture starts coming together. Add salt and honey to the shortening/flour mixture.
- NOTE: if using butter, stop blending/pulsing when your flour & butter mixture is pea-sized to help keep the butter cold. If using shortening, keep blending or pulsing till the mixture comes completely together.
- In a small bowl, mix together a slurry by combining 1/2 cup water and 1/3 cup flour mixture. Whisk or stir until smooth and no lumps remain. Pour the slurry over your dough and toss with a large fork until the mixture is one cohesive ball. Dough will be wet.
- Use a tiny amount of flour to dust your countertop or work surface and turn dough out onto the counter. Sprinkle a tiny dusting of flour over the top of the dough ball (just enough so that it doesn’t stick terribly to your hands), and shape the dough into a ball or disc.
- Divide the dough in half. Flatten each half into a small disc and wrap in plastic wrap.
- Refrigerate 20-30 minutes, or until mostly chilled, but still slightly pliable.
- Note: if you only need one crust for your pie recipe, place the second wrapped disc of dough into a freezer-safe zip top bag and freeze it for up to 3 months.
- Roll out the dough between to sheets of parchment by laying one piece of parchment paper down on the counter or work surface you’ll be using. Unwrap one disc of dough and place on the parchment. Cover with a second piece of parchment.
- Starting at the center of the dough and moving outward in all directions, use a rolling pin to roll out the dough to a 9 1/2-10″ circle (it doesn’t have to be perfect). If the dough is cracking quite a bit, it’s just a bit too cold. Give it 2-3 minutes to warm up a bit then try again.
- Remove the top piece of parchment and lay the open side down into your pie plate. Gently and slowly, peel back the second piece of parchment, then pat the dough down into the pie plate. If the dough has any cracks in it, use your fingers as needed to patch up any seams.
- Even out the edges by either trimming or folding any extra dough under. Then crimp with your fingers as shown, or press down the edges with a fork. Fill with your desired filling, and bake as usual. If you notice the edges browning at any point, you can tent them with foil (this hasn’t been a big issue for me.
To bake with a filling:
- Just follow your pie filling recipe directions. If your cherry pie bakes for 45 minutes, bake it 45 minutes. If your apple pie bakes for 50 minutes, bake it 50 minutes. This has worked for me for apple, berry, pecan, and pumpkin pies without any problem.
If you are baking it alone to fill with a cream filling later:
- If you are baking the crust alone to fill with a cold cream later, you can bake it at 375 degrees for about 30 minutes, or until it’s just starting to color around the edges and it’s completely set. Don’t forget to prick the bottom a few times with a fork (or use pie weights) to prevent the bottom from puffing up too much. Also be sure to let it cool completely before adding your filling.
- Prep Time: 10 minutes
- Category: Dessert, Pie
- Method: Oven, Baking
- Cuisine: American


That pie looks delicious! I’ve always been super intimidated to make pie crust, but this looks pretty easy!
Paige
http://thehappyflammily.com
You DO make it look easy… and I’m going to hope for the best when I try this in a few short weeks.
Boy Howdy! Does this Pecan Pie look divine!
Pecan pie is one of my favorites. My mother-in-law has celiac and usually just eats her pie crustless (I know…), I’ll need to tell her about this Bob’s Red Mill kind!
I have an illogical aversion to rice flour. I will try this with my sorghum blend and get back to you if it works. Even if I make it twice to turn out once, it is less than buying a crust from Sprout’s. (And i can choose my flours!)
Blend DID NOT WORK in this recipe!
But I found a sorghum crust here that worked great. http://wholegrainscouncil.org/node/6739/print. And I used the double wrap to roll to get a double crust.
Thanks for the inspiration!
I’m sorry it didn’t work for you! I made four pies for Thanksgiving using this blend, and 2 others in the weeks prior without a problem. I’m so sorry! Thanks for sharing the other recipe in case anyone else has trouble.
My blend, not BRM.
Oh, okay. I was going to be extra sad if it hadn’t turned out for you with the Bob’s blend 🙂
Made blueberry hand pies using this pie crust recipe yesterday substituting butter for shortening and it was amazing!
I had bought the 1 to 1 flour first, used traditional approach, and ended up with sticky mess and gave up that day. Then found your recipe since BRM did not have a crust recipe and tried again today! Success! It was for quiche so I omitted honey. The key was chilling the dough and rolling out between parchment paper, my new favorite way for rolling out dough. Had a little trouble peeling off paper once in tin, but a little patching isn’t unusual. The top piece of parchment peeled off easily–maybe I will try rolling it out, flipping and rolling from other side a couple of times, with the hope that both sides will peel off easily, having come in contact with the rolling pin. Thank you!
Oh, I’m so glad it worked for you! I had so many failed crusts before this one.
I will give this a try. I am not sure what your dietary restrictions are with dairy, but I found I could use ghee as the protein has been removed. For me it has opened all doors (although its pricey)! Thanks for the recipe. I will try.
We’re HUGE ghee fans. I haven’t tried it in this recipe, but I bet the flavor would be awesome!
I made this with butter – it was perfect! A little harder to work with when rolling than a wheat flour crust, but so worth the effort. Crust was flaky, browned nicely. Thank you so much!
Does the shortening need to be cold like butter is supposed to be when making crust?
It doesn’t need to be cold, but can be. Your choice!
Made this today for my grandkids as they have several allergies. First time they have ever had pie! It was really good! thanks so much for the recipe and tips!
I’m so glad they enjoyed it! Here’s to many more pies to come!
Thanks for sharing the recipe. There aren’t a lot of pie crust recipes for the 1 to 1 flour, probably because Bob’s has a gluten-free pie crust mix. There were a few problems with the recipe for me. I understand that not all recipes will work for everyone for whatever reason.
For one, I don’t see how 1/2 cup of water is at all enough. If other people had to add water, I wish they would have commented. I used ice water, so I’m not sure if that affected it. I was able to roll out the first half of the dough, but it kept breaking in the middle, even though that’s where most of the dough was? I also had trouble getting it to ball together with just the 1/2 cup of water. I followed the recipe exactly, but I used regular shortening.
When I rolled out the second half, I went ahead and just added a teaspoon of egg white wash and kneaded it in. That helped, but it was still crumbling at the edges and not staying together well. Also, there was NO extra crust. This means that if you don’t place your top crust directly in the middle, you will have to pray that you can center it without breaking it.
All that being said, it did bake into a pie crust, but it wasn’t pretty. I wanted to upload a picture, but the comments don’t allow, so I’ll try to put it on my website at some point. I put an egg white wash on the base and an egg yolk wash on the top. It did brown and the bottom crust held up to the very juicy blueberries inside for 24 hours. Not sure it will last much longer. I think the fat that you choose is really important for the taste in this recipe. Shortening doesn’t have a great taste to it.
I’m sorry this one wasn’t to your liking. It sounds like you’re on a good path to finding a method and recipe you love!
Why can’t you eat butter? Do you have a milk protein allergy? Readers see a comment such as the one about “can’t eat butter” and wonder why no more info – makes people think there is something wrong with butter that we should know more about.
Georgia – I have many places on my site mentioned that our family is gluten & dairy free. No other reason than that! I always try to provide options when possible 🙂
hi how long would you bake this for?
Gianna – Are you baking it by itself or with a filling? If you are baking it by itself (so you can fill it with a cold cream filling, for instance), I’d watch it carefully and start with about 12-15 minutes (per this tutorial). You want it to just be set and the edges are starting to get barely golden.
Hi Emily,
I used your pastry recipe this weekend to make pies for thanksgiving. I substituted the shortening with equal parts cold cubes butter and margarine. I had to fold the dough twice to bring it together, which was easy to do. The pastry itself rolled out beautifully and evenly and held up well once baked and cut. I look forward to baking with this recipe again. Thanks for sharing this with us.
Jess – I am SO happy to hear that! Thank you so much for sharing. (And happy belated Thanksgiving!)
Hello! I just found your pie crust recipe! I want to make my son a gluten free peanut butter meringue pie so I’m wondering would I bake the crust first or fill it then bake it all together. I’m not doing so well with my gluten free baking!
Monica – I know it can be tricky at first! Since it’s a cold-filling pie, I’d bake the crust first, let it cool, then fill it. Then, you’ll follow your recipe instructions for the meringue (some have you put it under the broiler, others have you use a kitchen torch, etc.).
I am excited to try this crust recipe. I am looking to make an apple pie. Will I need to double the recipe? Thank you.
Joy – This recipe is enough for a double crust (1 top and 1 bottom). You shouldn’t need to double it 🙂 Happy Thanksgiving!