


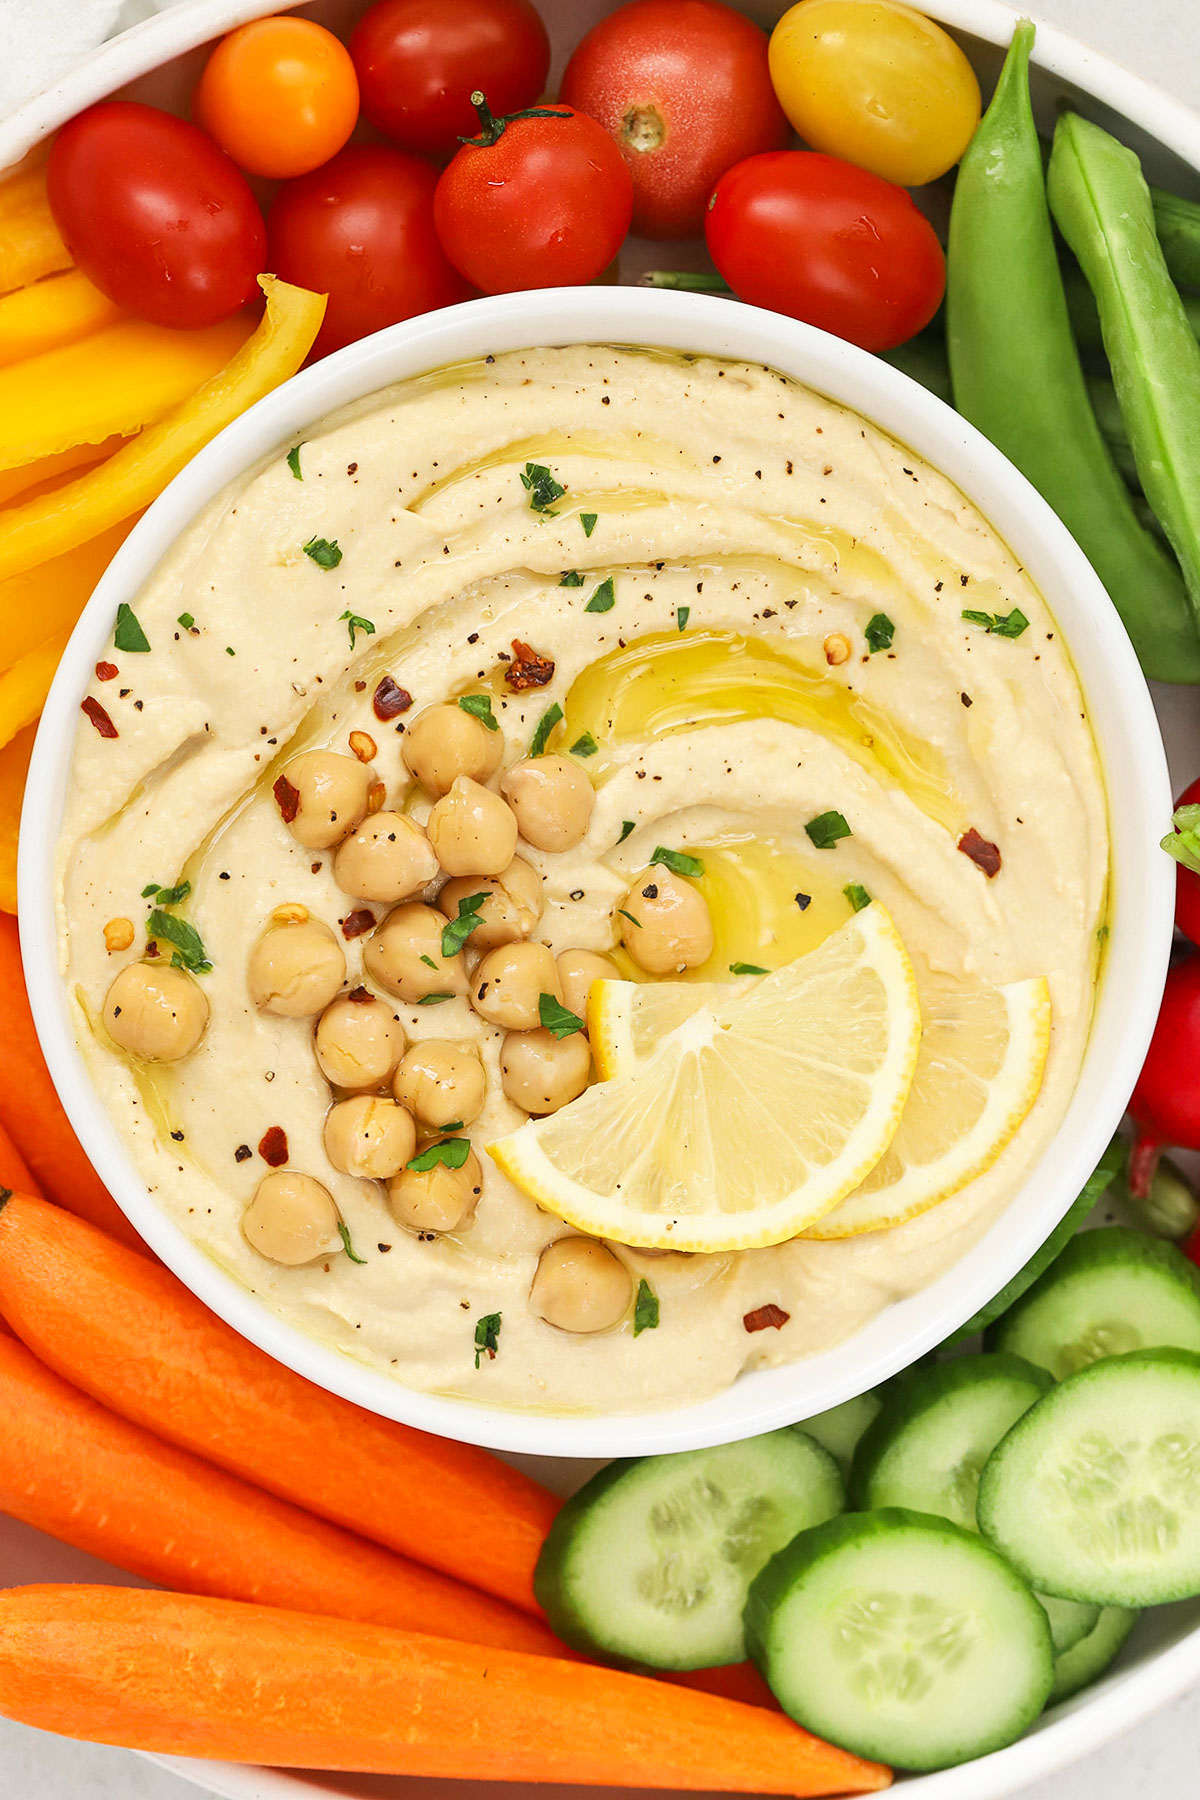
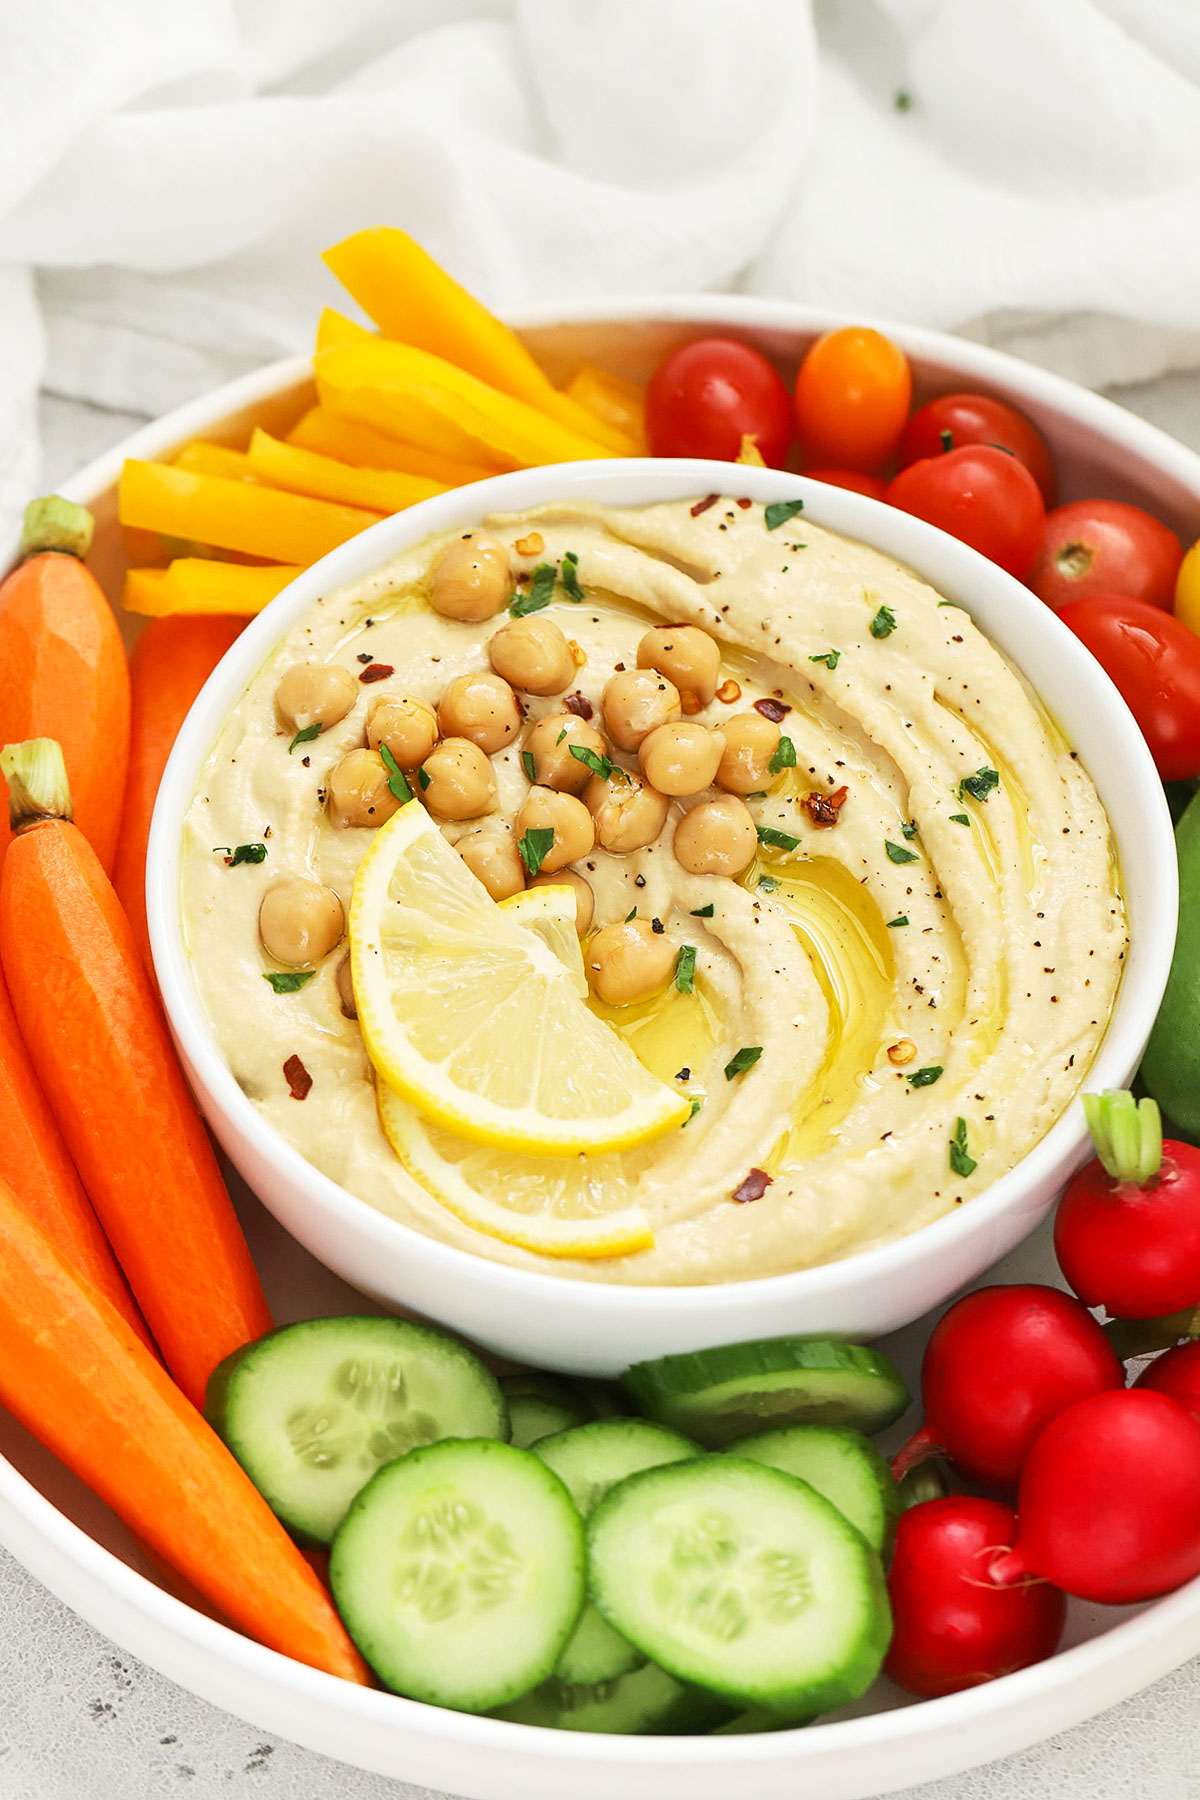
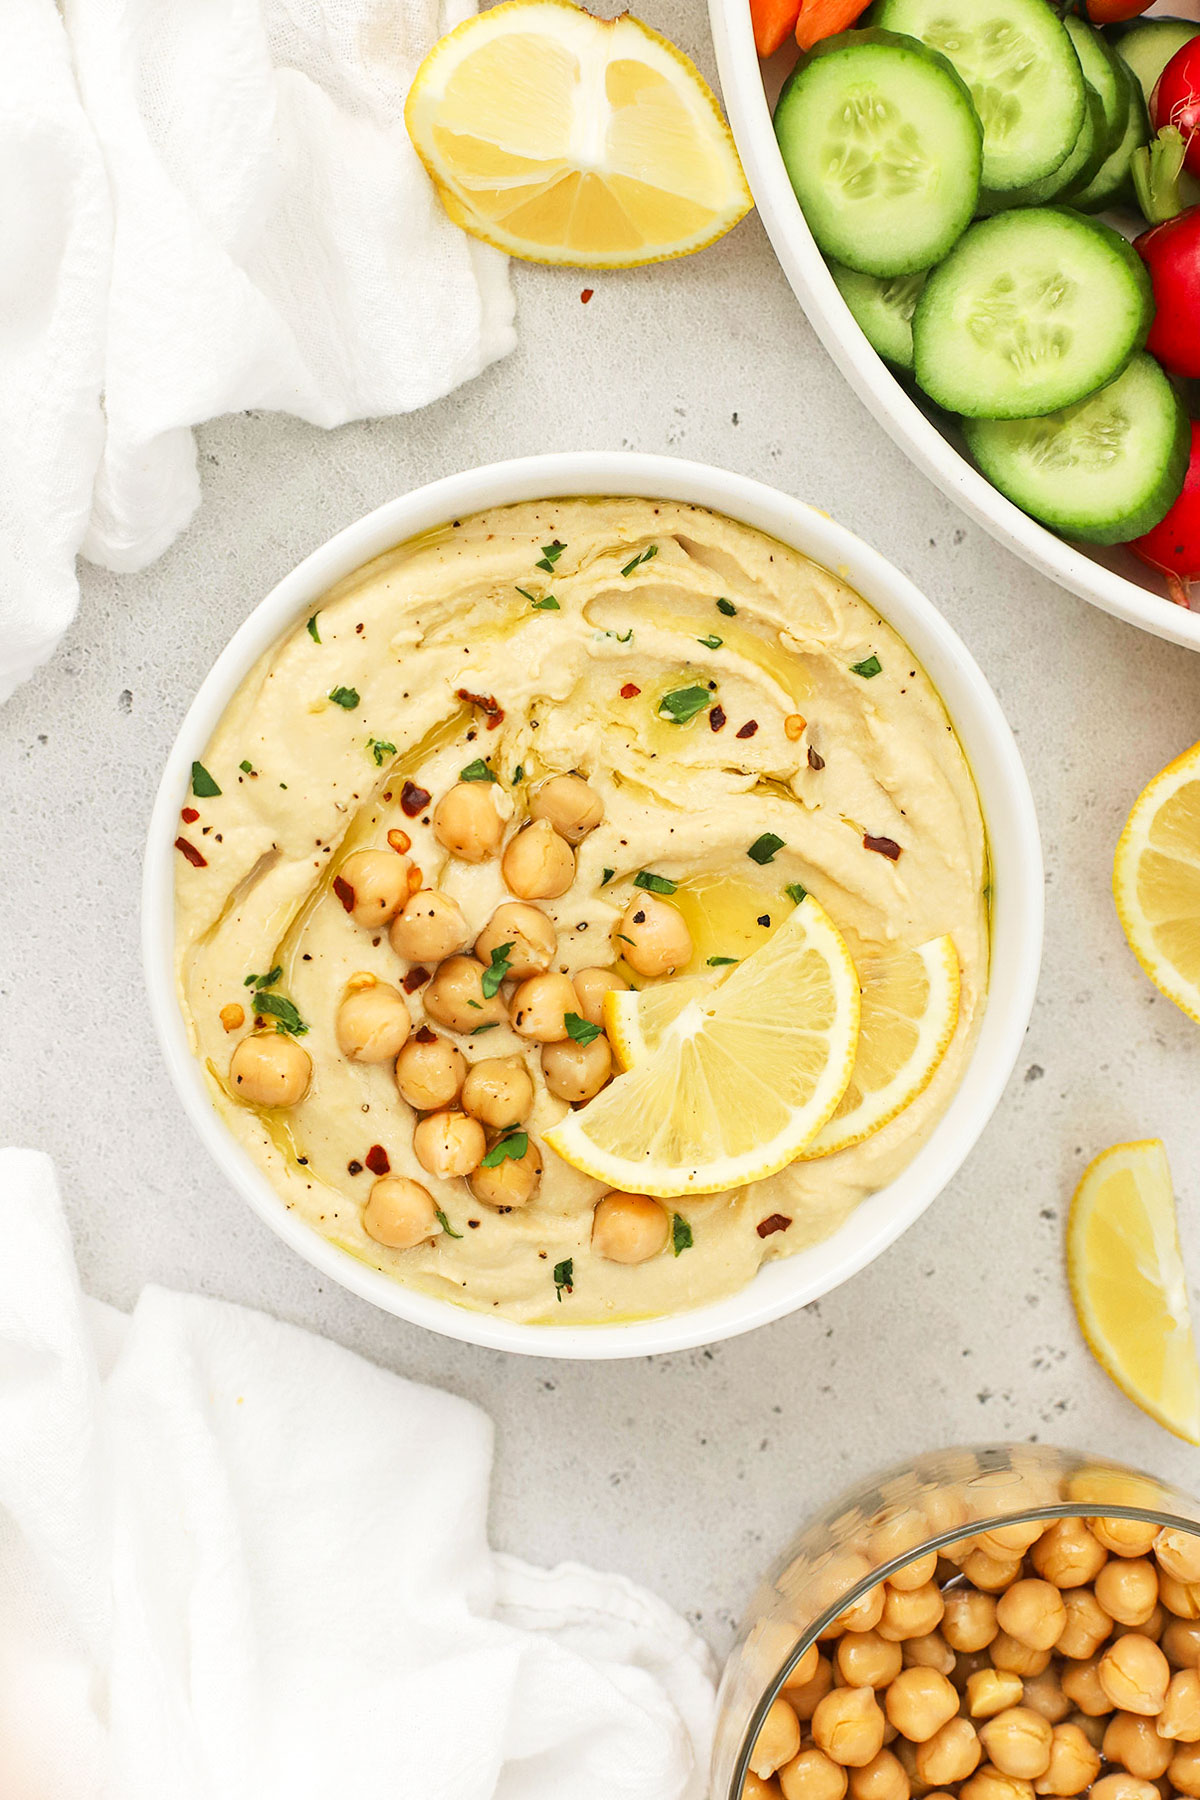
This easy Lemon Hummus recipe is one of my favorite healthy dips to add to snacks, lunches, appetizers, and more. It comes together in minutes with just a few simple ingredients! You’ll want to dip, dollop and spread it on everything!
I’ve been on a hummus kick.
It’s nothing new or fancy, but hummus is such a great dip to keep on hand! I love it as a healthy appetizer or easy snack with colorful fresh veggies, crackers, or pita chips, but this lemon hummus is also great on wraps, toast, or serving for parties. Basically: it’s the perfect hummus!
But the best part is that it couldn’t really be easier to make homemade hummus! All you need is a handful of ingredients and 5 minutes and you’ll have a batch of delicious, smooth hummus to enjoy any way you like!
Let’s make a batch!
Simple Ingredients To Get Started
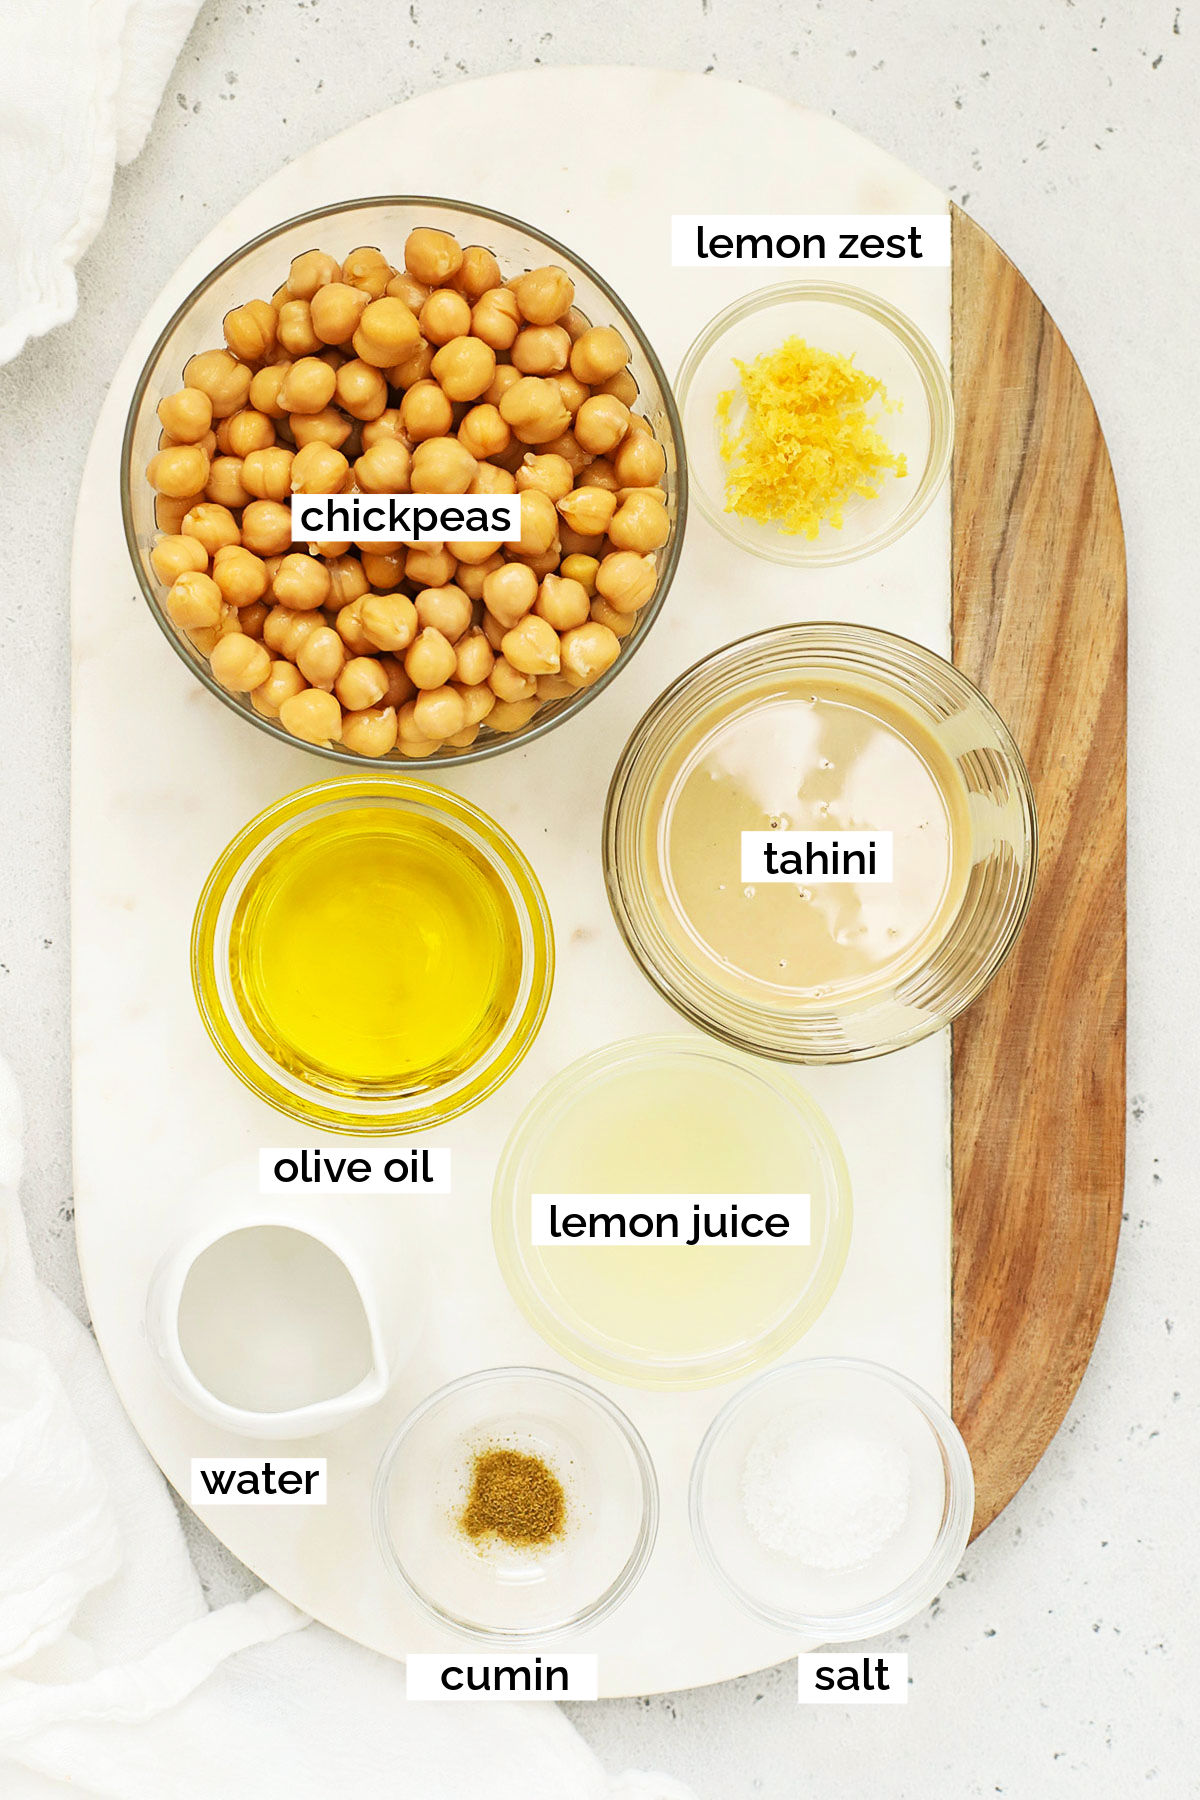
- A Can of Chickpeas (aka Garbanzo Beans). Depending on where you live and what brands are available to you, you might see chickpeas labeled as garbanzo beans. These are two names for the same thing, so either works here!
- Tahini. This sesame seed paste/sesame seed butter is a classic ingredient for hummus. On its own, it can taste strong and bitter, but mixed in with the other ingredients, the flavor is much softer and lighter. Don’t panic!
- Olive Oil. A classic hummus ingredient. A little bit of extra virgin olive oil vastly improves the texture, so I don’t recommend skipping it!
- Fresh Lemon Zest & Lemon Juice. For bright lemon flavor, we’re using both lemon zest and fresh lemon juice. You’ll need just 1 lemon for this delicious recipe! (PS – Don’t know how to zest a lemon? This tutorial will teach you 5 easy ways!)
- Water. A must for getting the right consistency. I like my hummus to be easy to dip things into, so a little water helps thin it out to a dip-able consistency.
- Salt & Cumin. Lastly, you’ll need some salt and ground cumin. Since I want the citrus flavor to shine through, I’m using less cumin than traditional hummus/plain hummus, but feel free to add more if you want more cumin flavor!
Swaps & Substitutions
- Chickpeas. Instead of using canned chickpeas, you can absolutely cook dried chickpeas at home, if you prefer! You’ll need about 1 1/2 cups cooked chickpeas to make this hummus.
- Tahini. Can I make lemon hummus without tahini? Yes. If you can’t find tahini or you’re allergic to sesame, you can try swapping in unsweetened cashew butter. Almond butter is another option, though I find cashew butter to be more neutral in flavor. (DON’T use peanut butter!)
- Lemon. Since lemon is the star flavor in this lemon hummus, I ONLY recommend fresh lemons rather than bottled lemon juice. You’ll need both the zest and the juice, so fresh lemons work best.
How To Make This Easy Hummus, Step By Step
As always, you can find the full recipe, with ingredient amounts, detailed instructions, and tips in the recipe card below!
I don’t mind store-bought hummus from the grocery store, but it’s remarkably easy to make your own hummus! All you need is a blender or food processor and our simple recipe. Here’s what to do, step by step:
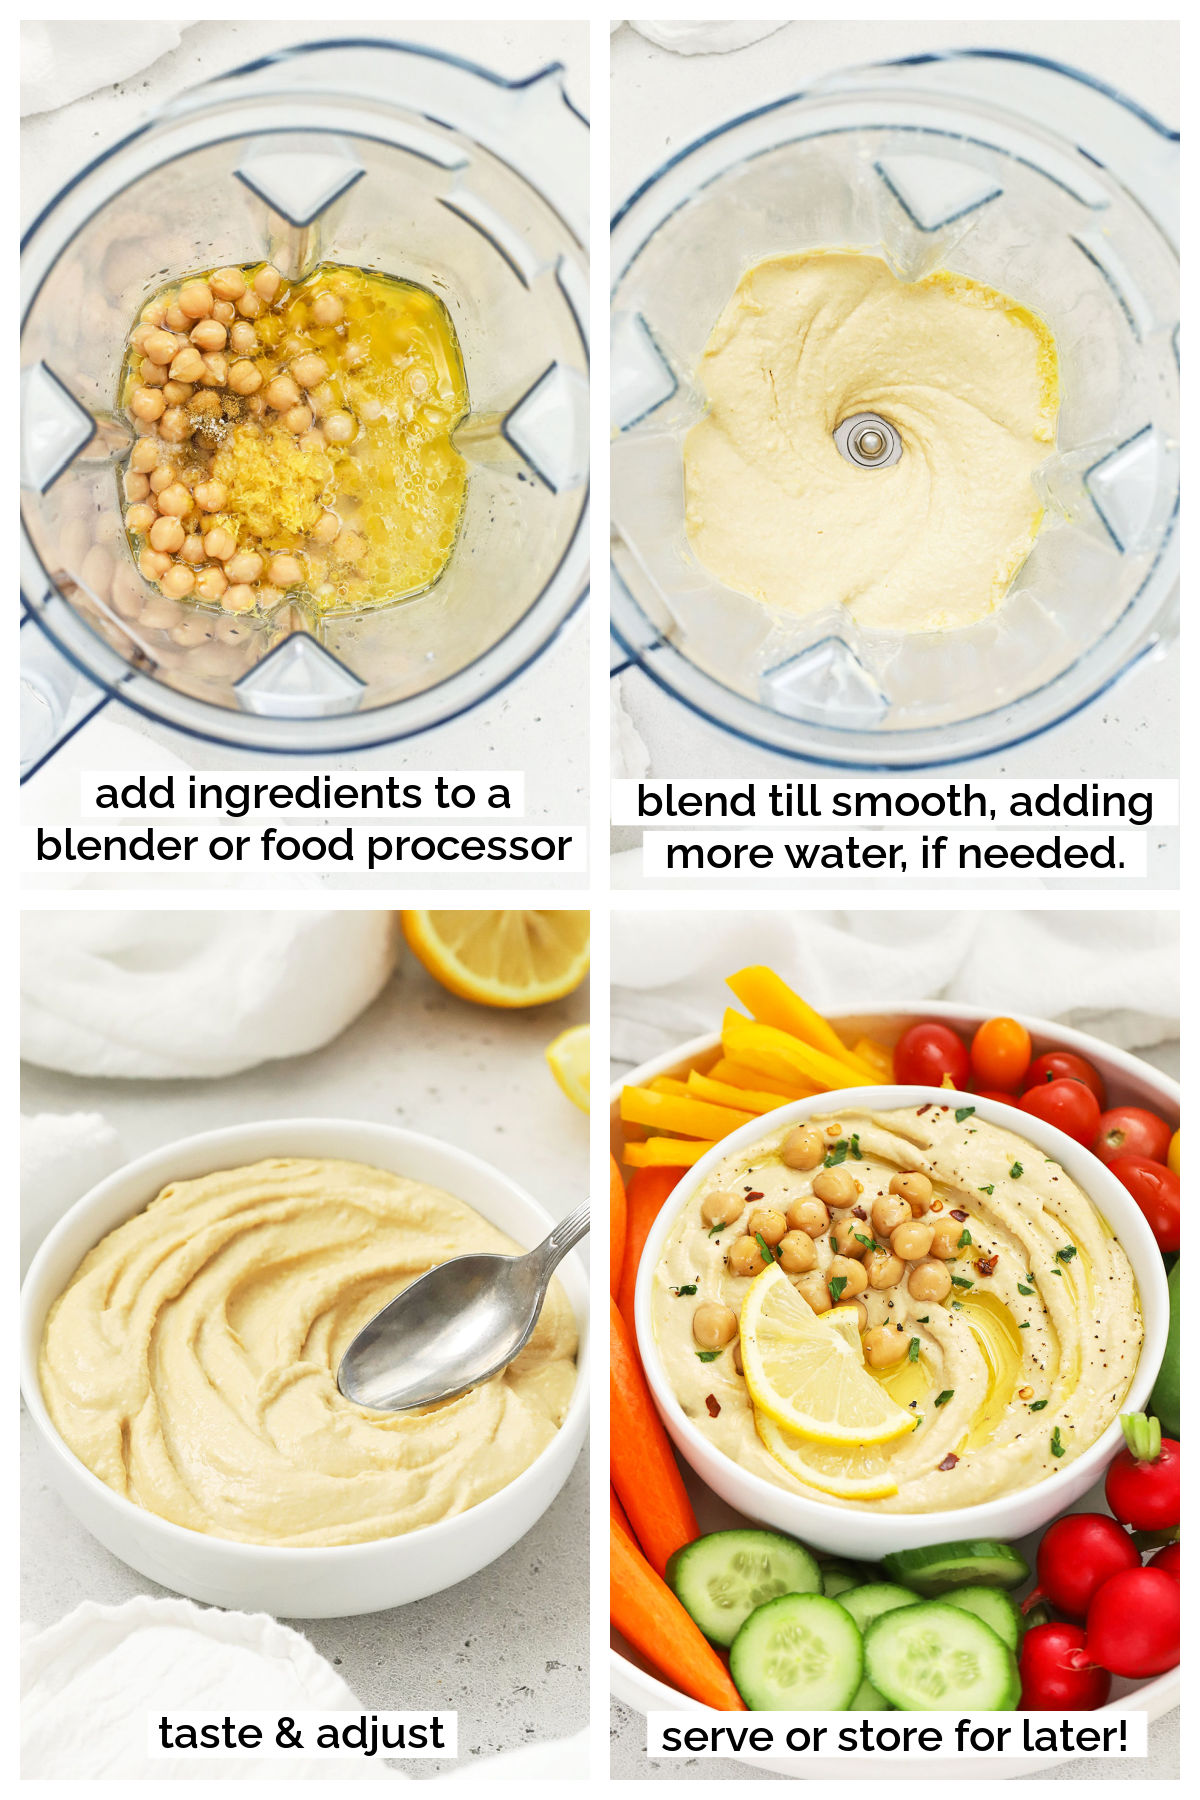
- Combine. In the bowl of a food processor or a high-speed blender, combine chickpeas, tahini, olive oil, lemon zest, 3 Tablespoons lemon juice, 3 Tablespoons of water, 1/4 teaspoon kosher salt, and the cumin.
- Puree the hummus, adding more water, if needed, to thin out the hummus (I like to add 5 Tablespoons of water total for a smooth, creamy texture.) If using a food processor, you may need to stop and scrape down the sides of the bowl a few times.
- Taste & Adjust. Taste the hummus and add more lemon juice, salt, or cumin, to taste.
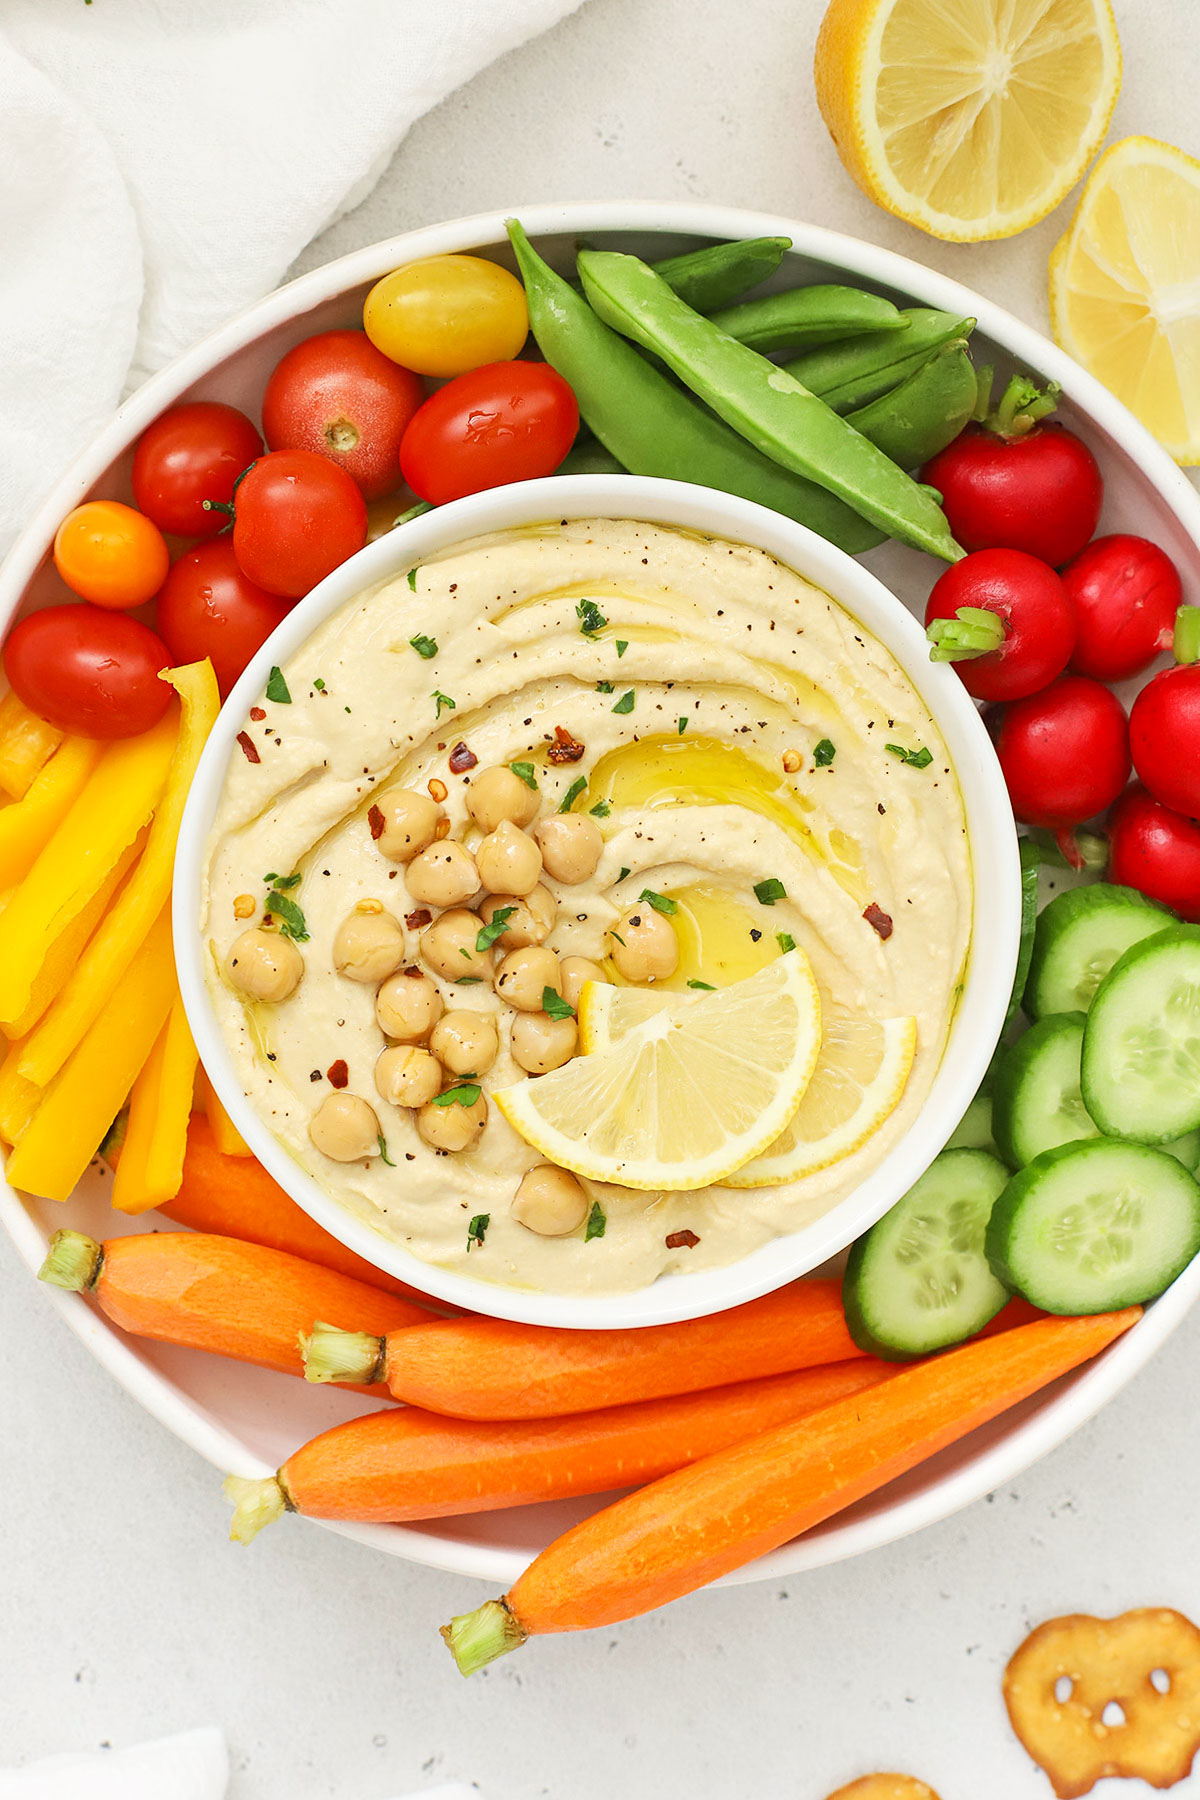
- Serve & Store. Add any desired garnishes and enjoy right away, or cover the hummus and store in an airtight container in the refrigerator 3-4 days. Enjoy with fresh veggies, crackers, pita chips, pretzels, etc. (Try our post: 40+ Things To Serve With Hummus!)
Get The Consistency Just Right! More water will thin out the hummus more. If you like thicker hummus, start with just 3 Tablespoons of water. For more creamy hummus, you can add more water. (I prefer 5 Tablespoons of water)
Make It Pretty!
When I’m making this for myself, I could literally eat it right out of the blender without a second thought. (It’s that good!) BUT. When I serve hummus for company (think: veggie tray, snack board, charcuterie board, etc.) I love to dress it up a bit. Here are a few tricks for pretty presentation:
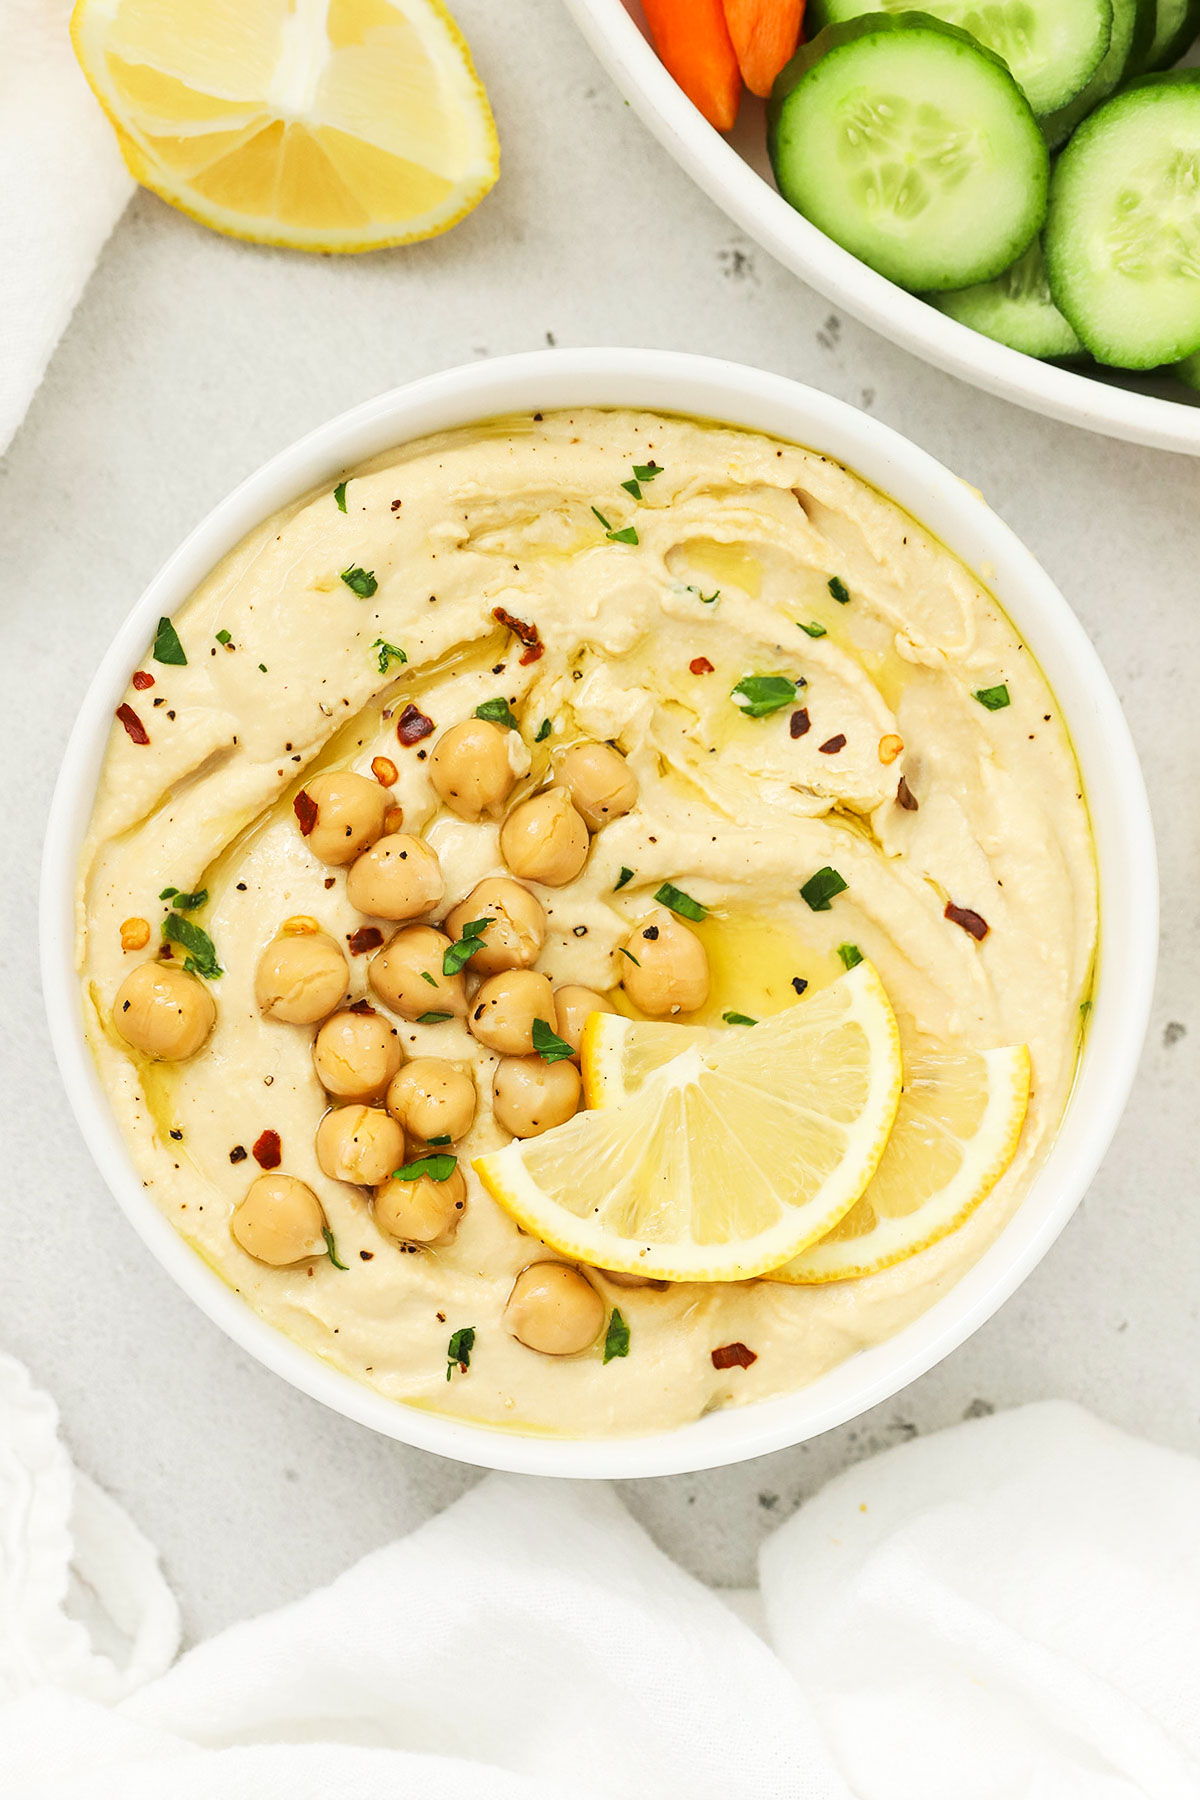
- Drizzle With Olive Oil. This little trick make the hummus look gorgeous, especially if you kind of “fluff” or shape the hummus a bit with the back of a spoon to create some texture first. (You can see how I did this in the video or in the step by step photos above!)
- Add Fresh Herbs. Some fresh parsley, dill, or basil can add a beautiful layer of color, while complementing the fresh lemon flavor.
- Garnish With Lemon Zest or Lemon Slices. A little flourish of lemon zest or a few slices of lemon immediately cue you in to the flavor you’re about to enjoy. Yum!
- Add A Pop of Color. This can be as simple as a few cracks of freshly ground black pepper, a sprinkle of paprika, some lemon zest, red pepper flakes, or one the fresh herbs suggested above. Or, surround the hummus with colorful veggies on a plate or platter. It immediately looks more inviting!
- Try Adding More Chickpeas. Garnish with a few whole chickpeas–it plays up the flavors of the hummus, and adds a little dimension. Toasted pine nuts can be another delicious option!
FAQ + Tips And Tricks For The Best Lemon Hummus
Try A High-Speed Blender. A food processor will absolutely get the job done, but for the smoothest, most velvety texture, a high speed blender will be the best method for making homemade hummus, since it can break down the chickpea skins easier. We love our Blendtec and Vitamix, but even our Nutribullet does a great job without breaking the bank!
How Long Does Homemade Hummus Last? This lemon hummus should keep well when covered and stored in the fridge for 3-4 days. (Keep in mind that the shelf life of homemade hummus is shorter than store-bought hummus, which can keep for 5-7 days in the fridge.)
Dietary Needs. This lemon hummus is gluten-free, dairy-free, vegan, and vegetarian friendly!
Variations To Try:
- Add Garlic! Feel free to add a clove of minced fresh garlic, or 1/8 teaspoon of garlic powder for another layer of flavor.
- Add Red Pepper Flakes. For some heat, add 1/8-1/4 teaspoon red pepper flakes for a kick.
- Add Herbs. Or, stir in some finely minced herbs at the end before serving, like parsley, basil, or dill.

Did You Make This Recipe?
Tell me all about it! Leave a star rating below when you try our easy Lemon Hummus recipe. I can’t wait to hear how it goes!
Easy Lemon Hummus
Ingredients
For The Lemon Hummus:
- 1 (14 oz.) can chickpeas, drained*
- 1/4 cup tahini
- 2 Tablespoons olive oil
- 1 teaspoon lemon zest zest of 1 lemon
- 3-4 Tablespoons fresh lemon juice
- 3-5 Tablespoons water
- 1/4-1/2 teaspoon kosher salt
- 1/8 teaspoon ground cumin or more, to taste
Optional Garnish:
- Lemon zest whole chickpeas, olive oil, red pepper flakes, cracked black pepper, or fresh herbs (parsley, basil, or dill)
Instructions
- Combine. In the bowl of a food processor or a high-speed blender, combine the drained chickpeas, tahini, olive oil, lemon zest, 3 Tablespoons lemon juice, 3 Tablespoons of water, 1/4 teaspoon kosher salt, and the cumin.
- Puree the hummus, adding more water, if needed, to thin out the hummus (I like to add 5 Tablespoons of water total for a smooth, creamy texture.) If using a food processor, you may need to stop and scrape down the sides of the bowl a few times.
- Taste & Adjust. Taste the hummus and add more lemon juice, salt, or cumin, to taste.
- Serve & Store. Add any desired garnishes and enjoy right away, or cover the hummus and store in the refrigerator 3-4 days. Enjoy with fresh veggies, crackers, pita chips, pretzels, etc.
- Keep in mind that for food safety, hummus should only be out at room temperature for a maximum of 2 hours. Store it in the fridge for best results!
Notes
- Blender VS Food Processor. In our experience, blenders make it easier for you to get creamy, smooth hummus.
- Chickpeas. You can absolutely cook your own dried chickpeas for making hummus. You’ll need about 1 1/2 cups cooked chickpeas for this recipe.
- Tahini. We like brands like Soom or Simple Truth. Look for unflavored, unsweetened tahini with only one ingredient (sesame seeds) for best results. If you’re allergic to sesame, you can try this recipe with unsweetened cashew butter, though the flavor will be slightly different.
- Lemon. For ease, zest the lemon BEFORE juicing it.
Video
Nutrition
Nutrition facts are an estimate only and will vary based on brands and amounts used.
Find it Online:
https://www.onelovelylife.com/lemon-hummus/Originally shared October 20, 2016. Fully updated January 4, 2024
I love how fresh this feels! And so easy to put together.
I made this a few days ago and the taste is perfect. good balance of lemon flavour.
I’m so glad to hear it! It’s my absolute FAVORITE. I make it on repeat all year long!
I make a very similar version of this (no tahini), but I mix everything together, and then roast it in a 400 degree oven for 1/2 hour before letting it cool and then pureeing. The roasted chickpeas really add a nice flavor.
That sounds delicious!
This looks amazing! I love the idea of the smoked paprika, it’s one of my favorite spices!