
How to Make an Animal Sensory Bin – Sensory play is a GREAT way to engage your kids. Learn how to put together a simple sensory bin with household items for HOURS of play!

Could anyone else use some more ideas for kids right now? (ME! I COULD!)
In addition to LOTS of books, kids’ podcasts, getting outside, and checking things off this list, I’ve been returning to some of our old favorites to keep kids entertained and help them regulate and process everything that’s going on in the world right now as we’re staying home for the foreseeable future.
One of our FAVORITES is sensory bins! We started using them when my kids were VERY small toddlers, and have adapted and grown with them as my kids have grown. It’s been ages since we put one together, but since I did a couple of weeks ago, it’s something even my bigger kids (7 and almost 9) have LOVED playing with every day.
If you’re new to sensory bins, I’ll walk you through just why we love them, how to make one with household items (it’s EASY!), and lots of ideas to change things up.
Here’s everything to know about making an animal sensory bin…
WHAT ARE SENSORY BINS?
SENSORY BINS ARE CONSIDERED AN INVITATION TO PLAY. They’re small boxes, bins, or bowls filled with items with different tactile textures, shapes, weights, etc. The idea is to allow your child to use his or her imagination to explore and play with the items inside while receiving sensory input.
SENSORY PLAY IS GOOD FOR KIDS! Learning to integrate your senses is a critical part of development for ALL kids, and sensory play (like sensory bins!) can be especially great for kids with sensory processing disorder, those on the autism spectrum, kids who feel anxious or upset, little ones with texture issues (food or tactile), etc.
THERE ARE *HUGE* BENEFITS TO SENSORY PLAY. Sensory-based play (anything that stimulates the senses–sight, sound, taste, smell, and touch/movement) was an integral part of our occupational therapy experience and continues to be even now that we’re past that phase of our lives. SENSORY PLAY CAN:
- ENGAGE YOUR 5 SENSES (a great way to integrate different systems in your body)
- HELP WITH BODY AWARENESS (proprioception), which can help kids understand where they are in space and how they relate to the things around them.
- ENCOURAGE BALANCE & MOTOR SKILLS. Hand in hand with body awareness, your child gets a better grasp of their own motor skills and balance with sensory play.
- REDUCE TEXTURAL SENSITIVITY/AVERSION. If you have a child who struggles with certain food textures, hates having messy hands, will only wear certain kinds of fabric, etc., they may benefit from regular (not forced!) sensory-based play. We saw huge strides in improving food and tactile sensory issues with regular sensory play.
- AND MORE! You can read more about sensory play (including how it positively impacts your brain, and even social development here)
Even now that sensory issues are much less of a struggle, we STILL love using sensory kids on school breaks, on weekends, or anytime we could use a good free play idea.
SAFETY DISCLAIMER – If you’re working with young kids, especially, it’s important to have a parent or adult supervising to make sure little ones aren’t putting stray items in their mouths, etc. Also, if your child has a diagnosed condition (such as Autism, SPD, etc.) I recommend approaching sensory play under the direction of your child’s therapists, specialists, and doctors.
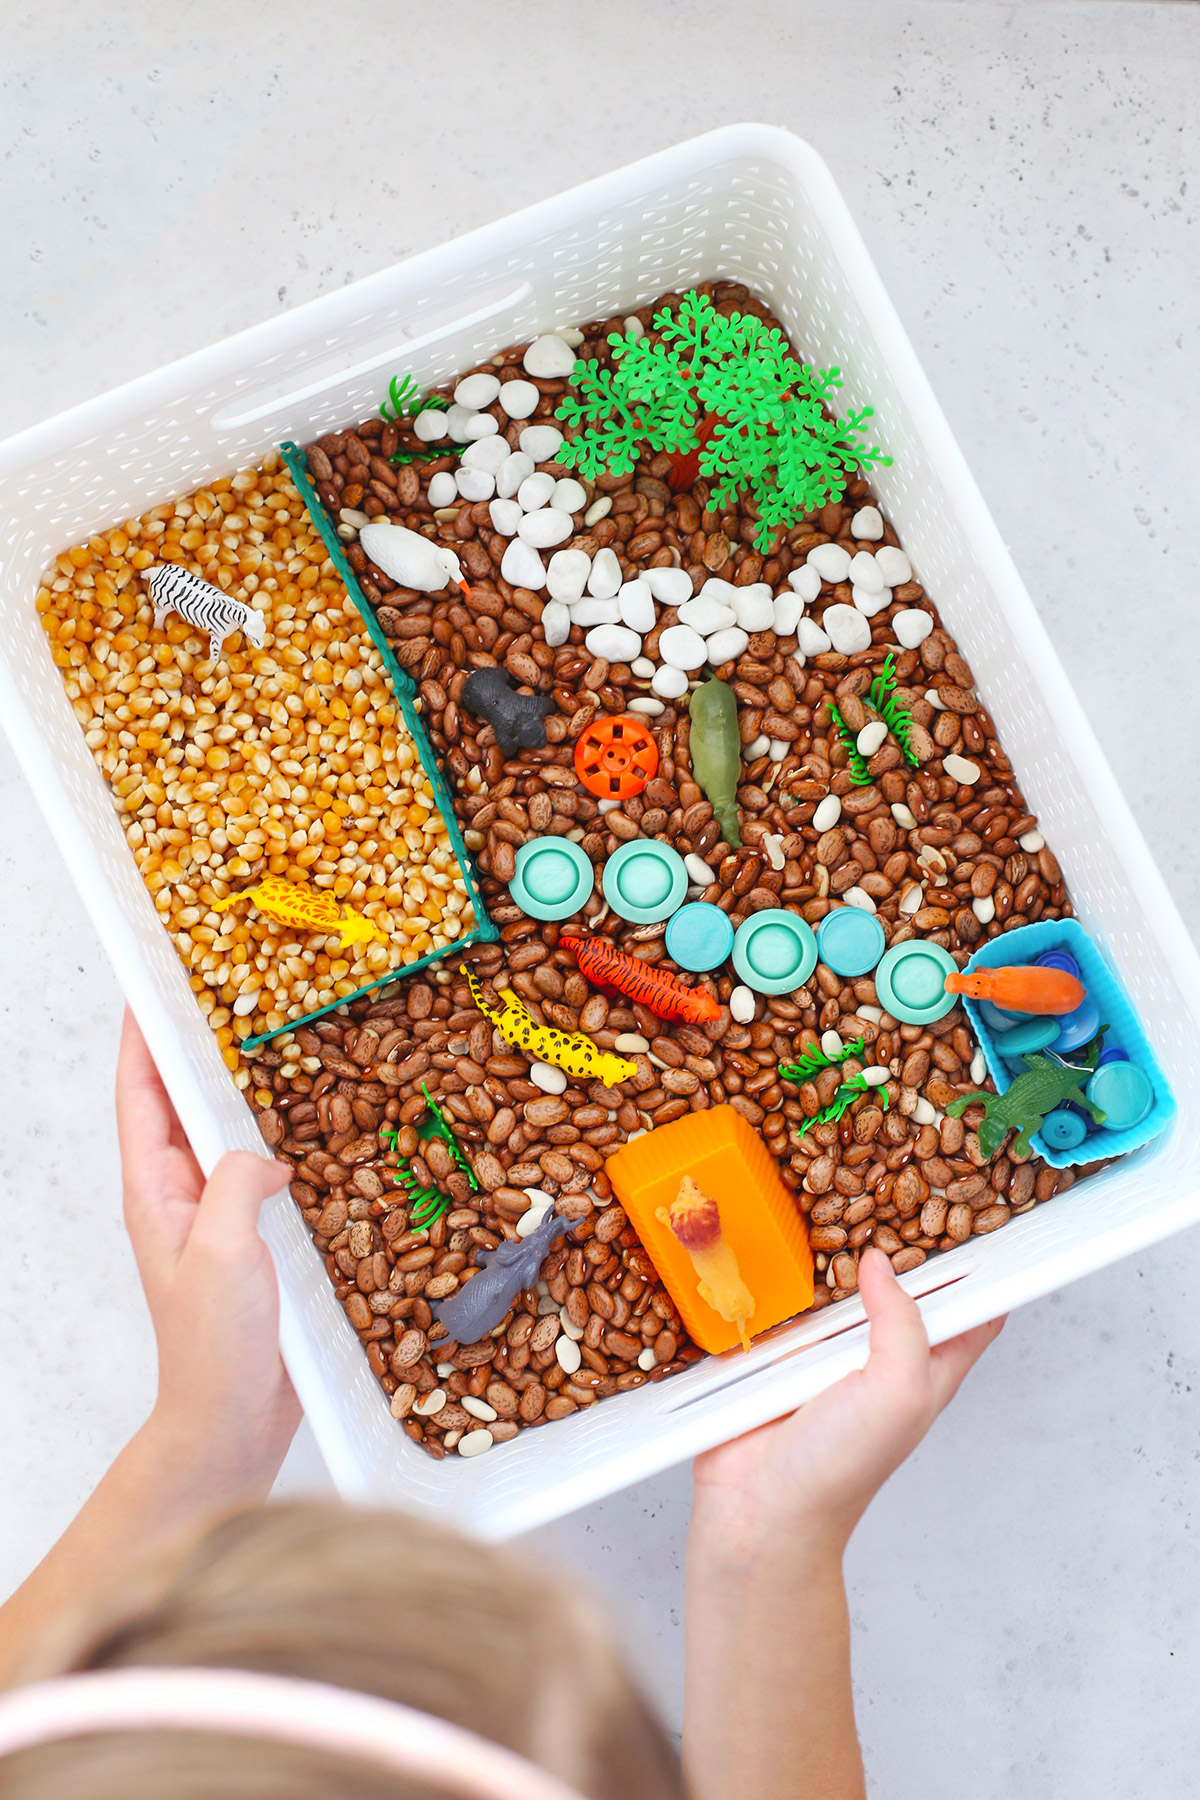
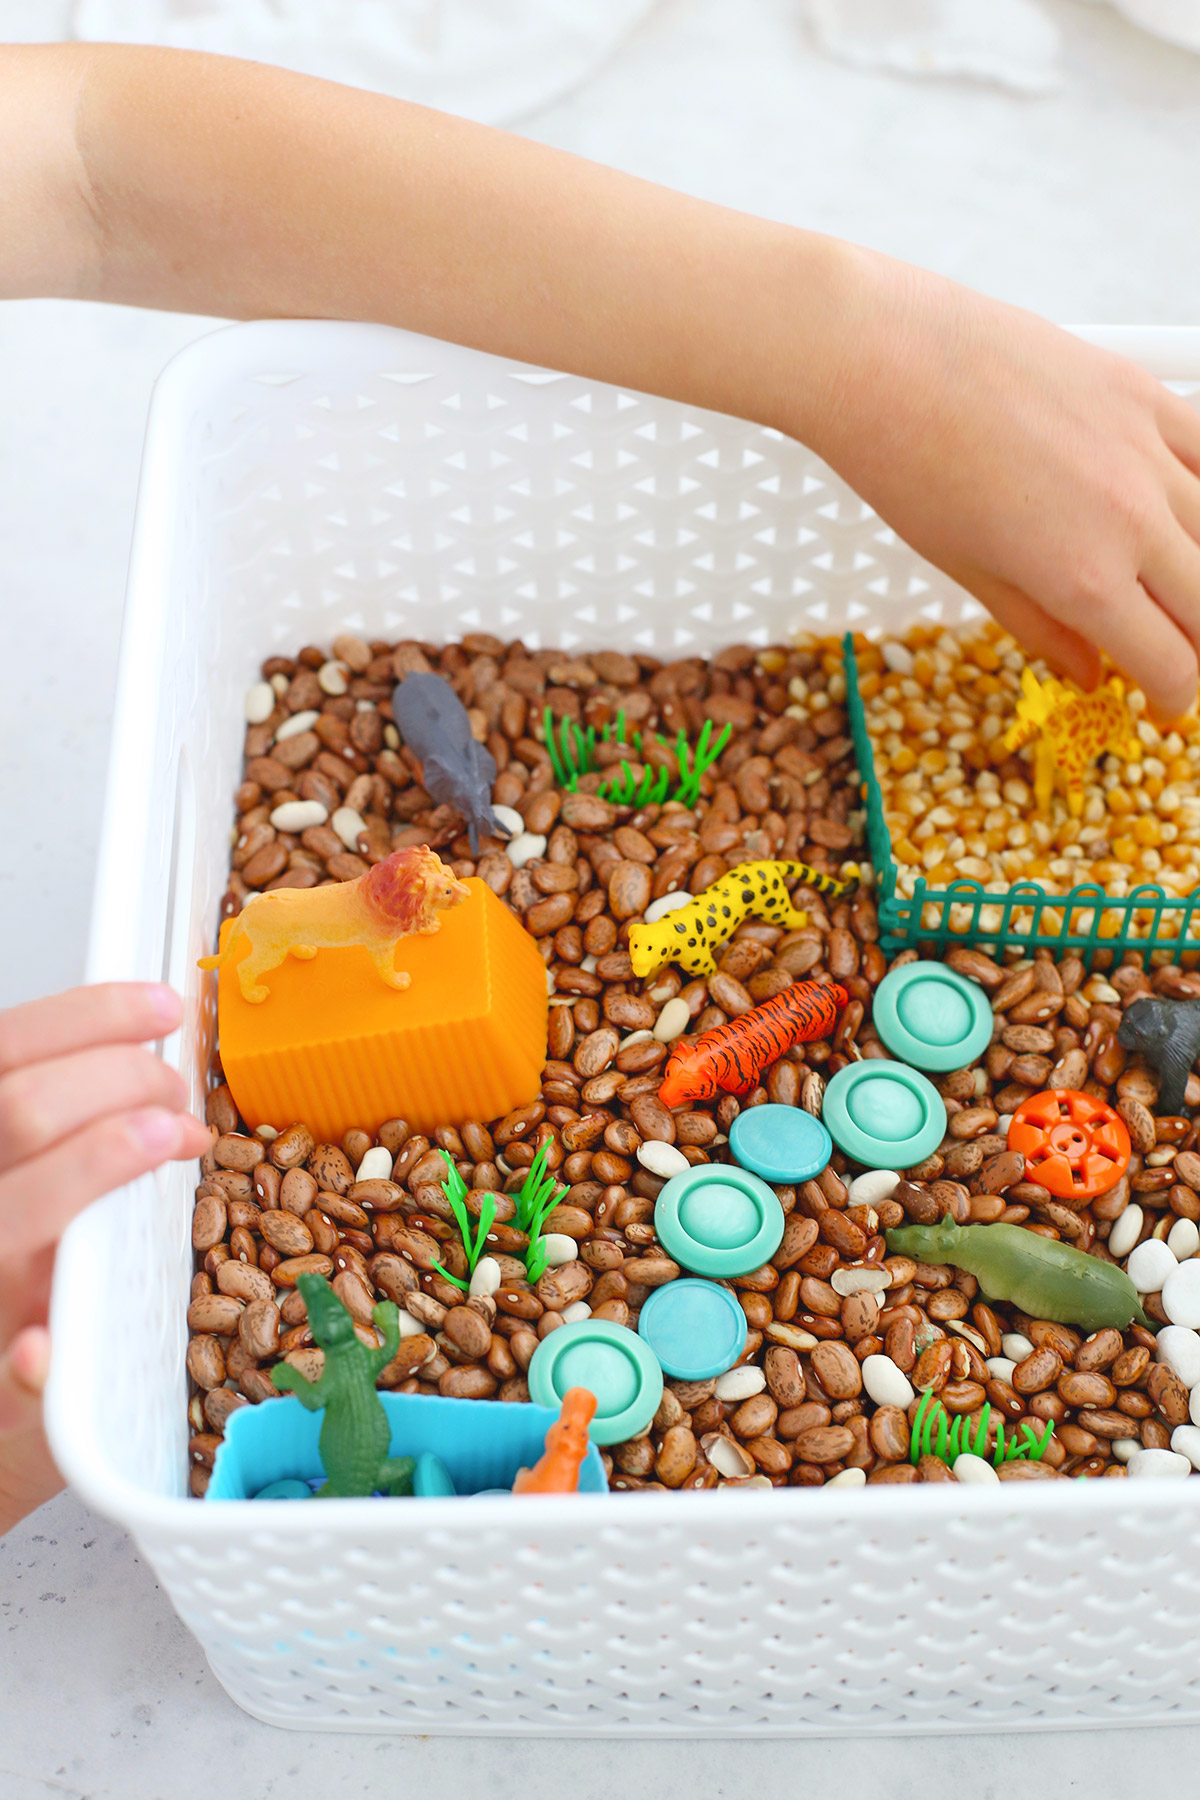
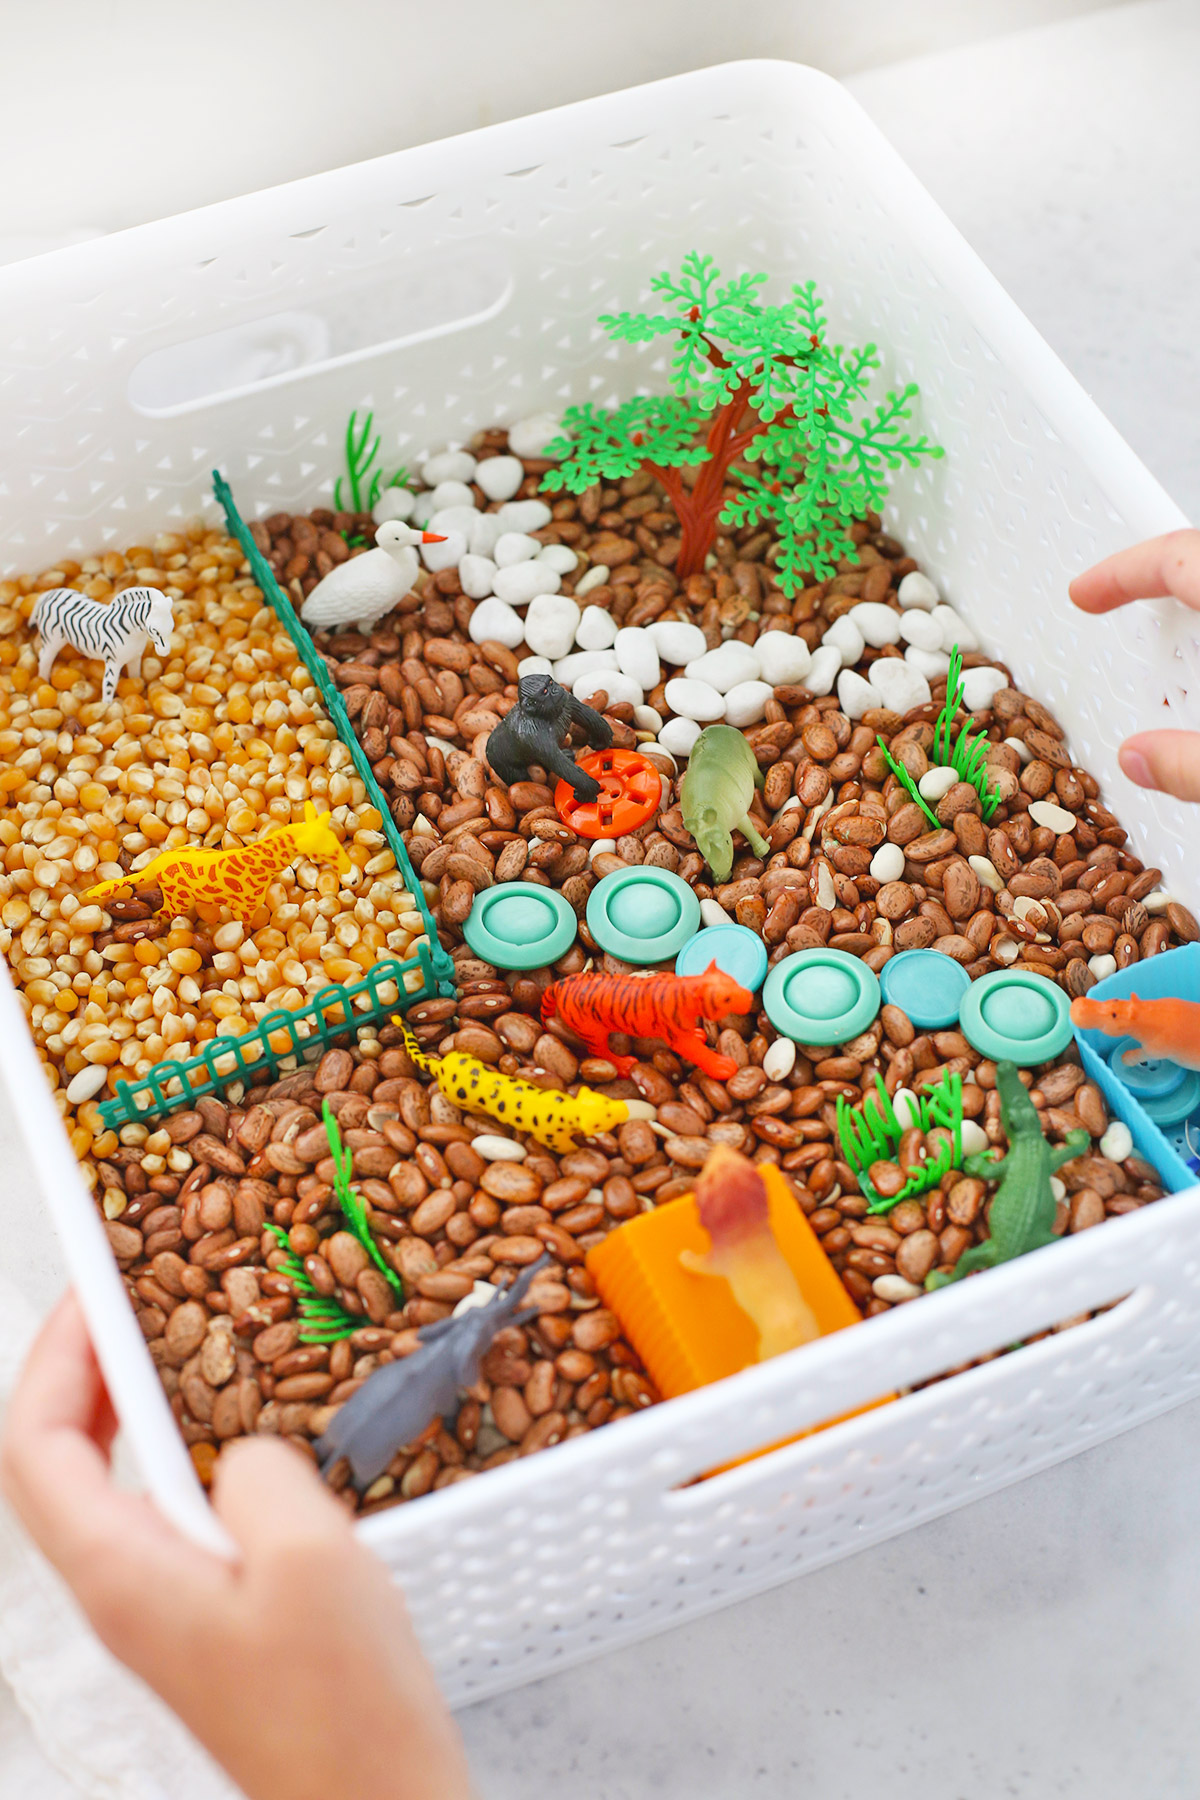
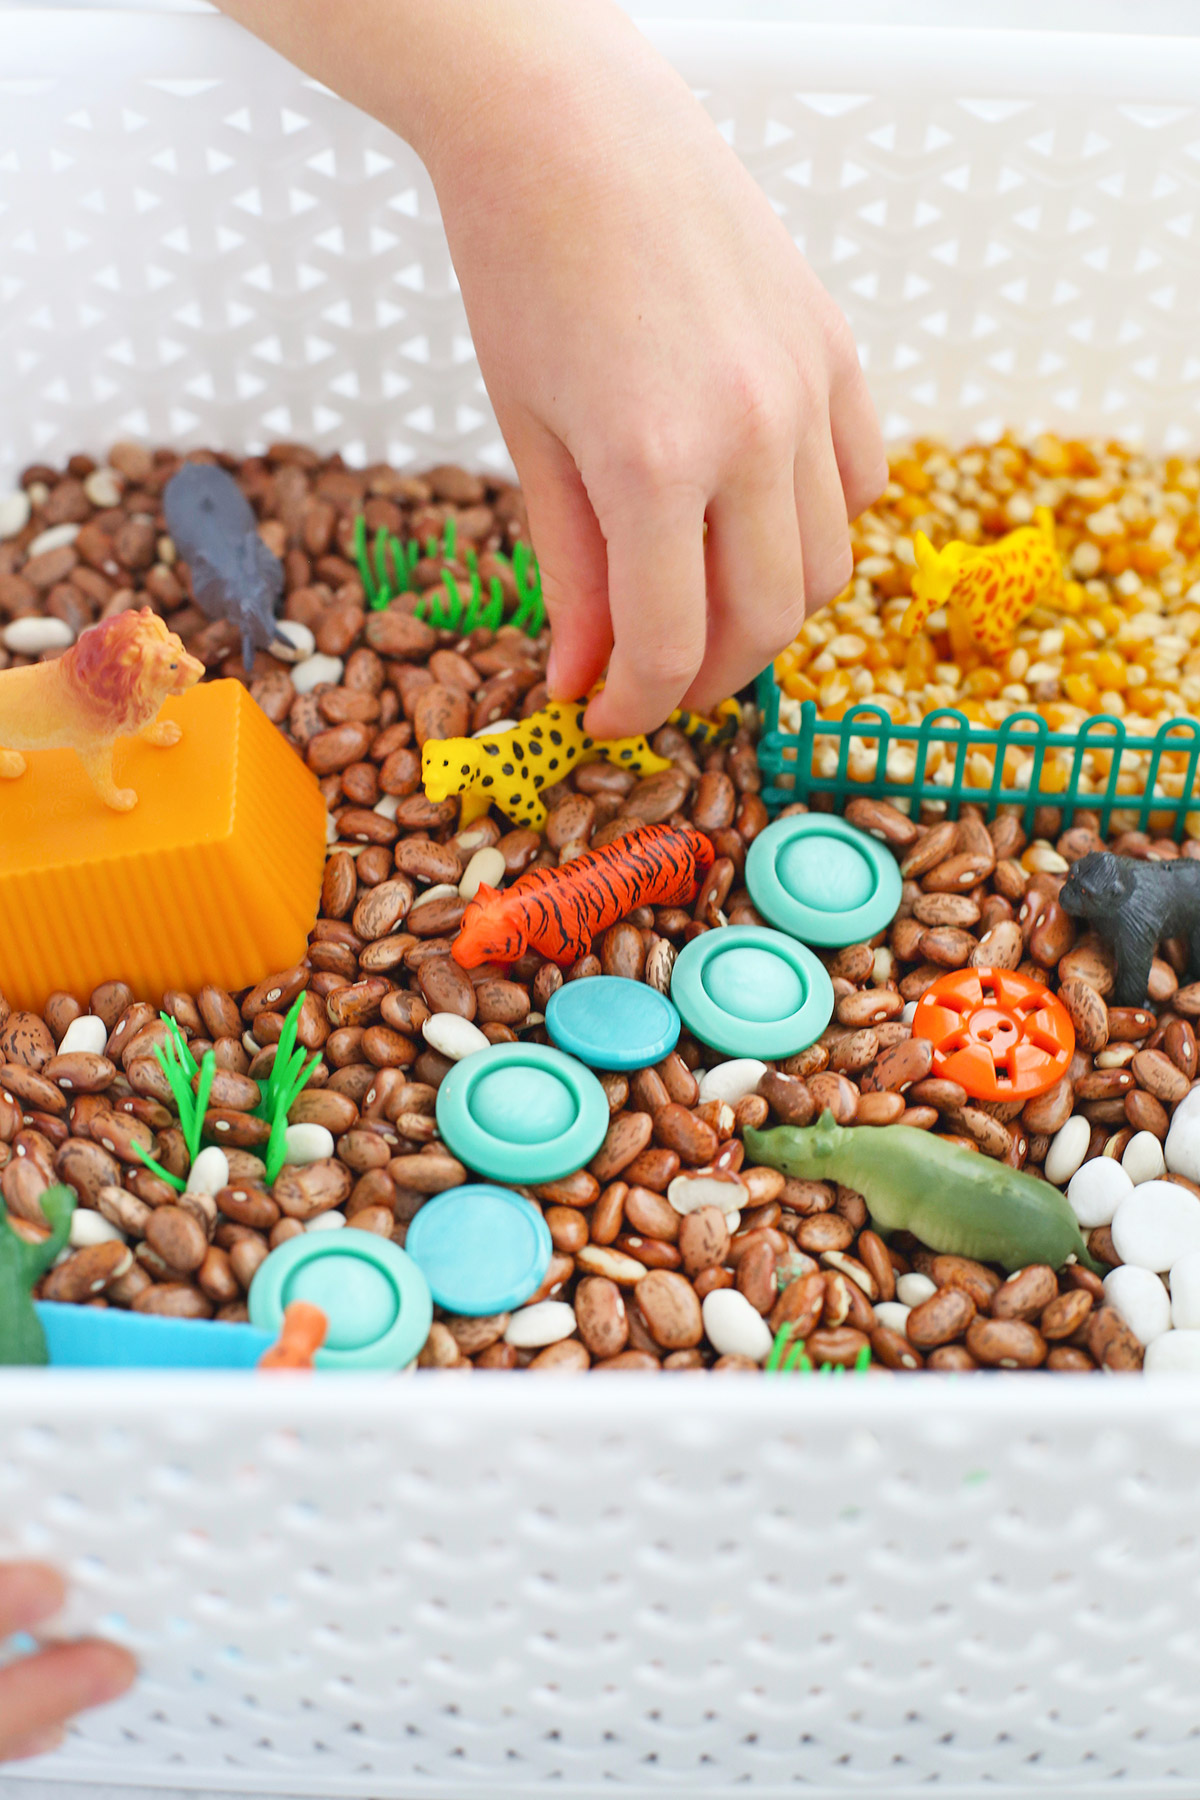
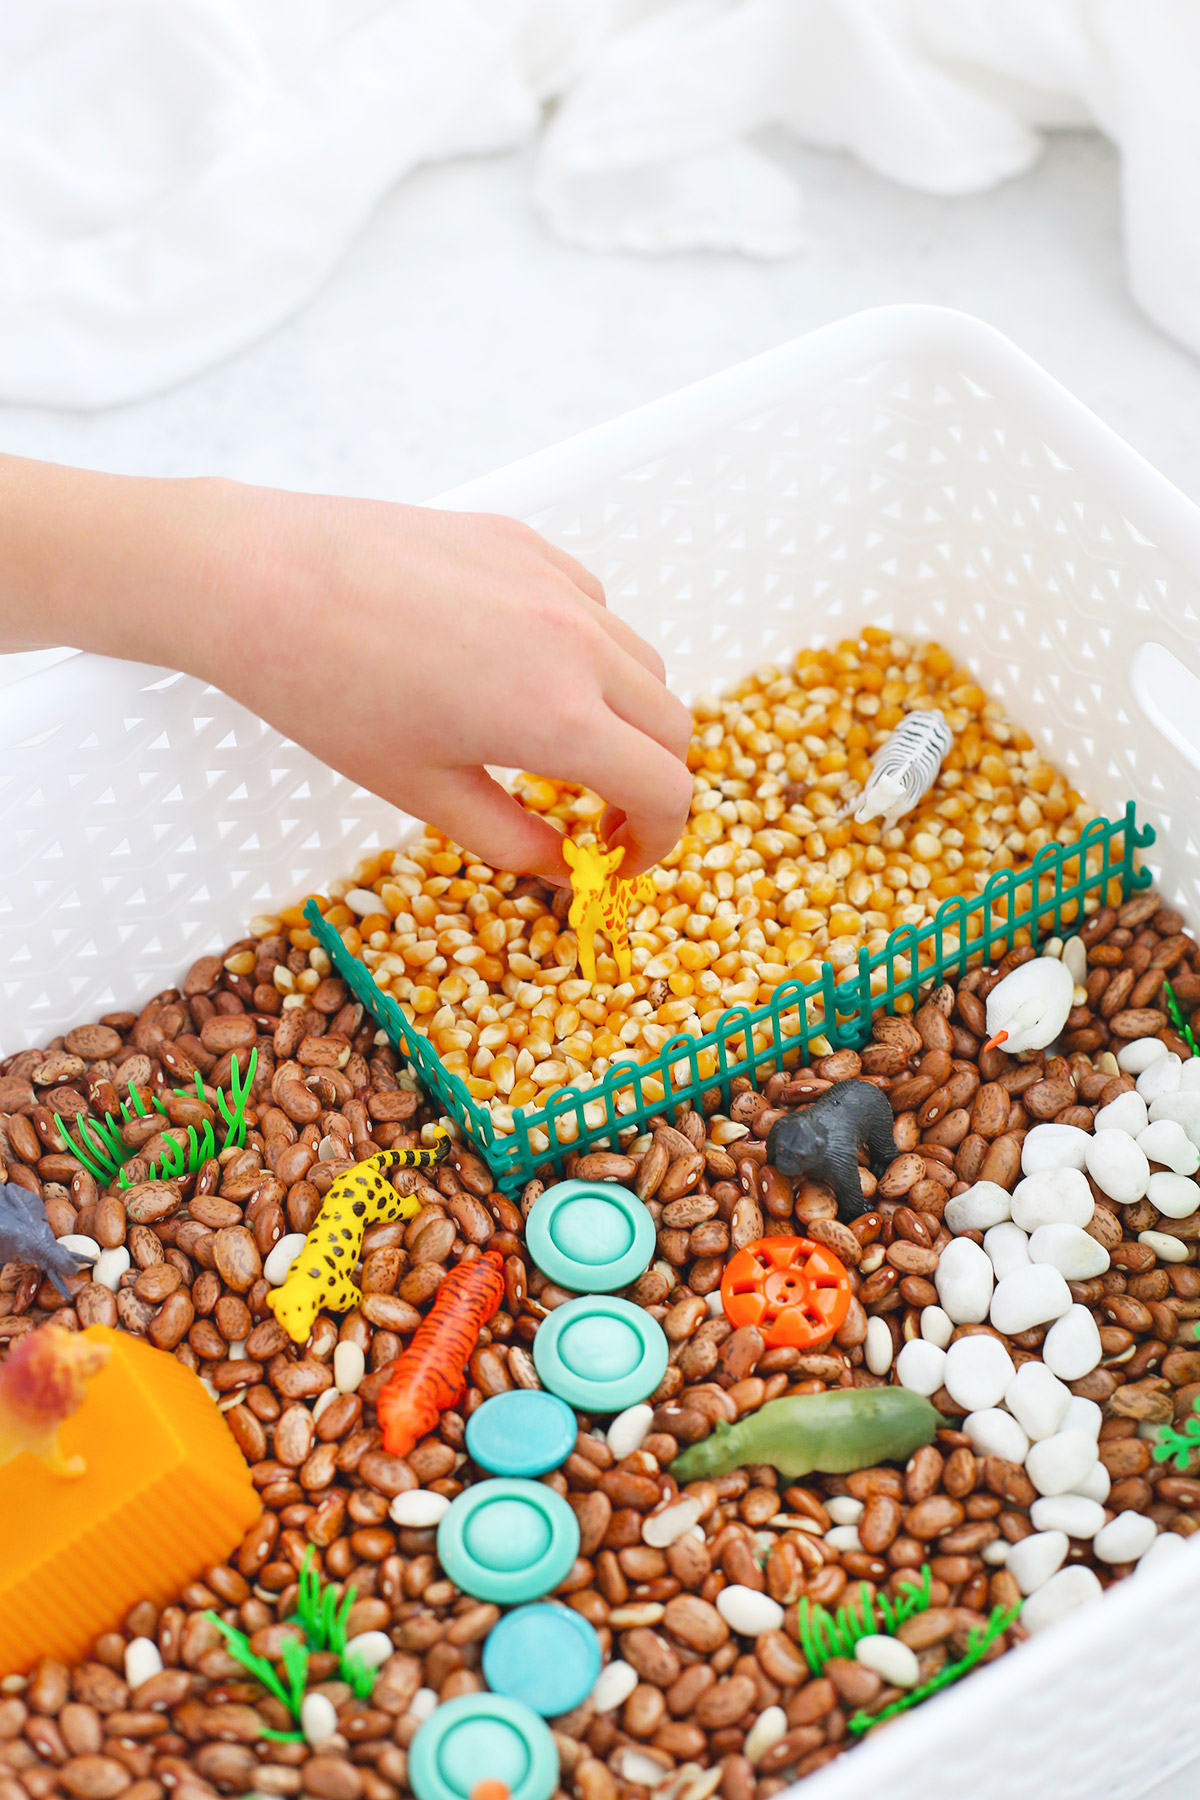
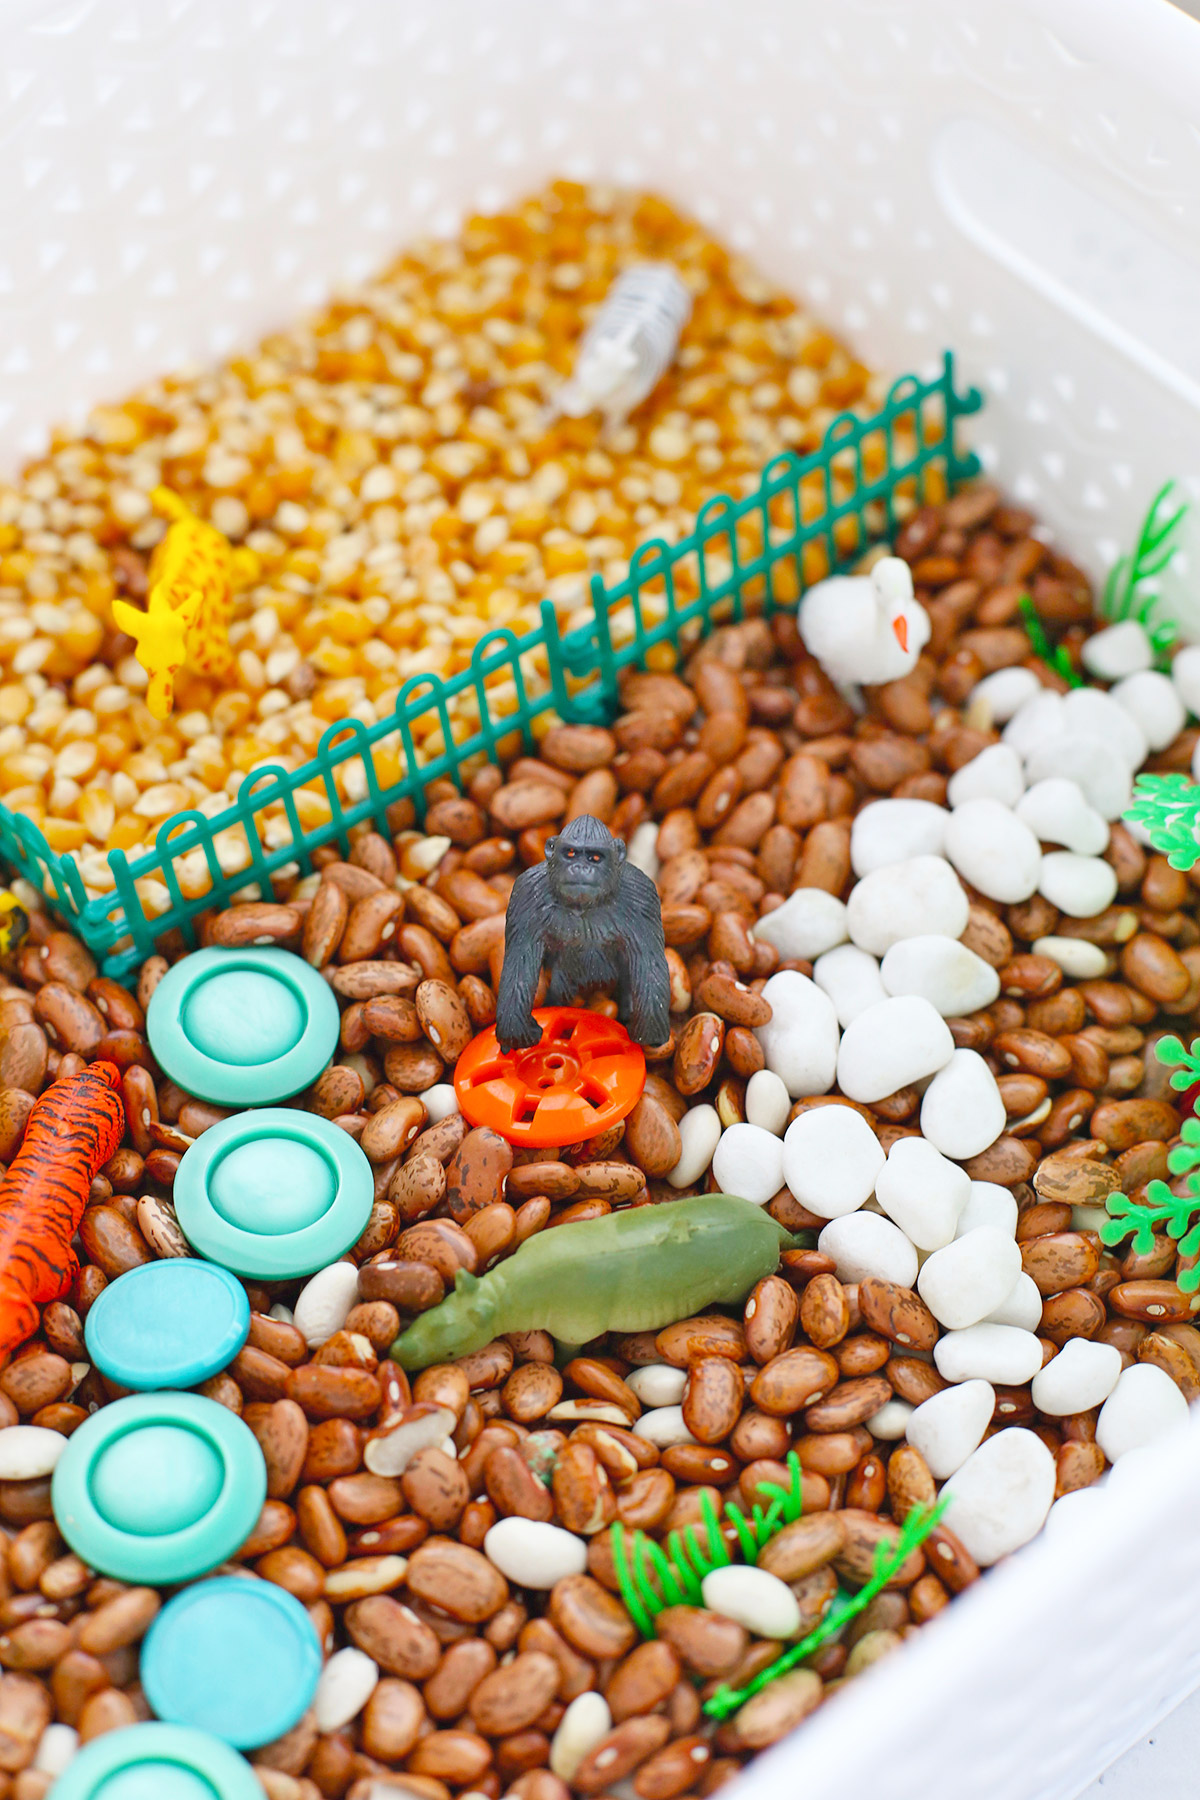
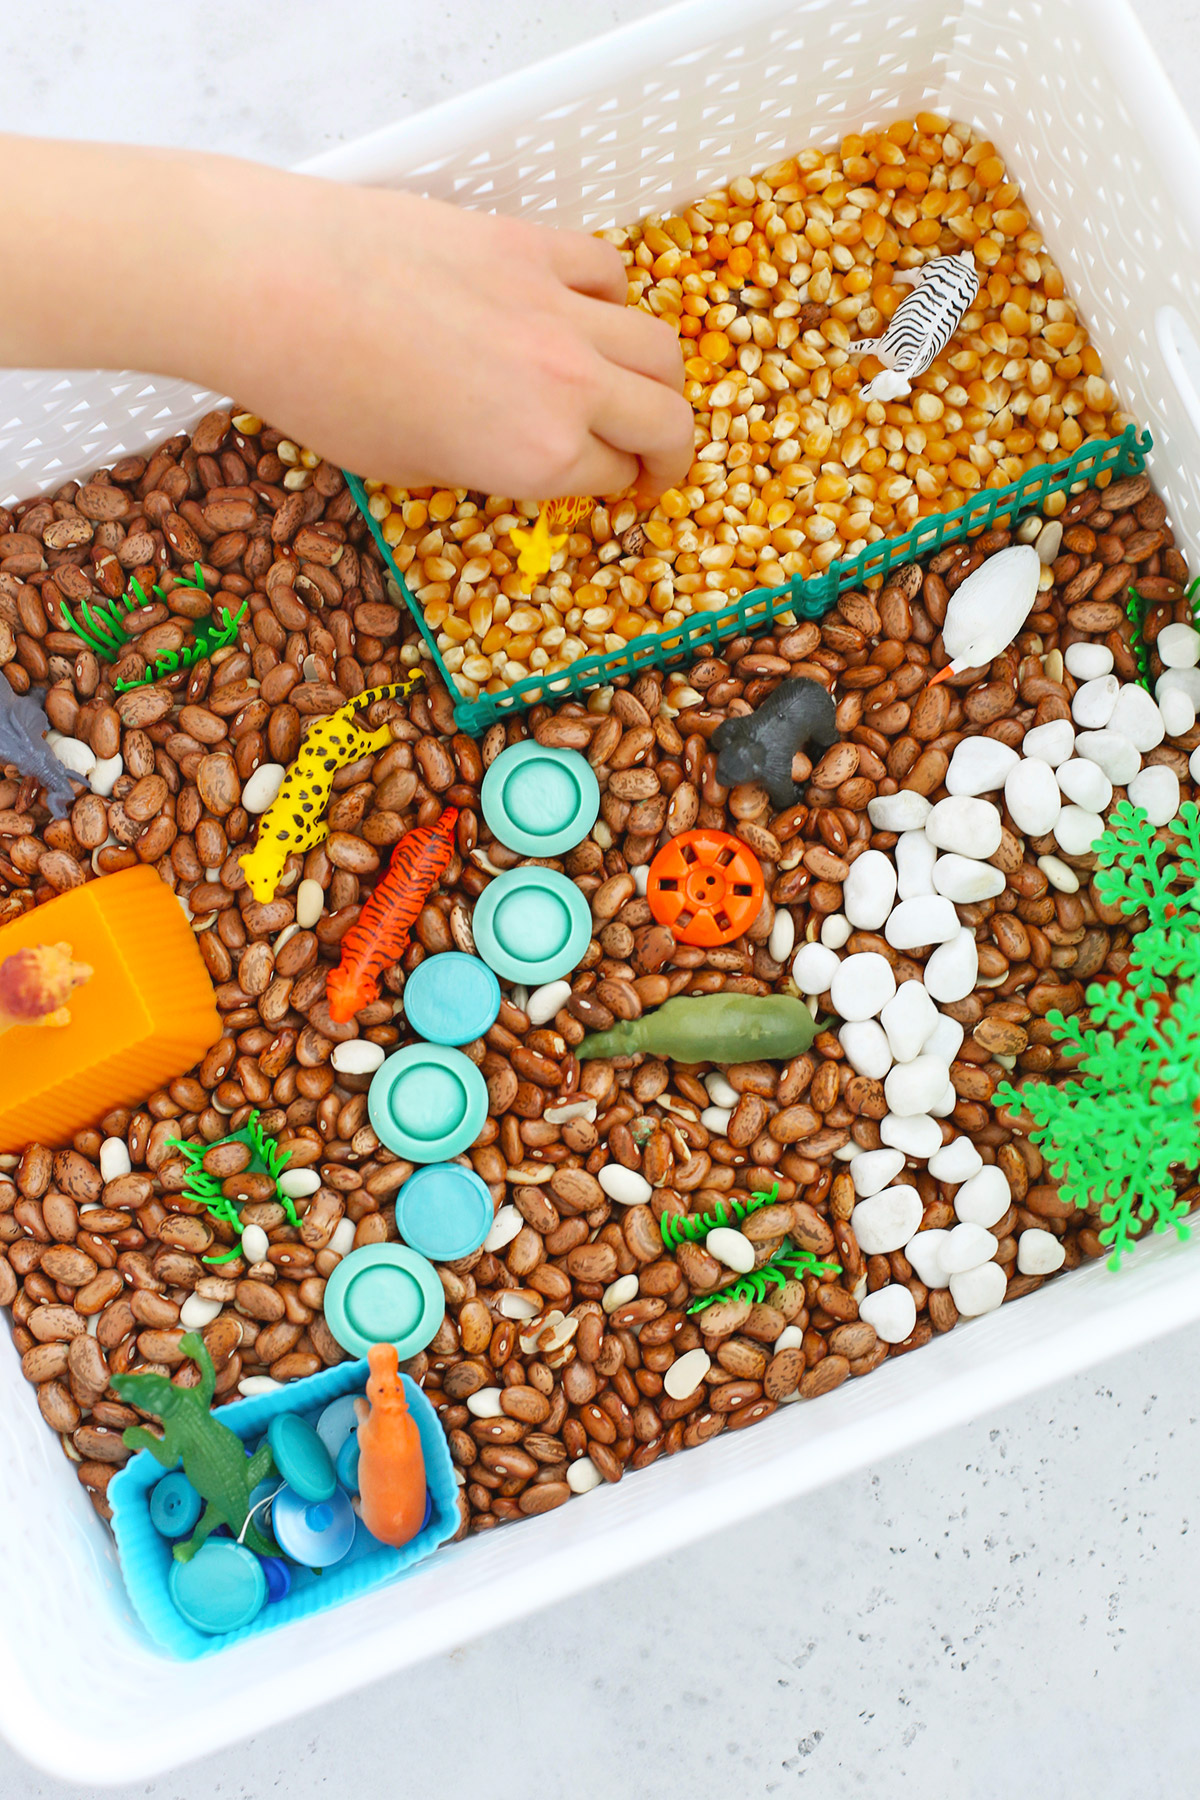
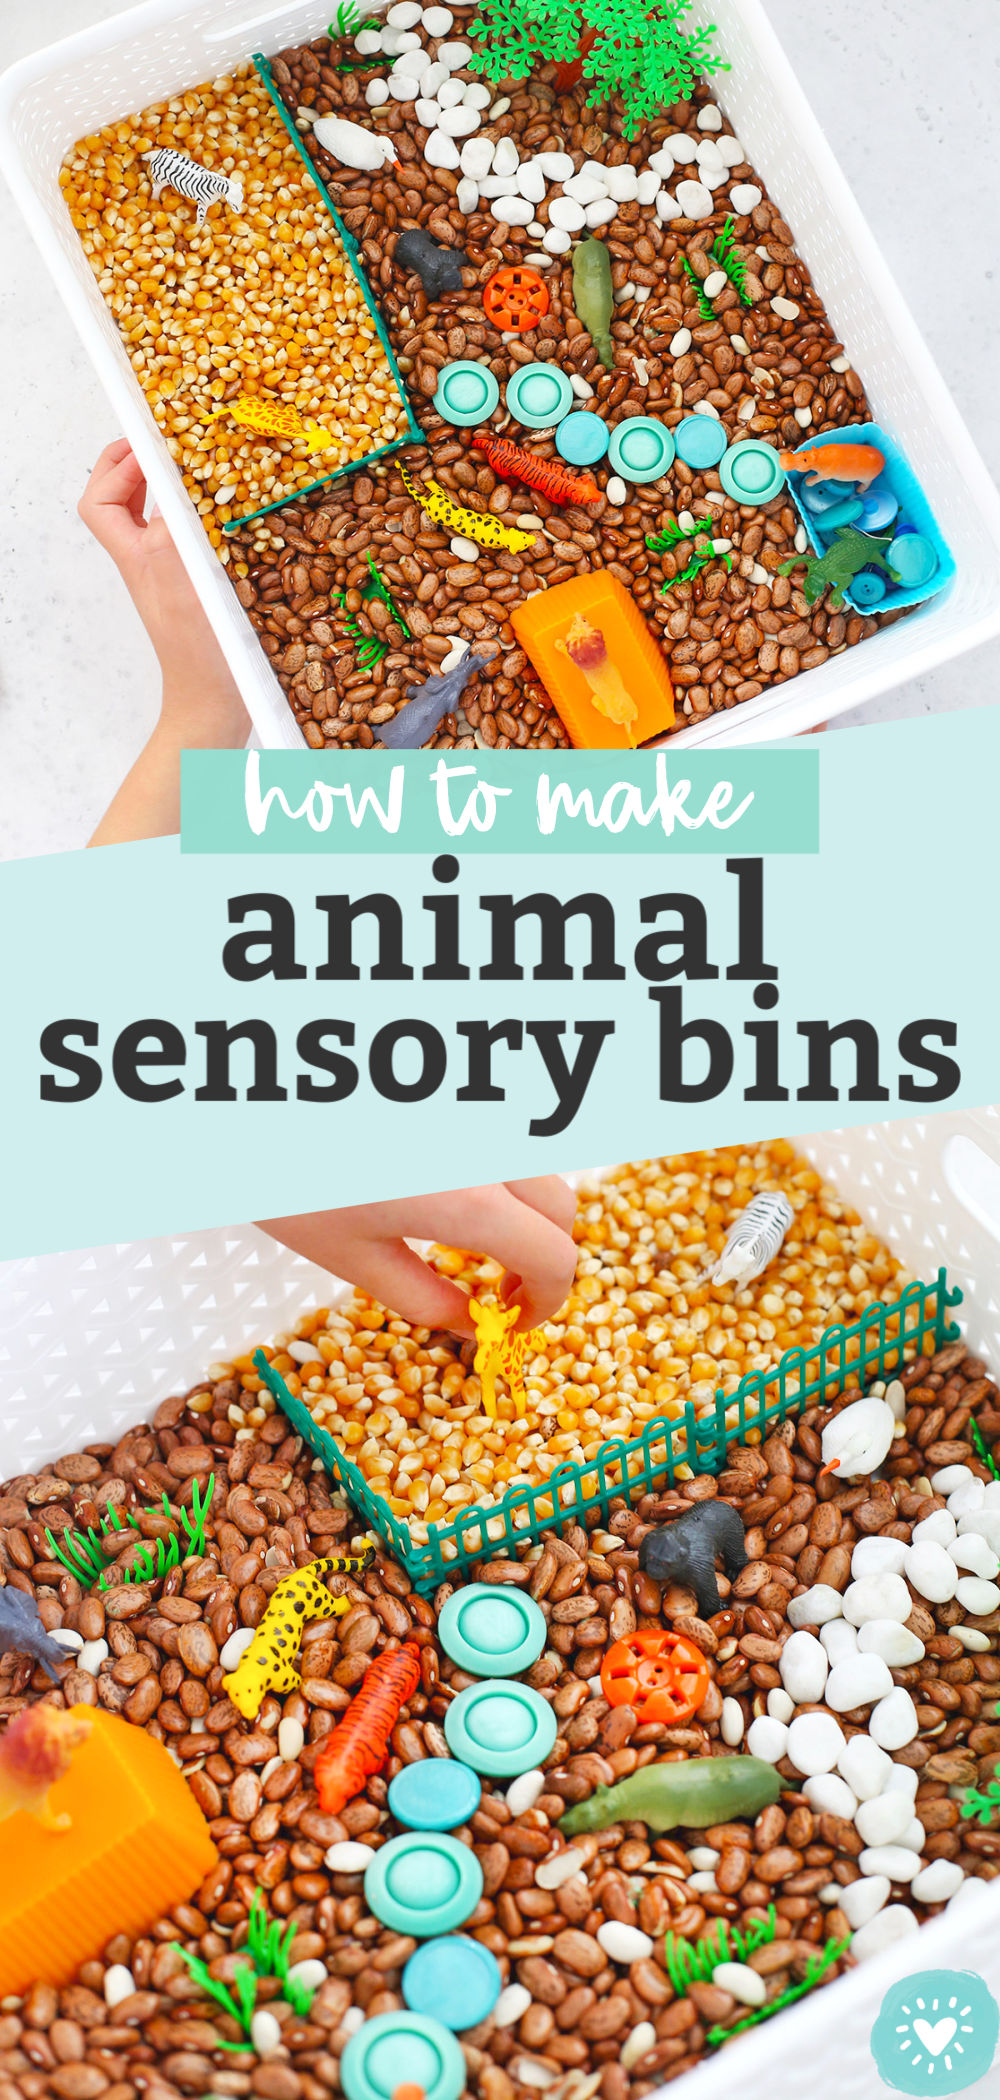
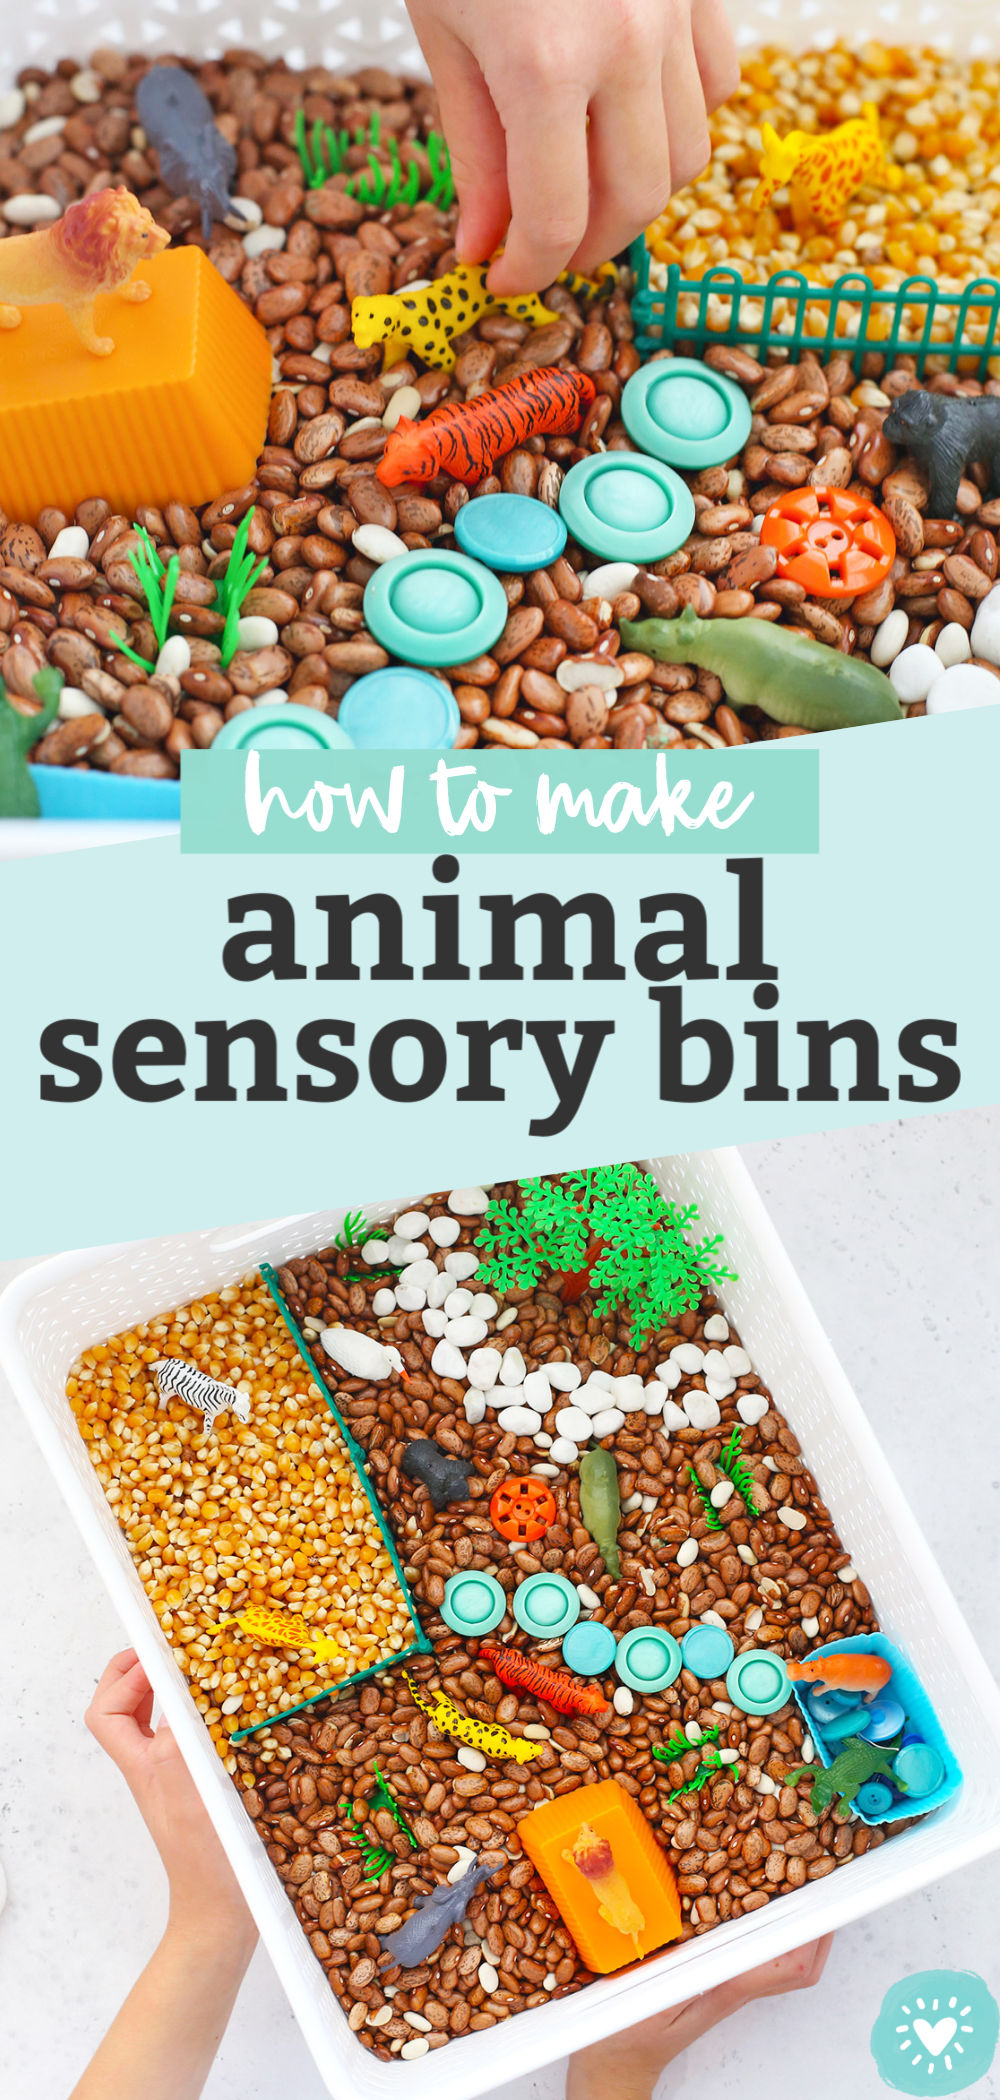
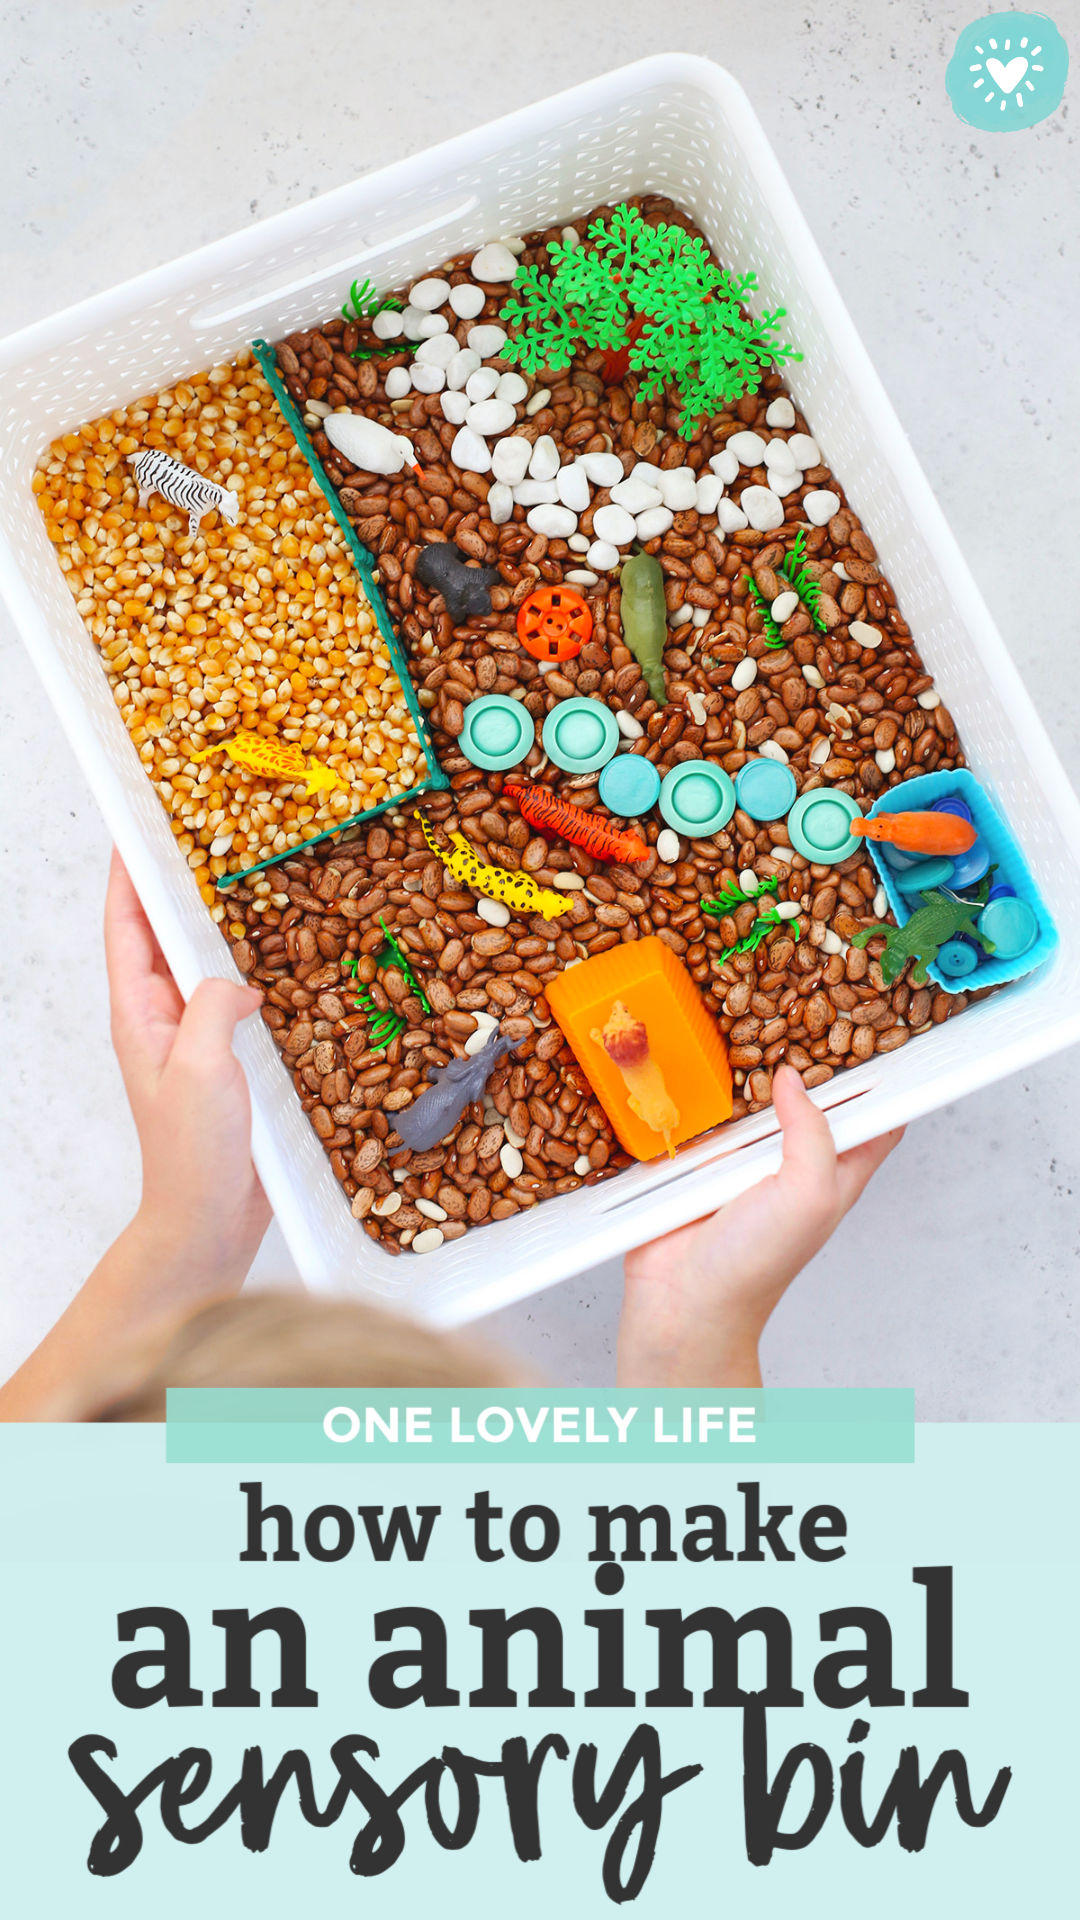
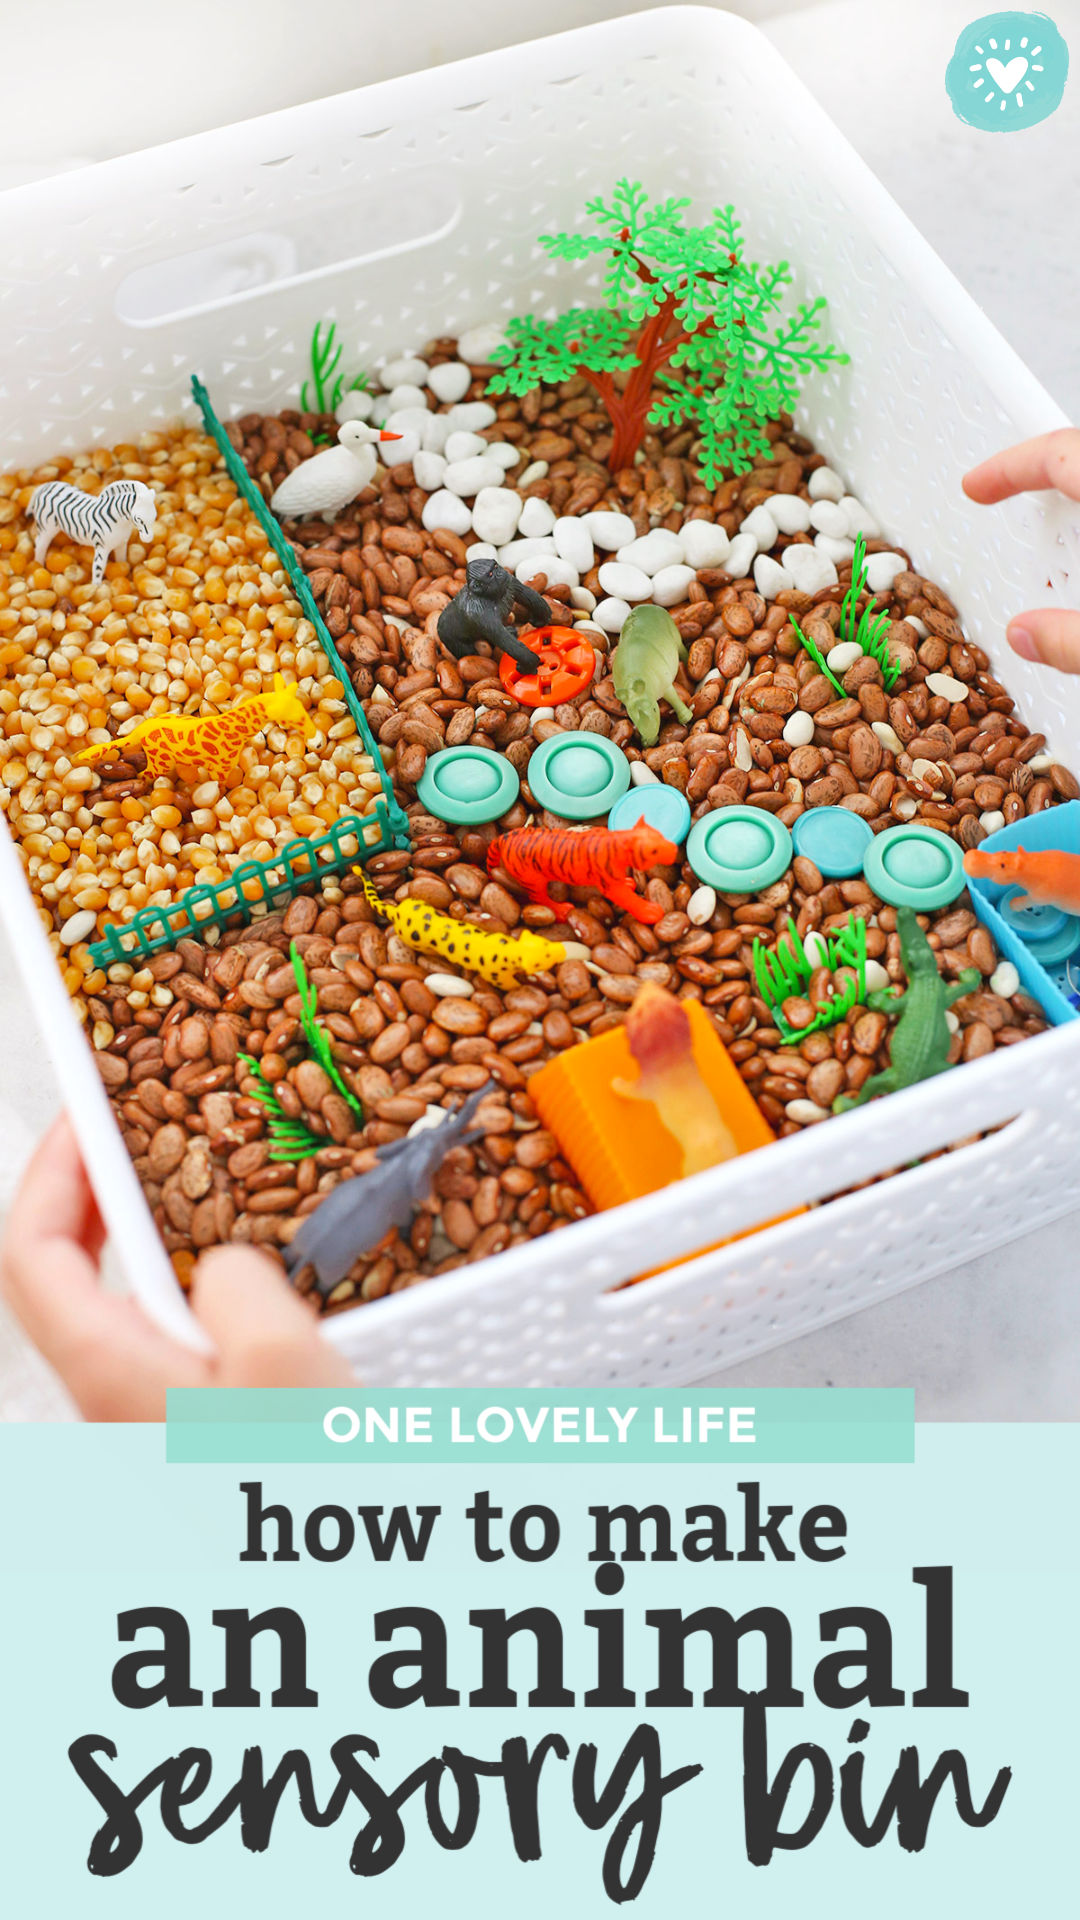
WHAT WE PUT IN OUR ANIMAL SENSORY BIN:
- DRIED BEANS. Pretty easy to clean up and they’re super versatile. (See below for more ideas if you can’t find or don’t have dried beans!)
- CORN KERNELS. They’re easier to find than a lot of dried/pantry items right now!
- PLASTIC ANIMALS (Our kit came with a few faux plants, too.) For some reason, small animals and figurines like this make animal sensory bins SUPER fun for littles. Similar animals HERE, HERE, and HERE.
- WHITE ROCKS. Any from outside would do, or you can get vase filler.
- BUTTONS. My kids used blue ones here to make a river & water, but they can be basically anything and any color! (See below for other ideas!)
- SILICONE MUFFIN LINERS. I just use these to divide things up or give them ideas for playing with. Sometimes these turn into feeding troughs at a “zoo,” a pond/pool/watering hole, “Pride Rock” (a la Lion King), a cave, etc.
WHAT KIND OF CONTAINERS TO USE FOR SENSORY KITS
You can use basically ANY enclosed container for your animal sensory kit and can make them as large or as small as you like. We’ve used:
- A WATER TABLE or SAND TABLE – especially great for little kids!
- PLASTIC STORAGE BINS with lids (large or small!)
- An OPEN BASKET (works better for older kids)
- Clean CARDBOARD BOXES
- Large KITCHEN MIXING BOWLS (I like that this one has a non-slip bottom and a lid!
MORE SENSORY MATERIALS TO USE AS THE BASE
There are LOTS of varieties of sensory bins that include wet or sticky items–foam, water beads, slime, etc., but for my purposes, the base of a sensory bin is usually something dry that feels interesting to touch. You can use inexpensive items you have around the house for an animal sensory bin, like:
- DRIED BEANS (black, kidney, pinto, white, etc.)
- RICE – You an even dye it for a fun effect!
- PASTA (small shapes work best)
- LENTILS
- SPLIT PEAS
- DRIED GRAINS (farro, buckwheat, barley, etc.–not these are not gluten-free)
- CORN KERNELS (unpopped popcorn)
- OATS
I typically include 1-2 different items for the base, and I reuse them over and over and over. We’ve been using the same set of dried beans for 6+ years at least.) I’ll sometimes add some contrast by pairing 2 different items together (such as dried beans + oats or split peas + pasta)
SENSORY MIX-INS
After you have the base of your sensory kit established, you can get creative with adding different objects or textures that will encourage your child to play and explore. I consider these sensory bin add-ins the way to set the stage. This can be almost anything, and you don’t need much!
- Pom-Poms
- Cotton Balls
- Pipe Cleaners
- Popsicle Sticks (or these cute ones!)
- Flat Glass Beads (sometimes sold as “vase filler”)
- Buttons
- Rocks
- Sticks
- Leaves
- Shells
- Faux plants (terrarium or fish tank plants work well!)
- Plastic gems or large beads
- Foam stickers
- Rubber erasers in fun shapes
- Bouncy balls
- Plastic coins
IDEAS TO MAKE IT EASY TO DIVE IN!
Make it easy for your child to get involved! If you’ve got little ones who don’t really know where to start, or are texture-sensitive, including some of these items in your animal sensory bin can help get them started…
- Scoops (Also great for developing hand strength, coordination & scissor skills!)
- Spoons (measuring spoons, plastic spoons, ladles, etc.)
- Measuring Cups
- Silicone muffin liners
- Tongs or “Grabbers” (also great for fine motor control!)
- Clean plastic lids from bottles/containers (choose a safe size for the age of your child–you don’t want anyone to choke!)
- Cardboard pieces (build fences, shelters, etc.)
PS – TIPS FOR DEALING WITH THE MESS!
- KNOW THERE’S GOING TO BE A MESS. It’s part of sensory play, and even if you have older or really neat children, there *will* be spilling (accidental or intentional). I provide reminders to keep things in the bin, but I try not to hover or flip out if kids make a mess. It’s more fun for EVERYONE. Promise.
- TRY PUTTING DOWN A PLASTIC TABLECLOTH TO HELP CONTAIN THE MESS. The little $5 ones from Target work great! Especially when you’re just getting started or have really little kids, a plastic tablecloth on the floor will help catch spills and messes. Then, you can just lift up the 4 corners of the tablecloth and pour the mess back into the bin. It’s a great option! (These cute leather mats are another good option!)
- CONSIDER USING LARGER ITEMS, such as dried beans instead of rice. It’s easier to sweep up and gather when accidental or intentional spills happen.
- FOR LITTLE KIDS… try using fewer beans in a larger-sized bin, and put the bin down on the floor (the temptation to dump scoopfuls on the floor goes down when you’re sitting on the floor.
- INCLUDE KIDS IN THE CLEAN-UP. Another tip is to include kids in the clean-up. Obviously, their ability to help will depend on their ages, but even small children can help a bit to gather up items, pick up beans, etc. Sometimes it helps kids feel more conscious of their spills when they also have to clean up the mess.
HAVE YOU MADE A SENSORY BIN BEFORE? WHAT ARE YOUR FAVORITE THINGS TO PUT IN THEM?
Oh my gosh! I am just contemplating our first sensory bin, and this article is so fantastically helpful! Thank you.
Oh good! I’ve got more sensory bin ideas coming soon, too! 🙂