


You won’t believe how easy it is to make refrigerator dill pickles at home. No fancy equipment or special skills required! (They’re also naturally Paleo, Whole30, Gluten-Free)

Maybe it’s just me, but homemade pickles always seemed like an intimidating project! That is, until I tried refrigerator pickles!
If you haven’t had these quick pickles before, you’re in for a treat–they’re the EASIEST pickle recipe around!
These easy refrigerator dill pickles don’t require any fancy canning equipment, special skills, or a lot of time. If you can slice + whisk, you can make dill refrigerator pickles! They’re perfect pickles for serving on burgers and sandwiches, in burger bowls, or for a simple snack.
You’ll be putting these easy dill pickles on EVERYTHING by the time we’re done!
Start With A Few Simple Ingredients
The great thing about refrigerator pickles is how simple the ingredients are! Here’s all you need to get started on these delicious pickles…
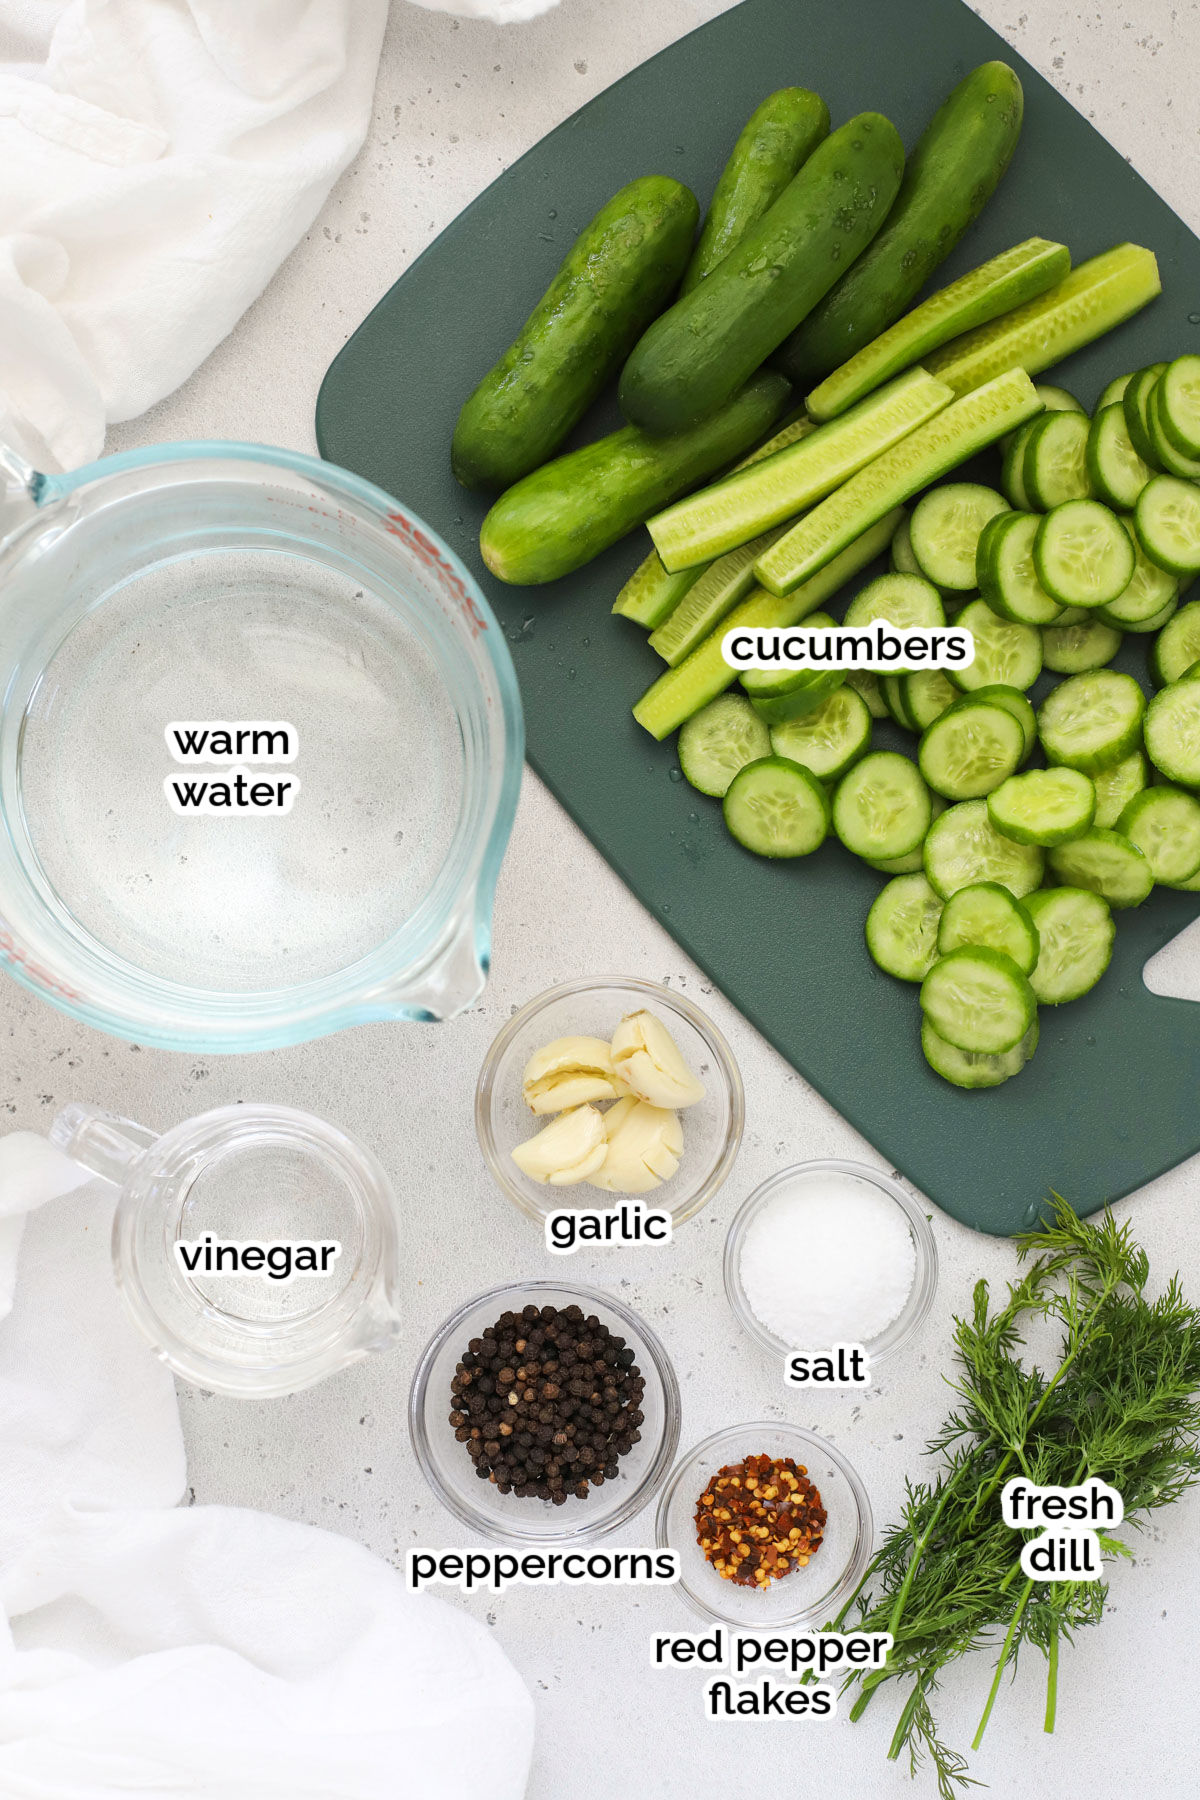
- FRESH CUCUMBERS. I recommend thin-skinned cucumbers for refrigerator dill pickles. English cucumbers or small cucumbers, like Kirby cucumbers, Persian cucumbers, or pickling cucumbers are the best pickles for making this refrigerator dill pickle recipe. Use what you can find at the grocery store or farmer’s market!
- FRESH GARLIC. I like a little crushed garlic in my dill pickles. I recommend 1 small or 1/2 a large clove crushed (not minced or sliced) per pint of pickles. To crush garlic, just use the flat side of a large knife to press down on the whole clove until it splits. (You can also do this with the bottom of a glass.)
- FRESH DILL. The big dill flavor in my refrigerator dill pickles comes from using fresh dill sprigs. I get it with other fresh herbs in the produce department of my grocery stores (even Target & Walmart have it!).
- WHOLE PEPPERCORNS + RED PEPPER FLAKES. For more flavor, I like using a mix of whole black peppercorns (plenty of flavor without any of the grit!) and red pepper flakes. These won’t be spicy, but adding a little bit of pepper will round out the flavor.
- VINEGAR + WATER + SALT. Lastly, the brine (aka pickle juice!)! The quick brine for my refrigerator pickles uses white vinegar, water, and kosher salt. That’s it! But after a day or two of sitting in the fridge, that simple brine will absorb all the other flavors from the garlic + dill + pepper. It’s delicious + easy!
Don’t Forget The Jars!
Strictly speaking, refrigerator pickles can be stored in any clean jar or any kind of container with a lid-–pint-size jars, glass food storage containers, and working glasses with lids are my favorites. We’ve had great luck with wide-mouth jars, which are easier to get food in and out of. Also, we like these reusable lids, which are washable and perfect for day-to-day use and won’t rust.
Additionally, you can use any size jars/containers you want for refrigerator dill pickles. I’ve used 32oz jars, 16oz jars, and 8oz jars. I’ll give instructions based on 16oz (pint) jars since that seems to be the most common size, but know that you can divide this among any size jars you have!
4 Shapes Of Refrigerator Pickles To Try
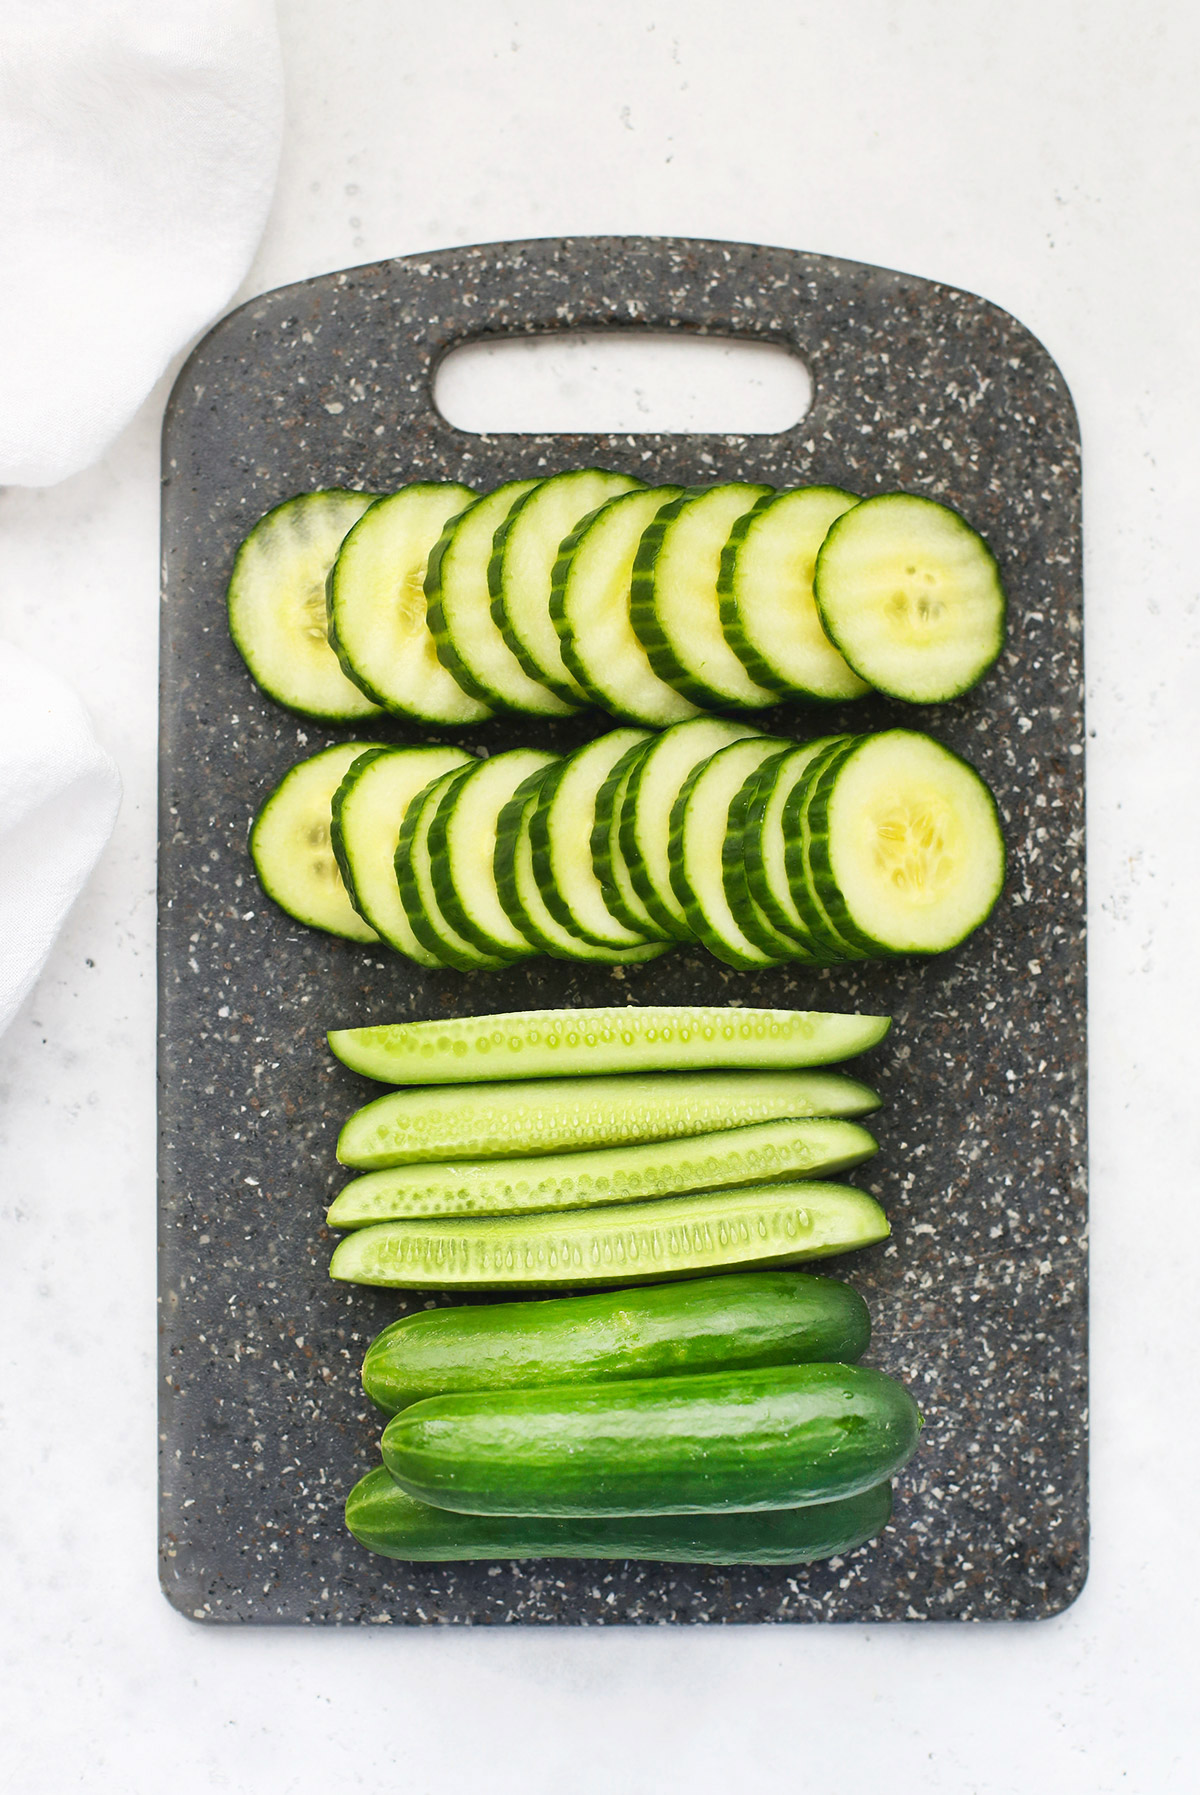
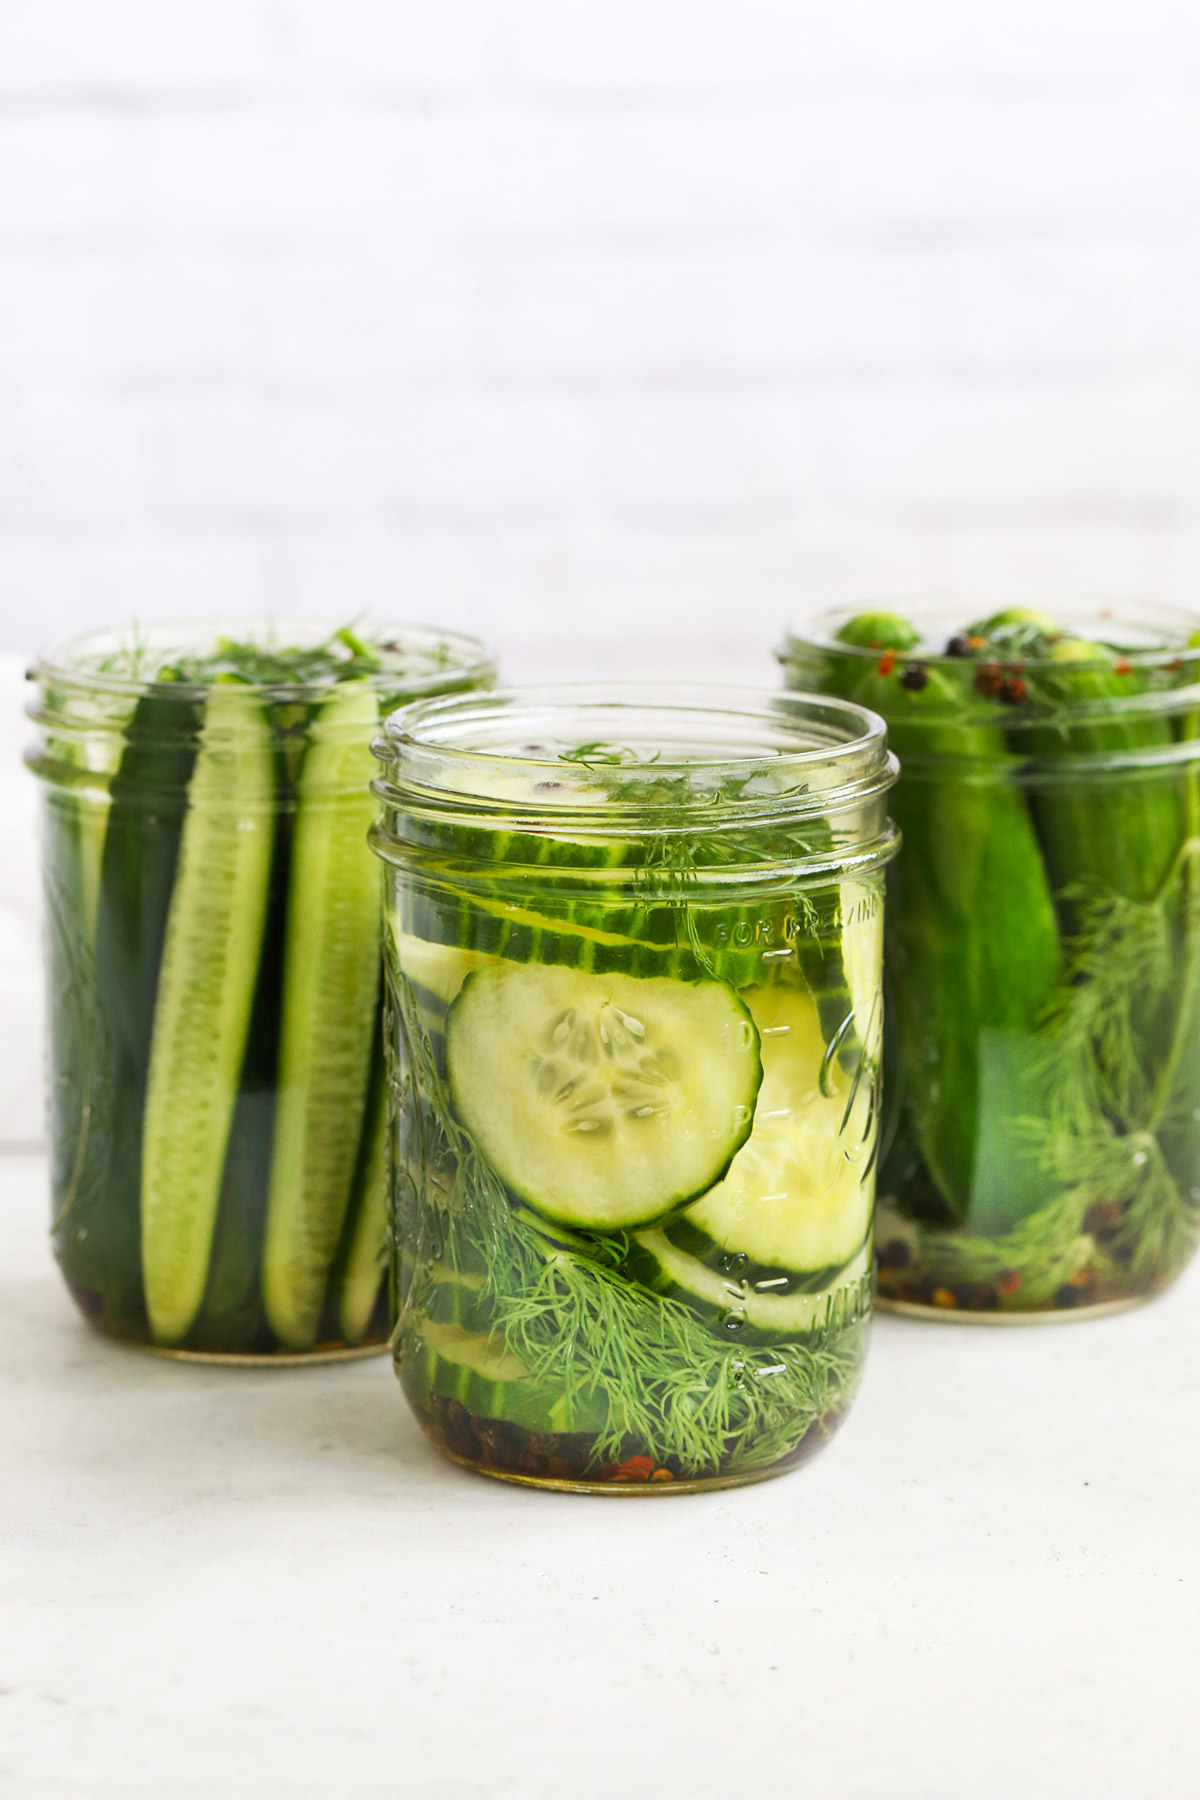
Now that you’ve gathered your pickle ingredients & jars, it’s time to choose your pickle shape! You can cut your cucumbers into several different shapes, depending on your preference. Here are the 4 I gravitate to most:
- WHOLE PICKLES. This works with small cucumbers, like Kirby or Persian. Pickles should easily fit in your jar and shouldn’t poke up above the surface of the brine.
- PICKLE SPEARS OR WEDGES. Cut cucumbers into quarters lengthwise. For larger cucumbers (like English cucumbers), you’ll also need to cut the spears in half or thirds so they’re short enough to fit into your jars.
- PICKLE CHIPS. My go-to shape for refrigerator dill pickles is pickle chips (round slices). You can slice them into coins with a sharp knife. I recommend no thinner than 1/4″ thick!
- CRINKLE CUT PICKLE CHIPS (MY FAVORITE!). Or, for a fun effect, you can cut the cucumbers into coins using a crinkle cutter to get a fun wavy shape. I own this crinkle cutter, but this style and this crinkle cutting knife are also great options with high reviews.
DON’T SLICE THE CUCUMBERS TOO THIN! For the best texture (crisp pickles, please!), try not to slice or cut your cucumbers much thinner than 1/4 inch for refrigerator pickles. This way, they’ll absorb the brine and stay crisp. Thinner sliced cucumbers can go limp more quickly.
How To Make Refrigerator Dill Pickles, Step By Step
As always, you can find the full recipe, with ingredient amounts, detailed instructions, and tips in the recipe card below!

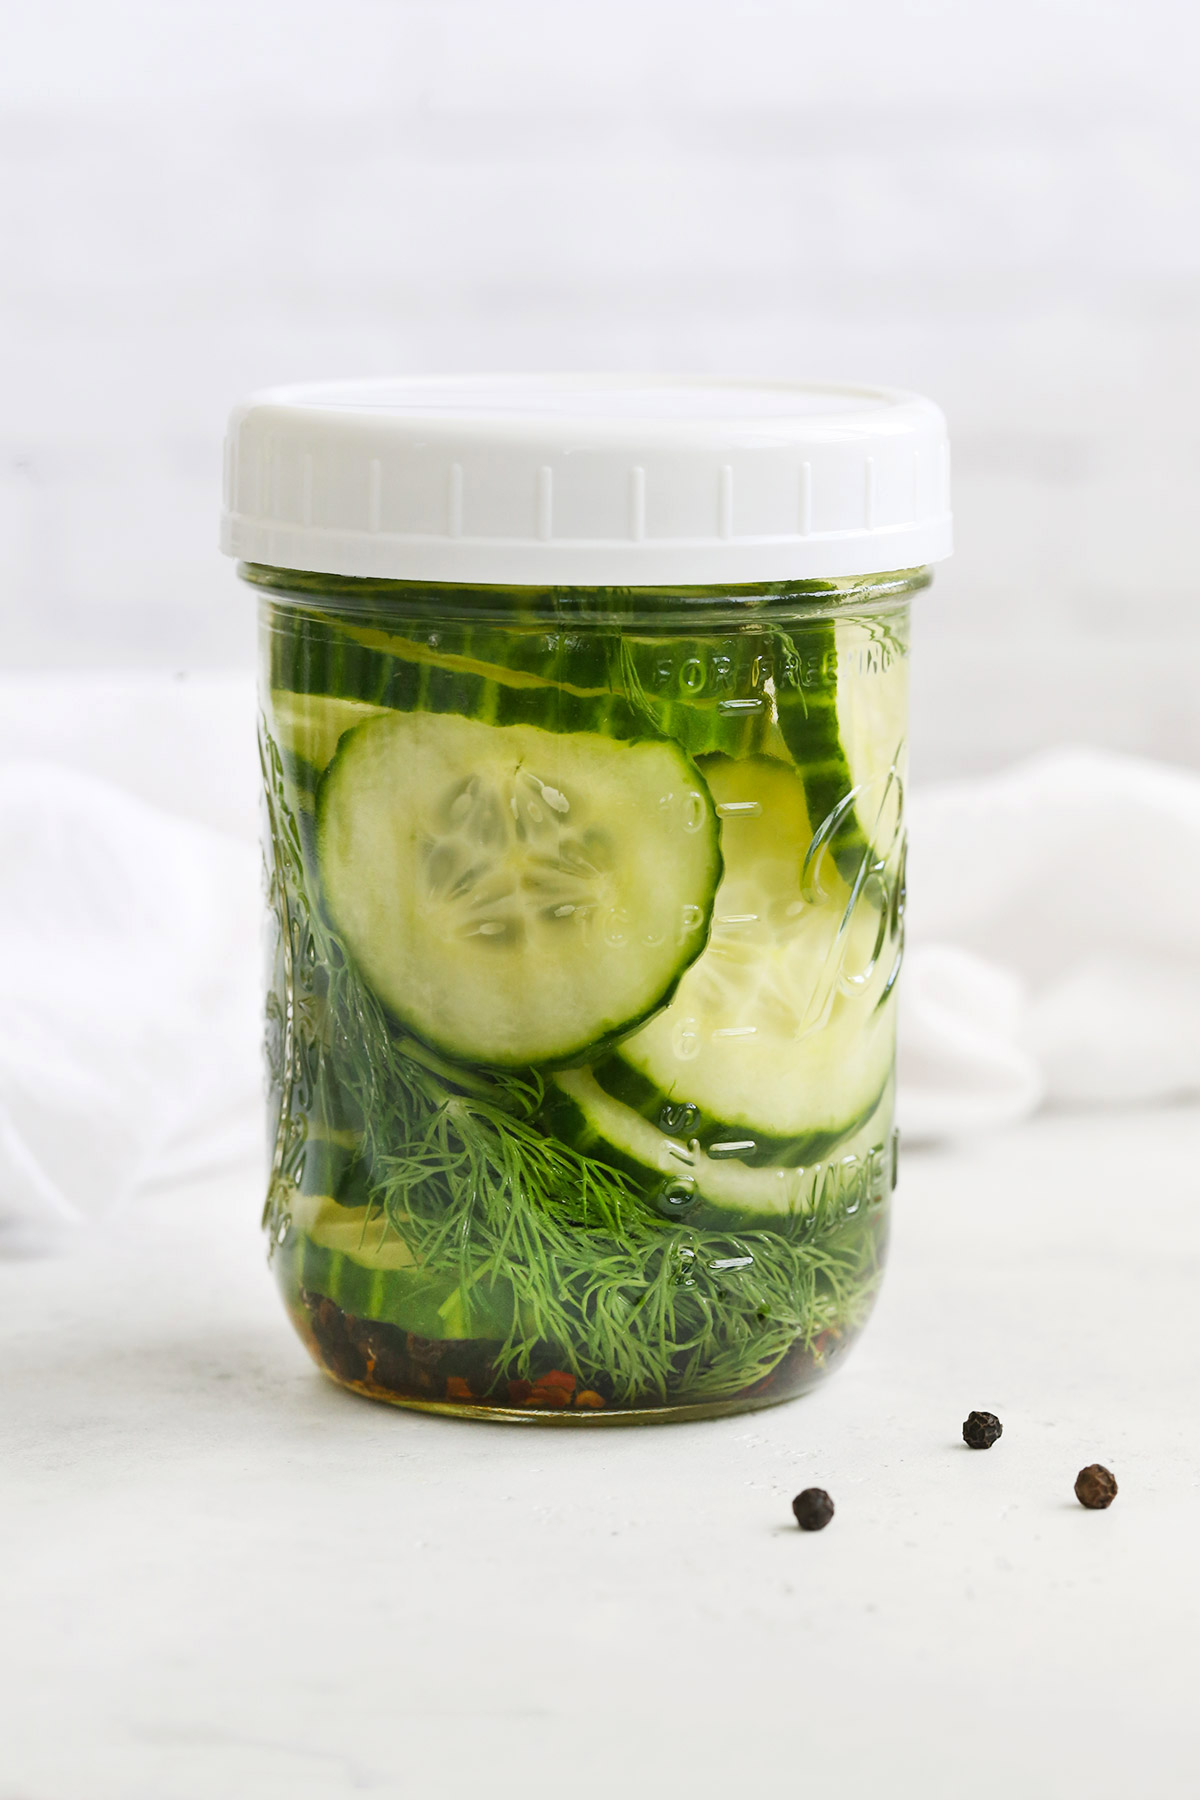
- Combine Seasonings. In each pint jar, place 1 smashed garlic clove, 1 tsp. peppercorns, 1/8 tsp. red pepper flakes, and 2 fronds of dill.
- Prepare your cucumbers. Slice cucumbers into your desired shape–whole mini cucumbers, pickle spears, pickle chips, or crinkle cut pickle chips.
- Divide the prepared cucumbers among the pint jars. For best results, pack them close together, but not so tightly that they’re full to bursting (make sure to leave enough room for the pickling brine!). If you have it, place one more frond of dill on top of the cucumbers.
- Prepare the pickle brine. Combine water, vinegar and salt until the salt dissolves completely. Carefully pour the vinegar mixture into each jar, filling to cover the cucumbers, if possible.
- Refrigerate the pickles. Secure lids on mason jars and refrigerate 24-48 hours before enjoying. (They’ll continue to develop flavor the longer they sit in the brine.) Homemade dill pickles should remain fresh 3-4 weeks in the refrigerator. They are not safe for long-term storage at room temperature.
FAQ + Tips For The Best Refrigerator Dill Pickles
HOW LONG WILL REFRIGERATOR DILL PICKLES KEEP IN THE FRIDGE? Refrigerator pickles are not shelf stable at room temperature but will stay fresh about 3-4 weeks in the refrigerator. They will soften slightly as time goes on, but won’t spoil before 3 weeks, thanks to the vinegar and salt in the brine.
WHAT SIZE JARS DO YOU USE FOR REFRIGERATOR PICKLES? Any size or shape of jar will work for this easy recipe, though I’ll be giving amounts per pint (2-cups/16oz) of pickles. If you’re using a larger or smaller jar, you’ll just need to divide the mixture accordingly.
CAN I USE DRIED DILL INSTEAD? I love dried dill in things like my homemade ranch dressing, but I don’t recommend dried dill for refrigerator dill pickles. The flavor won’t be as fresh or potent, and the finely cut dried dill will coat the surface of the pickles instead of just flavoring the brine.
ARE THESE PICKLES SPICY? No. They’re flavorful, but not hot. If you’re nervous, I recommend omitting the red pepper flakes. If you like spicy pickles, I recommend more red pepper flakes for some spice.

Did You Make This Recipe?
Tell me all about it! Leave a star rating below when you try our easy Refrigerator Dill Pickles recipe. I can’t wait to hear how it goes!
Refrigerator Dill Pickles (SUPER Easy!)
Ingredients
FOR THE PICKLES:
- 2 long English cucumbers – or about 1.3 lbs. (600g) of mini or persian cucumbers*
- 8-12 fronds of fresh dill (a .75 oz container should do the trick!)
- 4 garlic cloves – smashed with the flat side of a knife or the bottom of a glass
- 4 teaspoons black peppercorns
- 1/2 teaspoon red pepper flakes
FOR THE PICKLE BRINE:
- 4 cups water (warm water is best)
- 1/2 cup 8 Tbsp. white vinegar (or cider vinegar)
- 1 Tablespoon salt
Instructions
- Combine Seasonings. In each pint jar, place 1 smashed garlic clove, 1 tsp. peppercorns, 1/8 tsp. red pepper flakes, and 2 fronds of dill.
- Prepare your cucumbers by slicing them into your desired shape–whole mini cucumbers, pickle spears, pickle chips, or crinkle cut pickle chips.
- Divide the prepared cucumbers among the pint jars. Pack them close together, but not so tightly that they’re full to bursting. If you have it, place one more frond of dill on top of the cucumbers.
- Prepare the pickle brine by stirring together warm water, vinegar and salt until the salt is completely dissolved. Carefully pour the vinegar mixture into each jar, filling to cover the cucumbers, if possible.
- Refrigerate the pickles. Secure lid on each pickle jar and refrigerate 24-48 hours before enjoying. (They’ll continue to develop flavor the longer they sit in the brine.) Pickles should remain fresh 3-4 weeks in the refrigerator. They are not safe for long-term storage at room temperature.
Notes
- Love Garlicky Pickles? Double up on the garlic!
- Want Spicy Pickles? Add extra black peppercorns & red pepper flakes.
- More or Less. The original recipe listed above will make 4 pint jars of pickles (2 quarts). Feel free to halve the recipe if you only want 2 pints or quarter the recipe if you only want 1 jar of pickles!
- Serving Ideas. Try these crispy pickles on burgers, sandwiches, wraps, sloppy joes and more!
Video
Nutrition
Nutrition facts are an estimate only and will vary based on brands and amounts used.
Find it Online:
https://www.onelovelylife.com/refrigerator-dill-pickles/Recipe originally shared 2020. Fully updated May 2024.
so good! These pickles are addicting! Easy crunchy just right!
These dill pickles are crisp, tasty and so easy to make! And I love all the shape ideas.
My husband loves pickles and we discovered refrigerator dills this summer after growing a bumper crop of cucumbers. THIS RECIPE IS BY FAR HIS FAVORITE! Actually, I wouldn’t make anything else after trying this recipe. It’s got a bit of spicy taste, its garlic/dill/peppery taste is perfect. It’s also super easy to make and the pickles are crunchy! Exactly what we had hoped for!
You COMPLETELY Made my day with this review Karen!!! I’m so glad you love them as much as we do.
How long will they last in the refrigerator?
Hey Karen! You can find the shelf-life in the recipe card and the FAQ: “Pickles should remain fresh 3-4 weeks in the refrigerator.”
Can these also be canned for longer shelf life? or only to be put in the refrigerator after making?
Hi Ashley! This recipe is specifically for fresh, refrigerator pickles, so it can’t be canned. 🙂
We made refrigerator pickles many years ago and I don’t know what recipe we used. I searched Pinterest and found this one – looked good, no sugar (yay!), though we left out the red pepper flakes. As our cucumber plants progress and start to produce way more than my pickle/cuke-loving kids can consume, we will do the real-deal (canning), but for now we are enjoying these delicious pickles made from both Wautoma pickling cukes and Diva cukes. We let them sit in the fridge for initially 24 hrs and tried them on our burgers (and plain) and everyone really liked them (half pickle/half cuke flavor). We will test them again over the coming days to see when they hit peak flavor. Thanks for the great recipe!
So glad they’ve been a win for you! We’ve been making a batch every other week over the summer and I love them at every stage!
Can you use pickling salt? And do you heat up the brine
I haven’t tried it with pickling salt, but it should work great with either regular salt or pickling salt. You don’t need to heat the brine if you use warm water. (You just need the salt to dissolve.) Happy pickling! 🙂
Can I use dill seeds and if so how much
I haven’t tried it with dill seeds, but I’d love to know how it goes if you give it a try!
5 quart jars from 2 batches
Can you freeze these?
Great question. I wouldn’t freeze them, because they’d get really mushy upon thawing. You’ll be better off keeping them in the fridge, if you can.
Really easy and good! My pickles still taste very “cucumberish “. Even after 3-4 weeks. I’m going to try again and slice them a little thinner
Sounds like a great plan! (Out of curiosity, did you use fresh or dried dill?)
Have tried this recipe many times and it’s always a hit! Would it be ok to add banana peppers or jalapeños to it safely?
That sounds DELICIOUS! The vinegar in the brine should keep banana peppers or jalapeños fresh for at least 1 week!